

This post is sponsored by Hubble Network.
What if your Bluetooth LE device could communicate beyond the range of traditional gateways—even from remote locations without cellular coverage? Hubble Network makes this possible. They've built a global infrastructure for delivering device data to the cloud, using over 90 million terrestrial gateways that receive standard Bluetooth LE advertisements (available now) and a direct-to-satellite network with its own transmission protocol (currently in beta with select customers, with general availability expected later in 2026).
In this tutorial, we'll walk through setting up a Hubble Network demo on Nordic's nRF54L15 DK using nRF Connect SDK and VS Code. We'll use Hubble's reference app as our starting point, with a small tweak to how the device key is loaded—making the provisioning workflow simple and IDE-friendly. By the end, you'll have a working beacon that transmits encrypted data to Hubble's terrestrial network, and you'll see that data appear in their cloud dashboard—accessible via their open API for easy integration into downstream applications. I've found this to be one of the most straightforward ways to explore satellite/terrestrial IoT connectivity without needing specialized hardware or setting up my own scanning infrastructure.
In this tutorial, we'll cover:
- What Hubble Network is and how their terrestrial network works
- Setting up the development environment with nRF Connect for VS Code
- Provisioning our device with an encryption key
- Building and flashing the Bluetooth LE beacon application
- Verifying communication with the Hubble cloud
What is Hubble Network?
Hubble Network is building global IoT connectivity infrastructure that works with standard, off-the-shelf Bluetooth LE chips. Unlike traditional IoT solutions that require cellular modems, LoRa radios, or proprietary hardware, Hubble works with the standard Bluetooth LE radio that's already in most devices.
Founded in 2021 by Alex Haro (co-founder of Life360) and Ben Wild, the company has raised $100M in funding and achieved a major milestone in 2024: the first-ever Bluetooth-to-satellite connection.
Let's take a closer look at how this works.
How It Works
Our device broadcasts a standard Bluetooth LE advertisement containing an encrypted payload. Hubble's infrastructure—either terrestrial gateways or satellites—receives these advertisements and forwards the data to their cloud. From there, we can access our device data via API or dashboard.
The Hubble SDK handles all the complexity. For example, here's what happens under the hood when our device broadcasts:
- Encryption: Each device has a unique AES-256 key that encrypts the payload (AES-128 is also available for constrained devices)
- Device Identity: The encrypted payload contains a derived device ID (not transmitted in plain text)
- Replay Protection: A rolling counter prevents packet replay attacks
- Privacy: The device uses a Non-Resolvable Private Address (NRPA) that changes periodically
The following diagram shows the complete data flow from device to cloud:

How Hubble Compares to Amazon Sidewalk
If you're familiar with the IoT connectivity space, you might be wondering how Hubble compares to Amazon Sidewalk—another network that uses existing infrastructure for low-power device connectivity.
While both aim to solve the "last mile" connectivity problem for IoT devices, there are some key differences:
| Feature | Hubble Network | Amazon Sidewalk |
|---|---|---|
| Terrestrial Coverage | 90M+ smartphones (dedicated, always-on) | Consumer Echo/Ring devices (users may opt out) |
| Global Reach | Satellite constellation (coming later 2026) | US only, no satellite component |
| Coverage Consistency | Purpose-built network with high engagement users | Depends on Amazon device density and opt-in rates |
| Chip Support | Nordic, TI, Silicon Labs (any standard Bluetooth LE) | Amazon-certified devices only |
| Enterprise Focus | Built for commercial IoT with REST API and webhooks | Primarily consumer-oriented |
The key advantage of Hubble over something like Amazon Sidewalk is the satellite component—once operational, our devices will have connectivity anywhere on Earth, not just in neighborhoods with Amazon devices. For applications like stolen vehicle recovery, fleet tracking, or remote asset monitoring, you really need global coverage. You can't rely on thieves driving through areas with good Sidewalk coverage. 😄
Terrestrial and Satellite Networks
Hubble has two networks:
| Network | Status | Coverage | Use Case |
|---|---|---|---|
| Terrestrial | Available now | Urban/suburban via 90M+ smartphones | Asset tracking, fleet/vehicle tracking, stolen vehicle recovery, dense urban deployments |
| Satellite | Beta testing with select customers (coming later 2026) | Global including oceans and remote areas | Asset tracking, agriculture, maritime, wilderness |
For this tutorial, we'll focus on the terrestrial network. The satellite network has its own SDK library (CONFIG_HUBBLE_SAT_NETWORK) with a different transmission protocol, but it shares the same provisioning keys and cloud backend—so the foundation we build here transfers directly.
The Advertisement Format
When our device broadcasts, the Bluetooth LE advertisement contains 18-31 bytes of Hubble-specific data depending on whether we include custom payload (the complete Bluetooth LE packet includes additional headers and addressing). The following table shows the packet structure, using standard Bluetooth AD types:
| Hubble Bluetooth LE Advertisement (18-31 bytes) | |||
|---|---|---|---|
| AD Structure | Field | Value | Description |
| UUID List (4 bytes) |
Length | 0x03 |
3 bytes follow |
| Type | 0x03 |
Complete List of 16-bit UUIDs | |
| UUID | 0xFCA6 |
Hubble Network Service | |
| Service Data (14-27 bytes) |
Length | 0x0D - 0x1A |
13-26 bytes follow |
| Type | 0x16 |
Service Data - 16-bit UUID | |
| UUID + Hubble Payload | 0xFCA6 + 10 bytes |
Encrypted: Protocol version, sequence number, device ID, auth tag | |
| Custom Payload (optional) | 0-13 bytes | Encrypted application data (telemetry, sensor readings) | |
The base 10-byte Hubble payload (generated by the SDK) contains:
- Protocol Version: Hubble Terrestrial Network version
- Sequence Number: Rolling counter for replay protection
- Ephemeral Device ID: Derived from master key (not transmitted in plain text)
- Authentication Tag: Integrity verification
You can optionally add up to 13 bytes of custom payload for application-specific data—for example, temperature readings, motion events, or diagnostic information. See Hubble's Custom Payload guide for encoding examples. This custom data is encrypted alongside the Hubble fields using our device's master key.
When a Hubble gateway receives this advertisement, it adds its own GPS location and forwards everything to the cloud. The backend decrypts the payload using our device's key and associates the data with our account.
Supported Chip Platforms
The Hubble Device SDK is compatible with any Bluetooth LE-capable chip. The examples below are platforms Hubble has tested and provides additional resources for (like reference apps):
| Platform | Supported Chips | Notes |
|---|---|---|
| Nordic Semiconductor | nRF52, nRF53, nRF54 series | Official support via nRF Connect SDK (Zephyr-based) |
| Zephyr RTOS | Any Zephyr-compatible Bluetooth LE chip | Official support via Zephyr SDK module |
| Espressif | ESP32 family | Official support via ESP-IDF |
| Texas Instruments | CC23xx family (e.g., CC2340R5) | Official support via FreeRTOS (TI partnership) |
| Silicon Labs | EFR32MG24 and Series 2 SoCs | Includes Secure Vault integration |
This tutorial uses the nRF54L15 DK, but the same principles apply to any supported platform. The Hubble SDK integrates as a Zephyr module, making it compatible with any Zephyr-based build system.
Development Environment Setup
Let's get our development environment ready. We'll be using nRF Connect for VS Code, which is what I use for all my NCS projects. If you're already familiar with this toolchain, skip ahead to Step 2 where we clone the Hubble SDK.
Prerequisites
Before we begin, make sure you have:
Software:
- Visual Studio Code
- nRF Connect for VS Code extension pack
- nRF Connect SDK (tested with v3.2.0 for this tutorial)
- Account: Hubble Network developer account (sign up at dash.hubble.com)
What to Expect: Sandbox vs. Live Access
When you sign up at dash.hubble.com, you'll receive Sandbox access by default. Here's what that means:
| Access Level | What You Get | How to Test |
|---|---|---|
| Sandbox (self-signup) | Local testing only | Use the Hubble Connect mobile app as a local gateway |
| Live | Full Terrestrial Network access via 90M+ gateways | Contact Hubble Sales |
With Sandbox access, the production Terrestrial Network still detects our device's packets and shows aggregate statistics in our dashboard, but the actual packet data is only delivered when captured locally using the Hubble Connect mobile app on our phone. That works fine for development and testing—we can verify our implementation before deploying to production.
For production deployments with full Terrestrial Network connectivity, you'll need to contact Hubble's sales team.
For this tutorial, Sandbox access is all you need. We'll use the Hubble Connect app to verify our beacon is working correctly.
Step 1: Install nRF Connect for VS Code
If you haven't already set up nRF Connect for VS Code:
- Download and install Visual Studio Code
- Open VS Code and go to the Extensions view (Ctrl+Shift+X or Cmd+Shift+X)
- Search for "nRF Connect for VS Code" and install the extension pack
- Click the nRF Connect icon in the sidebar to open the extension panel
- Under Manage Toolchains, install the latest toolchain
- Under Manage SDKs, install nRF Connect SDK (v3.2.0 was used for this tutorial)
The SDK installation takes a few minutes as it downloads the full nRF Connect SDK (including Zephyr RTOS and all dependencies).
Step 2: Clone the Hubble Network SDK
The Hubble Device SDK is available on GitHub. Clone it to a convenient location:
mkdir hubble-demo && cd hubble-demo
git clone https://github.com/HubbleNetwork/hubble-device-sdk.git hubblenetwork-sdk
This gives you the following structure:
hubble-demo/
└── hubblenetwork-sdk/
    ├── samples/
    │   ├── zephyr/
    │   │   ├── ble-beacon/           # Terrestrial beacon
    │   │   └── ble-network/          # Combined terrestrial + satellite
    │   ├── esp-idf/ble-beacon/       # ESP32 sample
    │   └── freertos/ti/ble-beacon/   # TI FreeRTOS sample
    ├── port/
    │   ├── zephyr/                   # Zephyr/NCS integration layer
    │   ├── esp-idf/                  # ESP-IDF integration layer
    │   └── freertos/                 # FreeRTOS integration layer
    ├── include/hubble/               # SDK headers
    ├── tools/                        # Provisioning scripts
    └── zephyr/module.yml             # Module registration for Zephyr
Step 3: Set Up the Reference App
Hubble provides a reference app that streamlines the development workflow. It handles key loading and computes the UTC timestamp automatically at build time—no extra steps before each build.
Clone the reference app into your project directory:
git clone https://github.com/HubbleNetwork/hubble-reference-zephyr-simple.git ble-beacon-refappOur project structure should now look like:
hubble-demo/
├── hubblenetwork-sdk/            # SDK (keep clean, can git pull updates)
└── ble-beacon-refapp/            # Our reference app project
    ├── src/
    │   ├── main.c                # Application code
    │   ├── b64.c                 # Base64 decoder (for runtime key decode)
    │   └── b64.h
    ├── prj.conf
    └── CMakeLists.txt            # Key loading + UTC timestamp at build time
The key part is CMakeLists.txt. The stock reference app reads the device key from a HUBBLE_DEVICE_KEY environment variable—which works fine when building from the command line, but can be unreliable in VS Code since the IDE doesn't always inherit your shell environment. We've made a small modification to read the key from a file instead (hubble-device-b64.key in the parent directory), which works reliably regardless of how you trigger the build. It also computes the UTC timestamp automatically at build time—so we just need to save our key to a file before building:
# Device key from file (our modification — stock app uses environment variable)
set(_keyfile "${CMAKE_CURRENT_SOURCE_DIR}/../hubble-device-b64.key")
if(EXISTS "${_keyfile}")
  file(READ "${_keyfile}" HUBBLE_DEVICE_KEY)
  string(STRIP "${HUBBLE_DEVICE_KEY}" HUBBLE_DEVICE_KEY)
else()
  set(HUBBLE_DEVICE_KEY "1111111111111111111111111111111111111111111=")
endif()

# UTC timestamp computed automatically at build time
string(TIMESTAMP EPOCH_S "%s" UTC)
math(EXPR TIME_MS "${EPOCH_S} * 1000")

target_compile_definitions(app PRIVATE HUBBLE_KEY="${HUBBLE_DEVICE_KEY}")
target_compile_definitions(app PRIVATE TIME=${TIME_MS})
The app decodes the Base64 key at runtime using a bundled b64.c decoder, so the raw key bytes are available to the Hubble SDK at initialization.
Step 4: Create the Build Configuration
Now let's set up the build configuration in VS Code:
Configure the following settings:
- Application: Browse to
hubble-demo/ble-beacon-refapp(our reference app project) - Board: Select
nrf54l15dk/nrf54l15/cpuapp - SDK: Select your installed nRF Connect SDK (e.g., v3.2.0)
Expand Extra CMake arguments and add:
-DEXTRA_ZEPHYR_MODULES=/absolute/path/to/hubble-demo/hubblenetwork-sdkThat's all you need—no extra Kconfig fragments required. The reference app has CONFIG_LOG_BACKEND_UART=y in prj.conf, so serial logging is ready to go.
- (Replace with the actual absolute path to your SDK folder)
- Click Build Configuration to create the configuration
The EXTRA_ZEPHYR_MODULES argument tells the build system to include the Hubble SDK as an external Zephyr module, making its Kconfig options (like CONFIG_HUBBLE_BLE_NETWORK) and source files available to your project. If you've worked with Zephyr modules before, this should look familiar.
Step 5: Enable Debug Logging
The reference app registers its log module with CONFIG_APP_LOG_LEVEL, which defaults to CONFIG_LOG_DEFAULT_LEVEL (info). For development, I recommend overriding this to LOG_LEVEL_DBG directly in main.c so we can see all the diagnostic output—decoded key bytes, advertisement details, and payload contents:
LOG_MODULE_REGISTER(main, LOG_LEVEL_DBG);This enables debug logging for our application module only, without flooding the console with debug messages from every Zephyr subsystem (which is what happens if you set CONFIG_LOG_DEFAULT_LEVEL=4 globally). You'll see the key decode, temperature, and advertisement messages while keeping the OS-level noise at info level.
Device Provisioning
Before you can build and run the application, we need to provision our device with an encryption key. This key is used to encrypt the Bluetooth LE advertisements so that only Hubble's backend can decrypt and identify our device.
Step 1: Register Your Device with Hubble
First, we need to register a device in the Hubble dashboard to obtain an encryption key. You'll need an API Token to access the API—see how to create one here. You can also import the API spec into your preferred developer environment (Postman, Insomnia, etc.).
Go to the Register New Devices page in the Hubble Cloud API documentation, which provides an interactive form for registering devices directly from the browser.
In the interactive panel on the right, fill in:
- org_id: Your Organization ID (required path parameter)
In the Body section, configure:
- n_devices: Number of devices to provision (1-1000)
- encryption: Select "AES-256-CTR" (required)
- names: Array of device names (e.g., ["nrf54l15_demo"])
- tags: Optional array of tag objects
- Click SEND API REQUEST
- Copy the Base64-encoded
keyfrom the response—you'll need it for provisioning
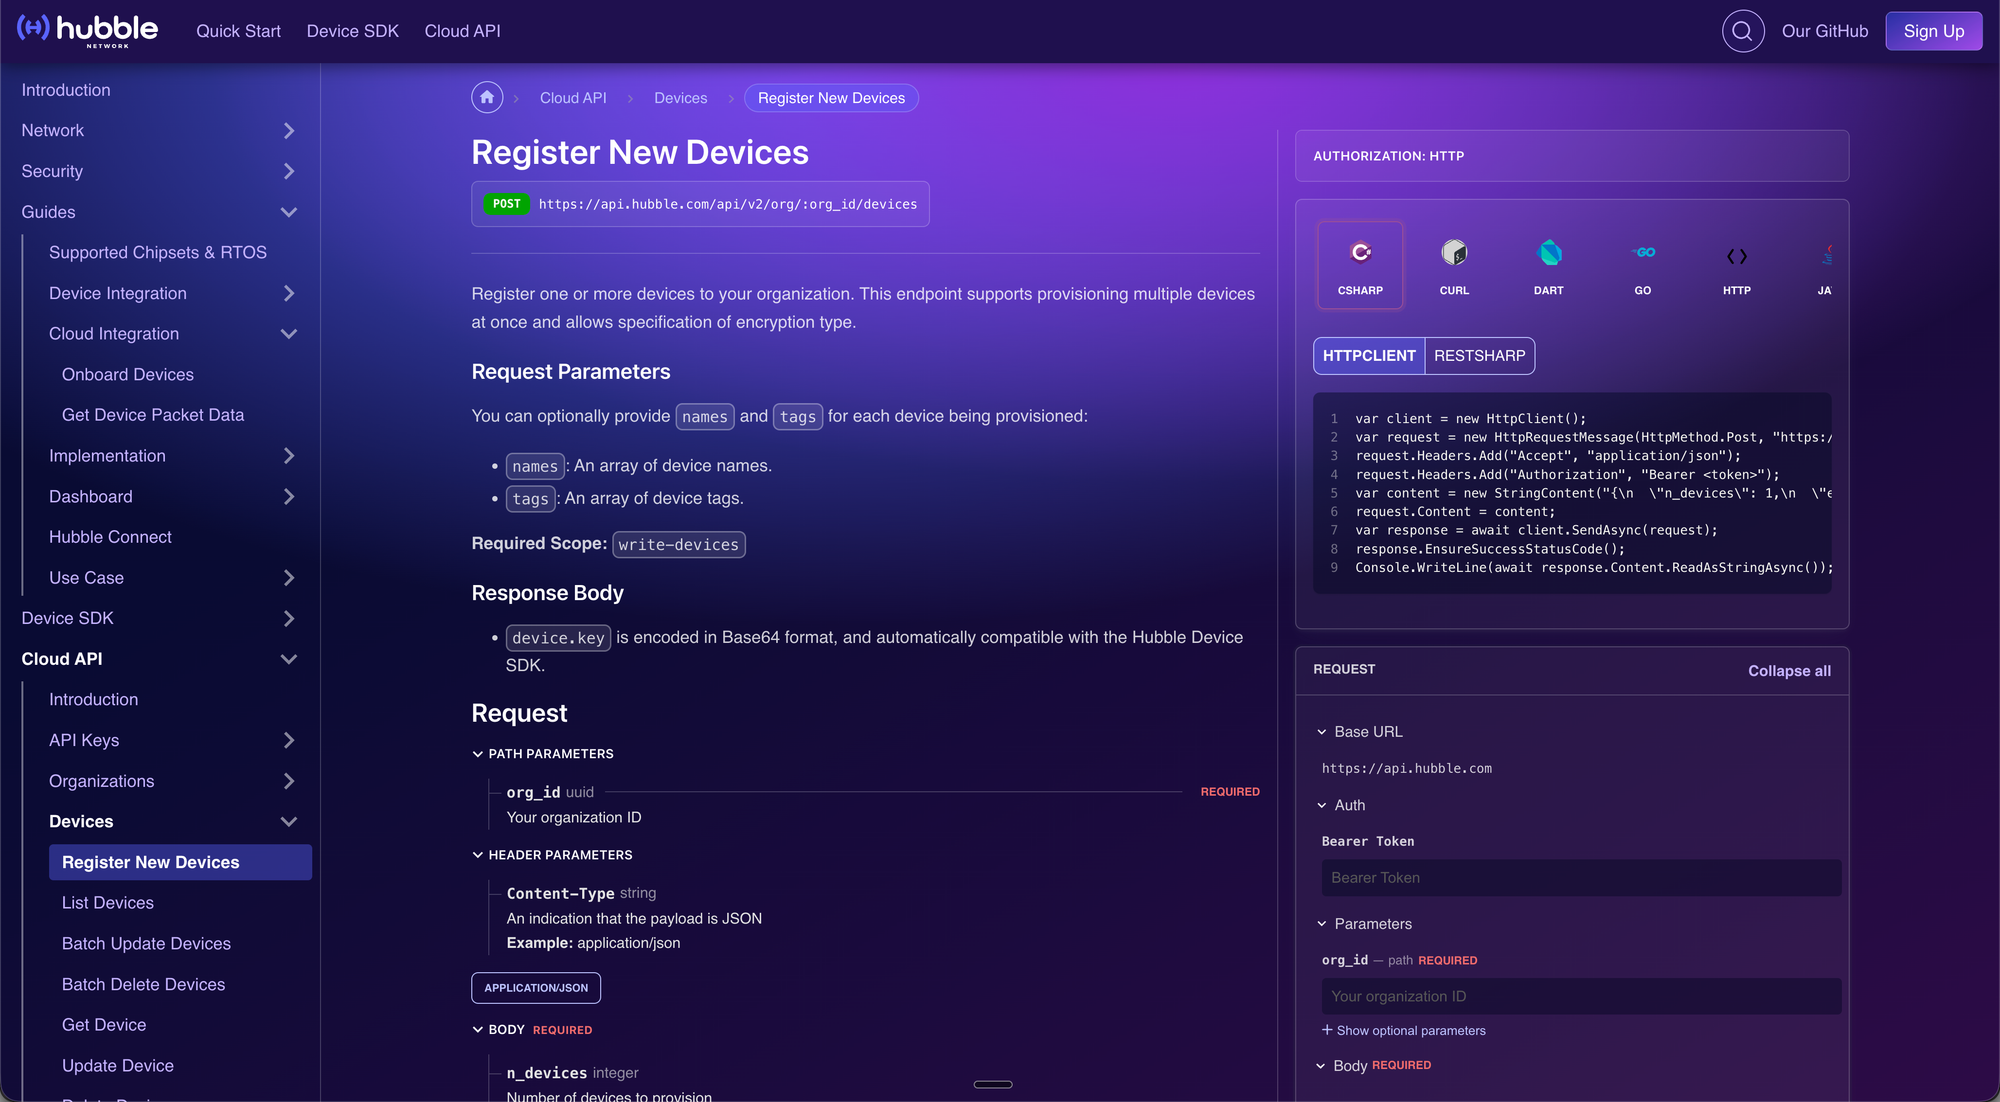
curl or any HTTP client to call the same API endpoint directly. See Hubble's API documentation for the request format.nrf54l15_dk_01 and nrf54l15_dk_02—so you can easily identify them in the dashboard.Step 2: Set the Device Key
With our modified CMakeLists.txt, we read the device key from a file called hubble-device-b64.key in the parent directory (i.e., the hubble-demo/ folder). Save your key to this file:
echo "YOUR_BASE64_KEY_HERE" > hubble-demo/hubble-device-b64.keyReplace YOUR_BASE64_KEY_HERE with the Base64-encoded key you received from the API in Step 1. The build system reads this file automatically—no environment variables to manage.
hubble-device-b64.key when switching between devices—no need to manage environment variables or restart your IDE.export HUBBLE_DEVICE_KEY=...), which is what Hubble's documentation shows. That works well when building with west build directly from the command line. However, when using VS Code with the nRF Connect extension, environment variables set in your shell profile (e.g., ~/.zshrc) aren't automatically inherited by the IDE's build process. That's why we modified CMakeLists.txt to read from a file instead—it works reliably regardless of how you trigger the build.Fresh Timestamp on Every Build
The UTC timestamp is computed fresh by CMake on every build, so you can just rebuild and flash at any time. The timestamp is always current.
The Terrestrial Network supports ±24 hours of clock precision. Since the reference app generates a fresh timestamp on every pristine build, you'll always be within that window as long as you do a pristine build before flashing.
For production devices, Hubble recommends at least 500PPM clock accuracy to control drift over time. If your device will run for extended periods, consider implementing a time synchronization protocol—the Terrestrial Network gateways do not manage or refresh device time.
hubble-device-b64.key file contains your actual device key before building. If the file is missing or contains the default test key, your device won't appear under "My Devices" in the Hubble dashboard.The reference app initializes the Bluetooth LE stack and the Hubble SDK, then calls hubble_ble_advertise_get() in a loop to generate fresh encrypted payloads. That single SDK function handles all the cryptography (key derivation, nonce generation, AES-256 encryption) internally, so we don't have to deal with any of that. We also add temperature sensor reading as a custom payload—see Adding Custom Sensor Data below for details on how the encoding works.
Building and Flashing
Now that our device key is in place, let's build and flash the application.
Build the Application
- Open the nRF Connect extension panel in VS Code
- Find your build configuration under Applications
- Click the Build button (hammer icon)
The build should complete without errors. You'll verify the key was loaded correctly in the serial output after flashing.
Flash to the nRF54L15 DK
- Connect your nRF54L15 DK to your computer via USB
- In the nRF Connect panel, click the Flash button
- Wait for the flashing process to complete
Verify with Serial Output
Open a serial terminal (115200 baud) to see the application output:
- In VS Code, open the nRF Terminal (View > Terminal, then select nRF Terminal)
- Or use your preferred serial terminal application
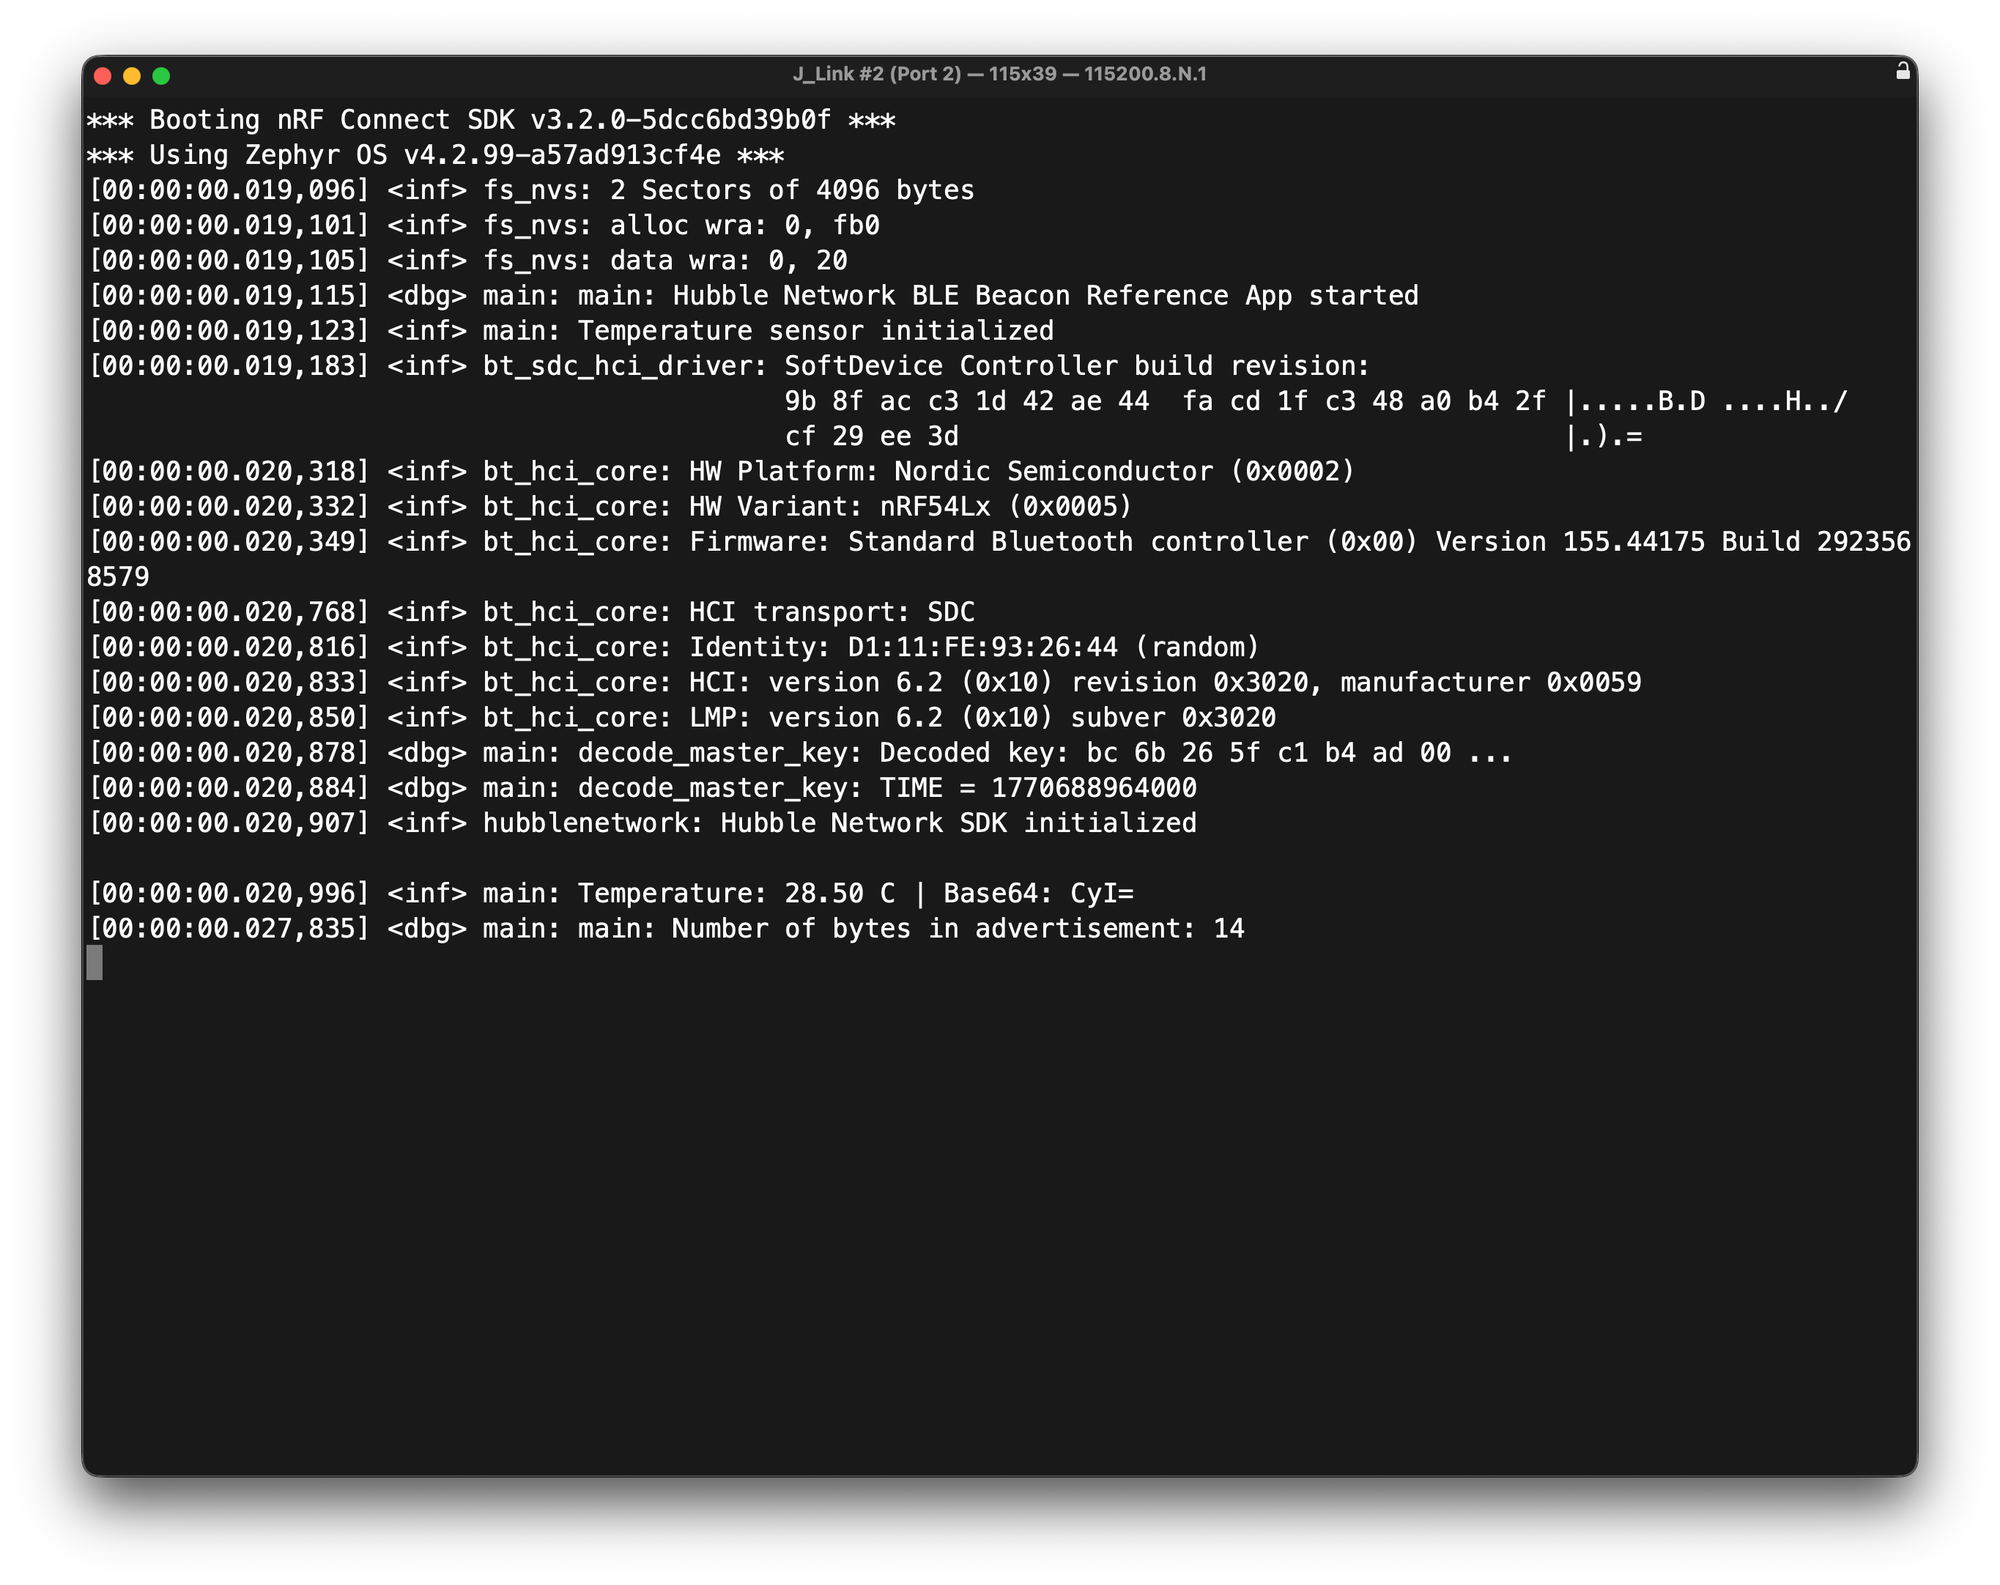
We should see output similar to:
*** Booting nRF Connect SDK v3.2.0 ***
[00:00:00.022,411] <dbg> main: main: Hubble Network BLE Beacon Reference App started
[00:00:00.022,439] <inf> main: Temperature sensor initialized
[00:00:00.024,124] <inf> bt_hci_core: Identity: D1:11:FE:93:26:44 (random)
[00:00:00.024,184] <dbg> main: decode_master_key: Decoded key: bc 6b 26 5f c1 b4 ad 00 ...
[00:00:00.024,200] <dbg> main: decode_master_key: TIME = 1738000000000
[00:00:00.024,213] <inf> hubblenetwork: Hubble Network SDK initialized
[00:00:00.028,996] <inf> main: Temperature: 28.50 C | Base64: CyI=
[00:00:00.031,137] <dbg> main: main: Number of bytes in advertisement: 14
The output confirms several things: our key was decoded correctly (the Decoded key: line logs the first bytes of the decoded key so you can confirm the right key was loaded), the temperature sensor we added is reading (28.50°C), and the advertisement includes 14 bytes of service data content (2-byte UUID + 10-byte Hubble payload + 2 bytes of our temperature data). The device broadcasts at a 2-second advertising interval, refreshing the encrypted payload—including a new temperature reading—every 5 minutes.
cat hubble-device-b64.key | base64 -d | xxd -p -c 8 | head -1The output should match the hex bytes shown in the
Decoded key: line.Our device is now broadcasting Hubble advertisements!
Testing and Verification
Let's verify that our device is communicating with the Hubble network. With Sandbox access, we'll use the Hubble Connect mobile app as a local gateway to receive our device's Bluetooth LE advertisements and forward them to the cloud.
Testing with the Hubble Connect App
The Hubble Connect app (available on iOS and Android) turns our smartphone into a local Hubble gateway for development and testing:
- Download Hubble Connect from the App Store
- Log in with your Hubble developer account (the same one you used at dash.hubble.com)
- Grant Bluetooth and location permissions when prompted
- The app will start scanning for nearby Hubble devices
- Our registered device should appear in the My Devices tab
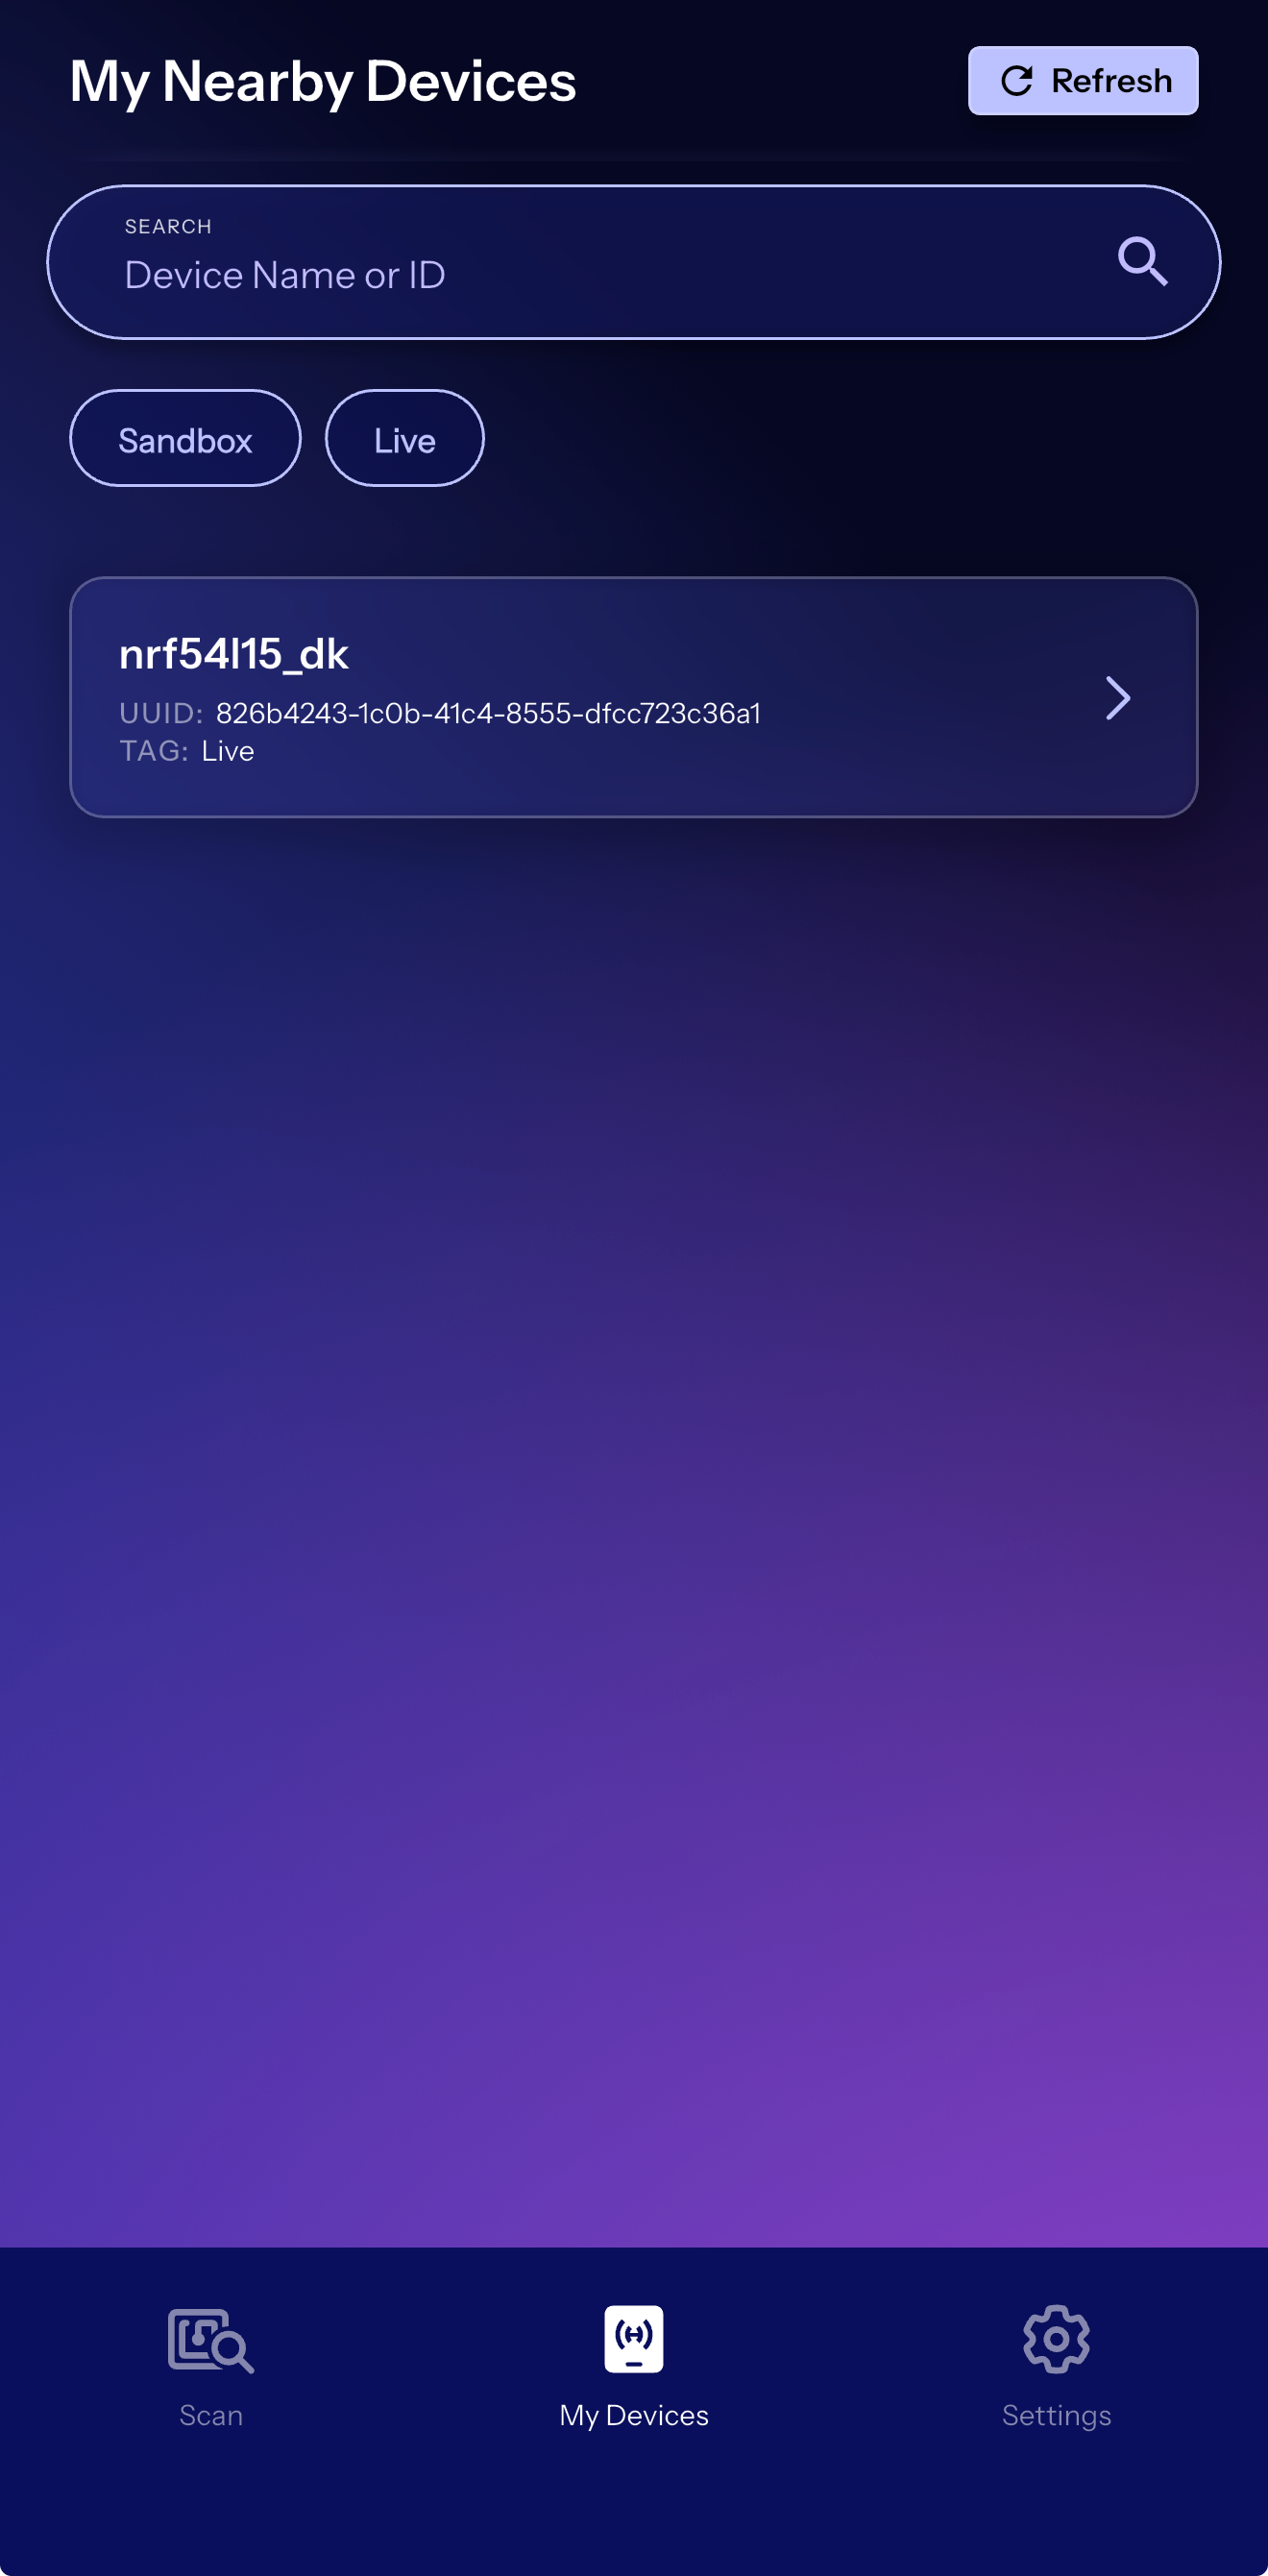
The app scans for nearby devices broadcasting on the Hubble protocol and registered with our organization. When it receives our device's advertisement, it forwards the encrypted payload to Hubble's cloud.
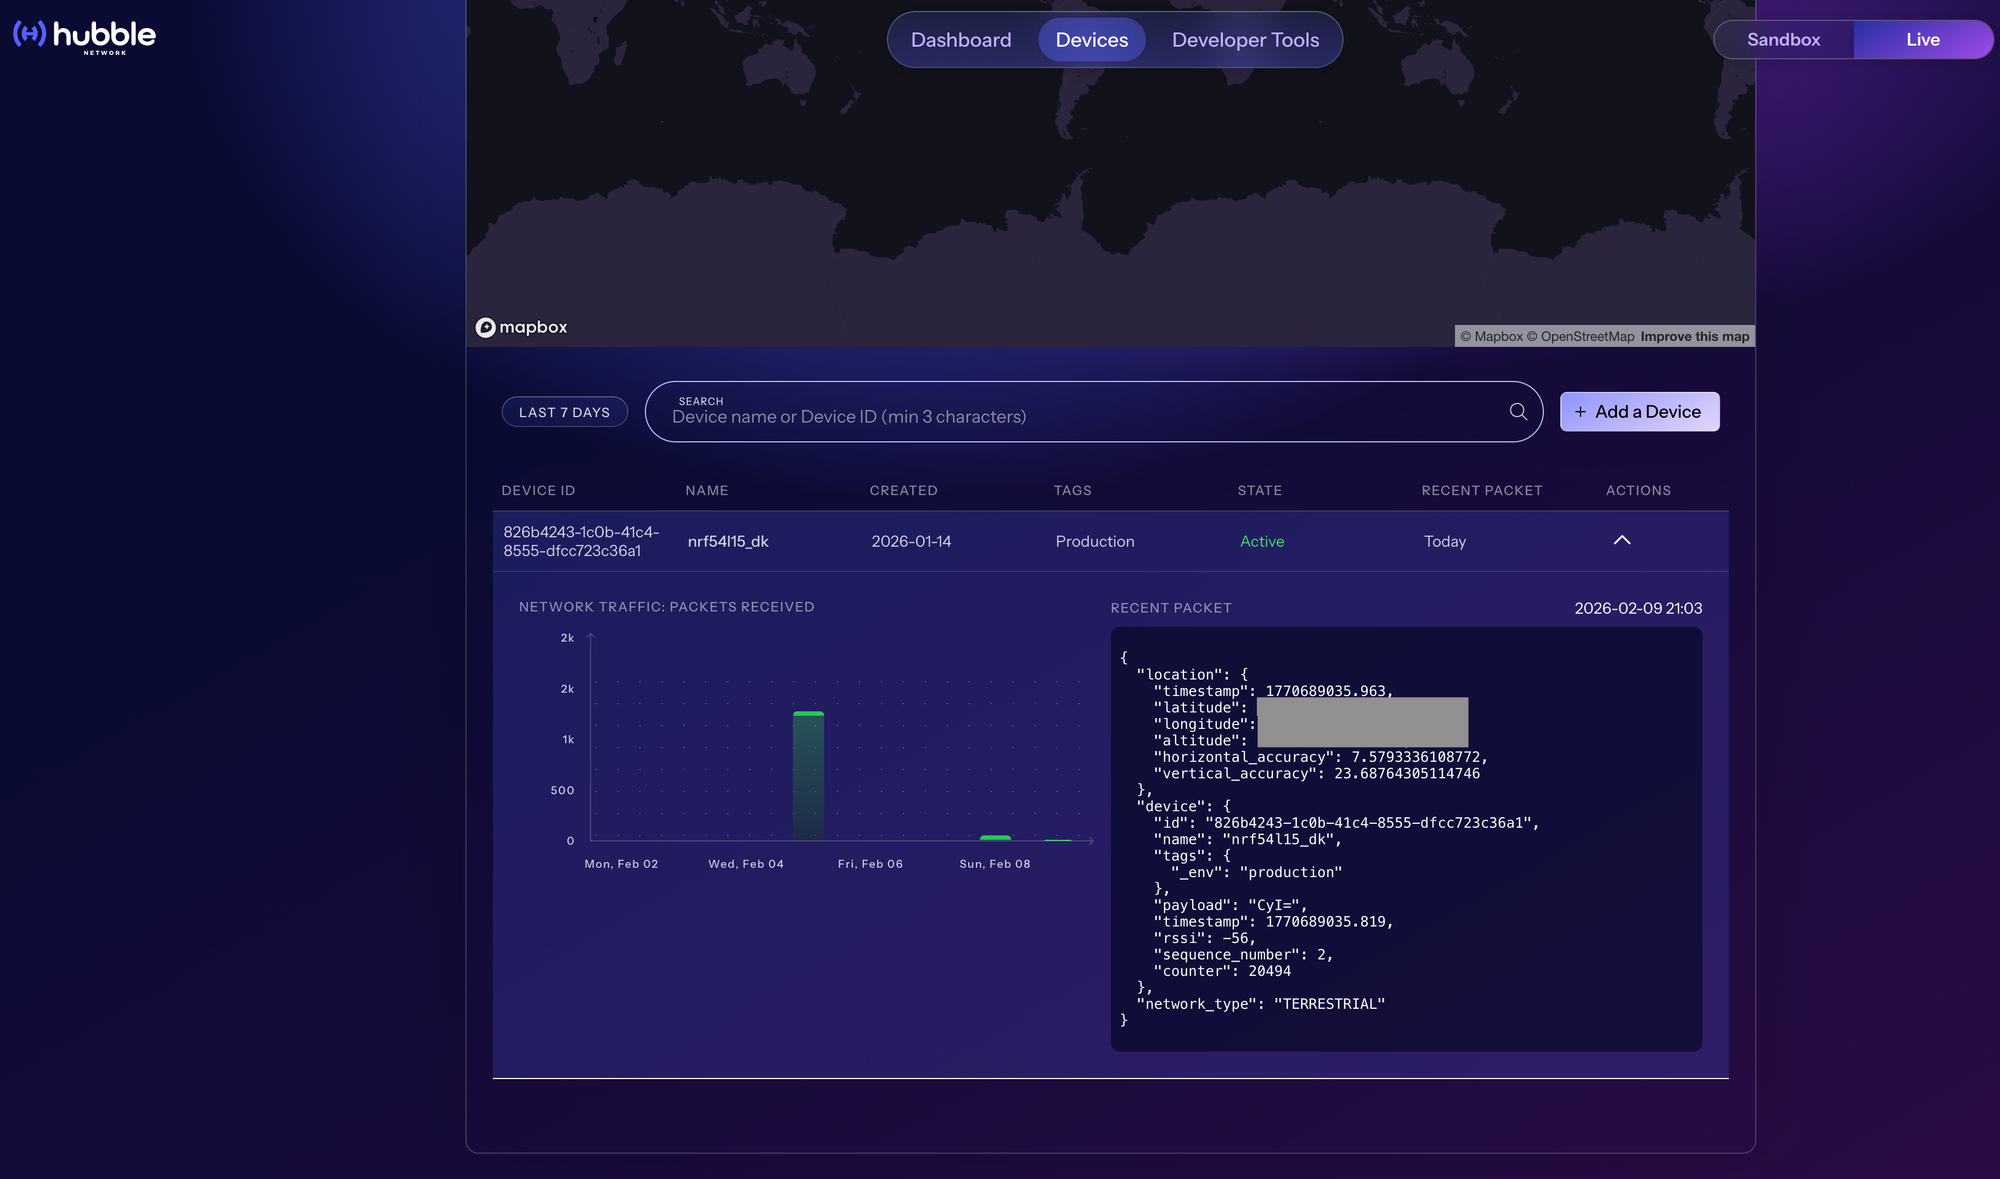
Check the Hubble Dashboard
- Open dash.hubble.com and log in
- Navigate to our devices list
- Find our registered device (e.g., "nrf54l15_demo")
- Click to view device details
With the Hubble Connect app running nearby, we should see recent data including:
- Location: GPS coordinates of the receiving gateway
- RSSI: Signal strength at the gateway
- Timestamp: When the packet was received
- Counter: Rolling counter value (for replay protection)
Understanding the Data
When we view a device packet in the dashboard, we'll see something like:
{
  "location": {
    "timestamp": 1769703217.7,
    "latitude": 39.76493314820157,
    "longitude": -86.16218773415692,
    "altitude": 219.84721038564210,
    "horizontal_accuracy": 4.67592332215799,
    "vertical_accuracy": 30
  },
  "device": {
    "id": "826b4243-1c0b-41c4-8555-dfcc723c36a1",
    "name": "nrf54l15_dk",
    "tags": {
      "_env": "production"
    },
    "payload": "CyI=",
    "sequence_number": 3,
    "counter": 20481,
    "rssi": -51,
    "timestamp": 1769703220.007
  },
  "network_type": "TERRESTRIAL"
}
The location comes from the gateway, not your device. This is how Hubble provides location context—the gateway knows where it is and tags the received packets with that information.
Adding Custom Sensor Data
To demonstrate end-to-end data flow, we add temperature sensor reading to the reference app. This is a small modification—we read the nRF54L15's on-chip die temperature sensor every advertising cycle and include it as a 2-byte custom payload in the Hubble advertisement.
I find that sending a known sensor value and comparing the Base64 output on the serial console with what appears on the dashboard is the quickest way to verify end-to-end data flow—from the device, through the gateway, to the cloud.
How the Payload Works
The temperature is packed as a big-endian int16 in 0.01°C units (so 28.50°C becomes the integer 2850, or 0x0B22). Our app logs both the human-readable temperature and its Base64 encoding for easy comparison with the dashboard:
[00:00:00.028,996] <inf> main: Temperature: 28.50 C | Base64: CyI=The 2 bytes of temperature data are passed to hubble_ble_advertise_get() as the custom payload, encrypted alongside the Hubble protocol fields, and transmitted in the advertisement. That's well within the 13-byte maximum—you still have 11 bytes left over if you want to pack in additional readings or device state down the road.
Configuration
For the temperature sensor and Base64 debug logging, we add these Kconfig options to prj.conf:
# Sensor subsystem (for on-chip temperature)
CONFIG_SENSOR=y

# Base64 encoding (for debug payload logging)
CONFIG_BASE64=y
Verifying the Payload End-to-End
Now let's verify that our data made it through. The serial console shows each temperature reading along with its base64 encoding:
And on the Hubble Connect app (or the web dashboard), the same base64 string appears in the payload field:
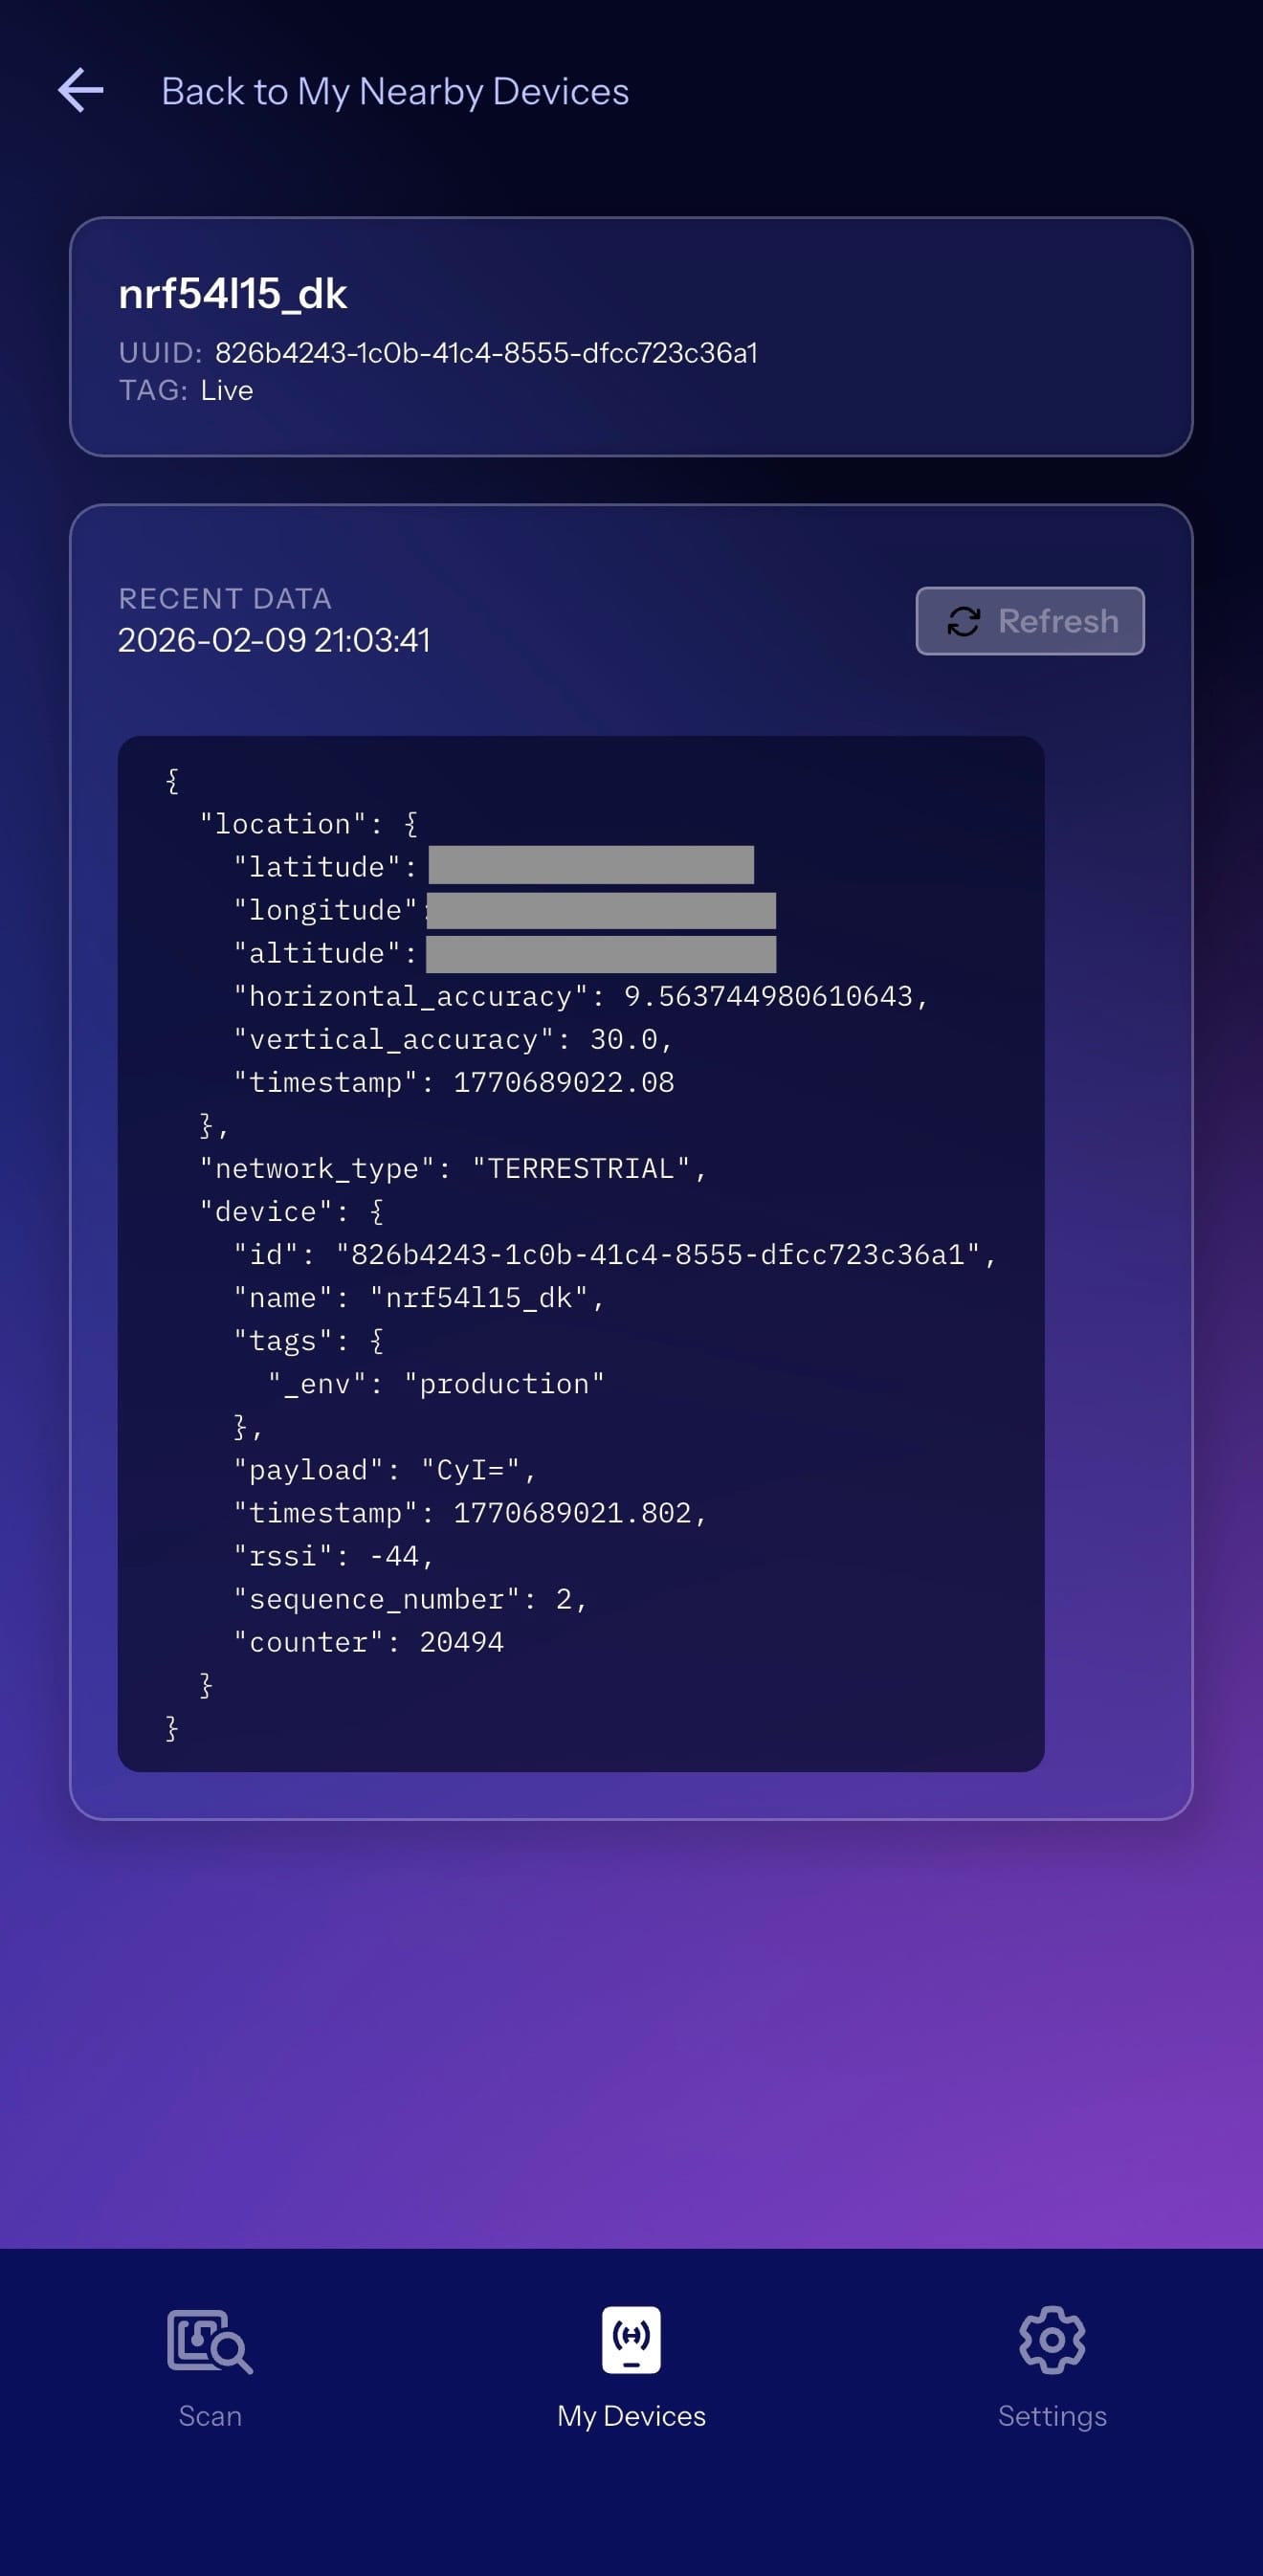
The payloads match. For example, a reading of 28.50°C gets packed as 0x0B22 (2850 in 0.01°C units), which base64-encodes to CyI=. That value was encrypted by the SDK, transmitted via Bluetooth LE, received by a terrestrial gateway, decrypted in the cloud, and delivered to our dashboard—all verifiable with a quick glance at both screens.
This is the core workflow for any custom payload application. Whether it's sensor readings, device diagnostics, or application state—the pattern is the same: pack your data into a byte array (up to 13 bytes), pass it to hubble_ble_advertise_get(), and retrieve it from the dashboard or via Hubble's API. At this point, you should be able to send any custom data through the Hubble network and verify it arrives intact.
Video Demo
Want to see the entire process in action? In this video, I walk through the complete tutorial—from provisioning the nRF54L15 DK to building and flashing the firmware, then verifying the device using the Hubble Connect mobile app and the cloud dashboard.
Real-World Applications
Hubble's technology enables applications that were previously impractical with standard Bluetooth LE. Two use cases that make the most sense here:
Stolen Vehicle Recovery
Traditional GPS tracking modules and cellular modems are bulky, predictably placed (usually under the dashboard or in the engine compartment), and therefore quickly disabled by criminals who know exactly where to look. With Hubble, there's no telltale antenna or obvious hardware to rip out. A tiny Bluetooth LE beacon can be hidden virtually anywhere in a vehicle—for example, inside a door panel, within the seat cushion, or embedded in a non-obvious location. Since the beacon doesn't need a cellular signal or large GPS antenna, thieves have no easy way to locate and disable it.
This same principle applies broadly to stolen asset recovery—think high-value equipment, construction machinery, boats, trailers, or even expensive bicycles. Any asset that's at risk of theft can benefit from a tracking solution that's small, inconspicuous, and doesn't rely on easily-disabled cellular infrastructure.
Fleet Tracking
For logistics and transportation companies, tracking vehicles and cargo across vast distances (including areas with spotty cellular coverage) has traditionally required expensive satellite communicators or accepting gaps in visibility. Hubble enables continuous fleet tracking using inexpensive Bluetooth LE beacons, with the upcoming satellite network ensuring coverage even through remote highways, rural areas, and international routes.
Other Applications
Beyond vehicle and fleet tracking, you can think of any scenario where you need to know where something is (or that it's still there) without relying on cellular—agriculture sensors in remote fields, wildlife trackers, pipeline monitoring, shipping containers on ocean crossings. Hubble delivers not only better satellite connectivity but also lower power requirements than traditional cellular IoT solutions, which works well for battery-constrained deployments.
Next Steps
That's it—we now have a working Hubble Network beacon on the nRF54L15 DK, complete with custom sensor data. Here are some ways to extend this further:
- Expand your payload: We used 2 bytes for temperature, but you have up to 13 bytes available. Consider adding battery voltage, accelerometer data, or device status flags. See Hubble's Custom Payload guide for encoding examples.
- Optimize power consumption: For battery-powered deployments, tune the advertising interval and transmit power (dBm) for your battery budget. Higher output power means better range and reliability, but draws more current. Early Hubble customers report achieving 1+ year battery life on a coin cell with the right tuning. The nRF54L15 is designed for ultra-low-power operation—see the BlueJoule project for standardized power consumption benchmarks across Bluetooth LE chips.
- Prepare for satellite connectivity: Hubble's satellite constellation is in beta testing and expected to launch more broadly later this year. Devices will use a separate satellite protocol in the SDK for global coverage—oceans, deserts, anywhere.
Conclusion
In this tutorial, we covered a lot! We went from zero to a working Hubble beacon. We set up the nRF Connect SDK toolchain, cloned the Hubble SDK and reference app, provisioned our device key, and added temperature sensor reading as a custom payload. We then verified the whole thing end-to-end through the Hubble Connect app and cloud dashboard.
Here's what we covered:
- How Hubble's terrestrial network uses 90M+ smartphone gateways to receive standard Bluetooth LE advertisements
- Setting up the reference app with nRF Connect for VS Code and the Hubble SDK as an external Zephyr module
- Provisioning a device key via a key file
- Building, flashing, and verifying serial output on the nRF54L15 DK
- End-to-end verification of custom temperature payload from device to cloud dashboard
At this point you should be comfortable integrating the Hubble SDK into your own nRF Connect SDK projects, provisioning devices, and deploying Bluetooth LE beacons with custom payload data that talk to Hubble's infrastructure.
The nRF54L15 paired with Hubble's network is a solid combination for IoT applications that need connectivity beyond cellular or WiFi. And once the satellite constellation goes live, your Bluetooth LE devices will be able to communicate from anywhere on Earth—no gateways required.


