

What is the Zephyr Project?
Zephyr is an open-source real-time operating system (RTOS) meant for use on resource-constrained embedded systems. This can range from simple sensor devices without connectivity to much more complex IoT devices such as smartwatches and medical devices.
Zephyr is a Linux Foundation project that is backed by many members including Intel, NXP Semiconductors, Synopsys, Linaro, Texas Instruments, DeviceTone, Nordic Semiconductor, Oticon and Bose.
The project's source code is licensed under the Apache 2.0 license. However, it also includes imported components that carry different licenses (learn more here). It supports multiple architectures including ARM Cortex-M, Intel x86, ARC, and others. For a full list of supported development boards and architectures, refer to the following link:
https://docs.zephyrproject.org/latest/boards/index.html#boards
Zephyr is powerful because it can be customized to contain only the components that are needed to support the specific requirements of your project. This allows much more efficient use of memory and resources and cuts out anything that is unnecessary for your specific application. The project offers a large number of supported features that are also growing.
Some of the features it supports include:
- Multi-threading
- Interrupt services
- Memory allocation
- Interthread communication and synchronization
- Power management
- Memory protection
- Compile-time resource definition
- Device tree support
- Bluetooth Low Energy (including Bluetooth 5.0 and Bluetooth mesh support)
- Native Linux, macOS, and Windows development
- Virtual filesystem interface
- Multi-backend logging
- Full-featured shell interface
- Non-volatile storage
- POSIX
Fun fact: Zephyr is an English name for the Latin Zephyrus, the ancient Greek god of the west wind.
Bluetooth Low Energy Support in Zephyr
Bluetooth Low Energy is one of the major supported features and the main wireless connectivity option for devices running Zephyr (as of January 2020).
Some of the most important Bluetooth LE features supported are:
- Bluetooth Host, Bluetooth Controller, and HCI layer
- Unlimited role and connection count, all roles supported
- Generic Access Profile (GAP) with all possible LE roles: Peripheral & Central, Observer & Broadcaster.
- GATT Server and Client
- Pairing and LE Secure Connections
- Bluetooth mesh: Relay, Friend Node, Low-Power Node (LPN) and GATT Proxy features. Both Provisioning bearers supported (PB-ADV & PB-GATT)
Interesting fact: Did you know that Nordic Semiconductor has decided to migrate away from the nRF5 SDK and SoftDevices to using Zephyr for their new products, including the nRF9160 and the nRF5340? Learn more.
The Bluetooth Stack in Zephyr
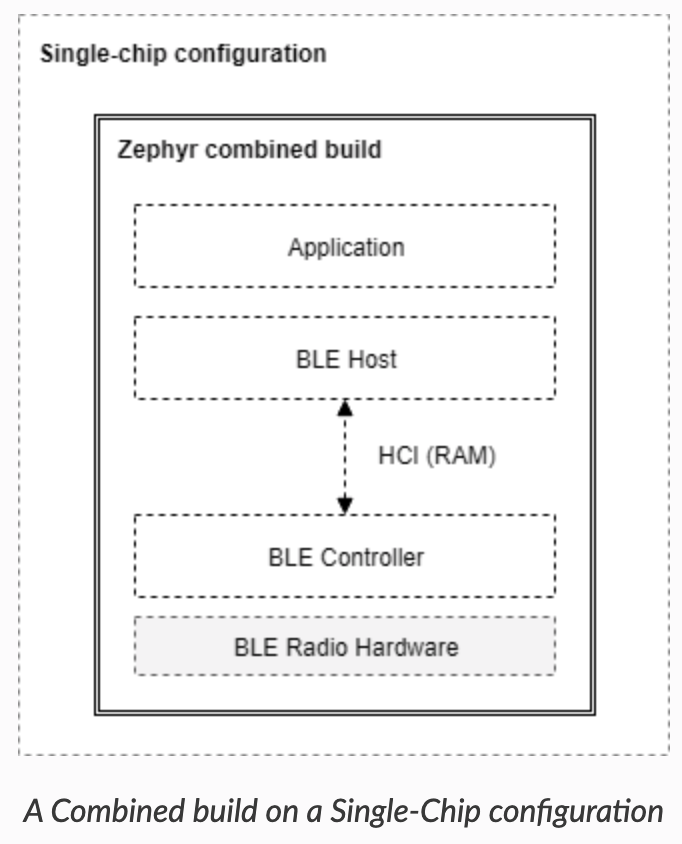
Zephyr implements both the Controller and Host layers of a Bluetooth stack on top of the 2.4 GHz radio hardware layer. It allows two common Bluetooth LE configurations:
- Single-chip configuration: the three layers are all implemented on a single microcontroller. In this case, the Host and Controller interact with each other via API calls. So, while there's no standard specification for implementing the HCI layer in the Bluetooth specification in a single-chip configuration, the HCI layer is still present in Zephyr when used in this way. However, keep in mind that, in this scenario, how HCI commands, events and data flows between the Host and Controller are implementation-specific.
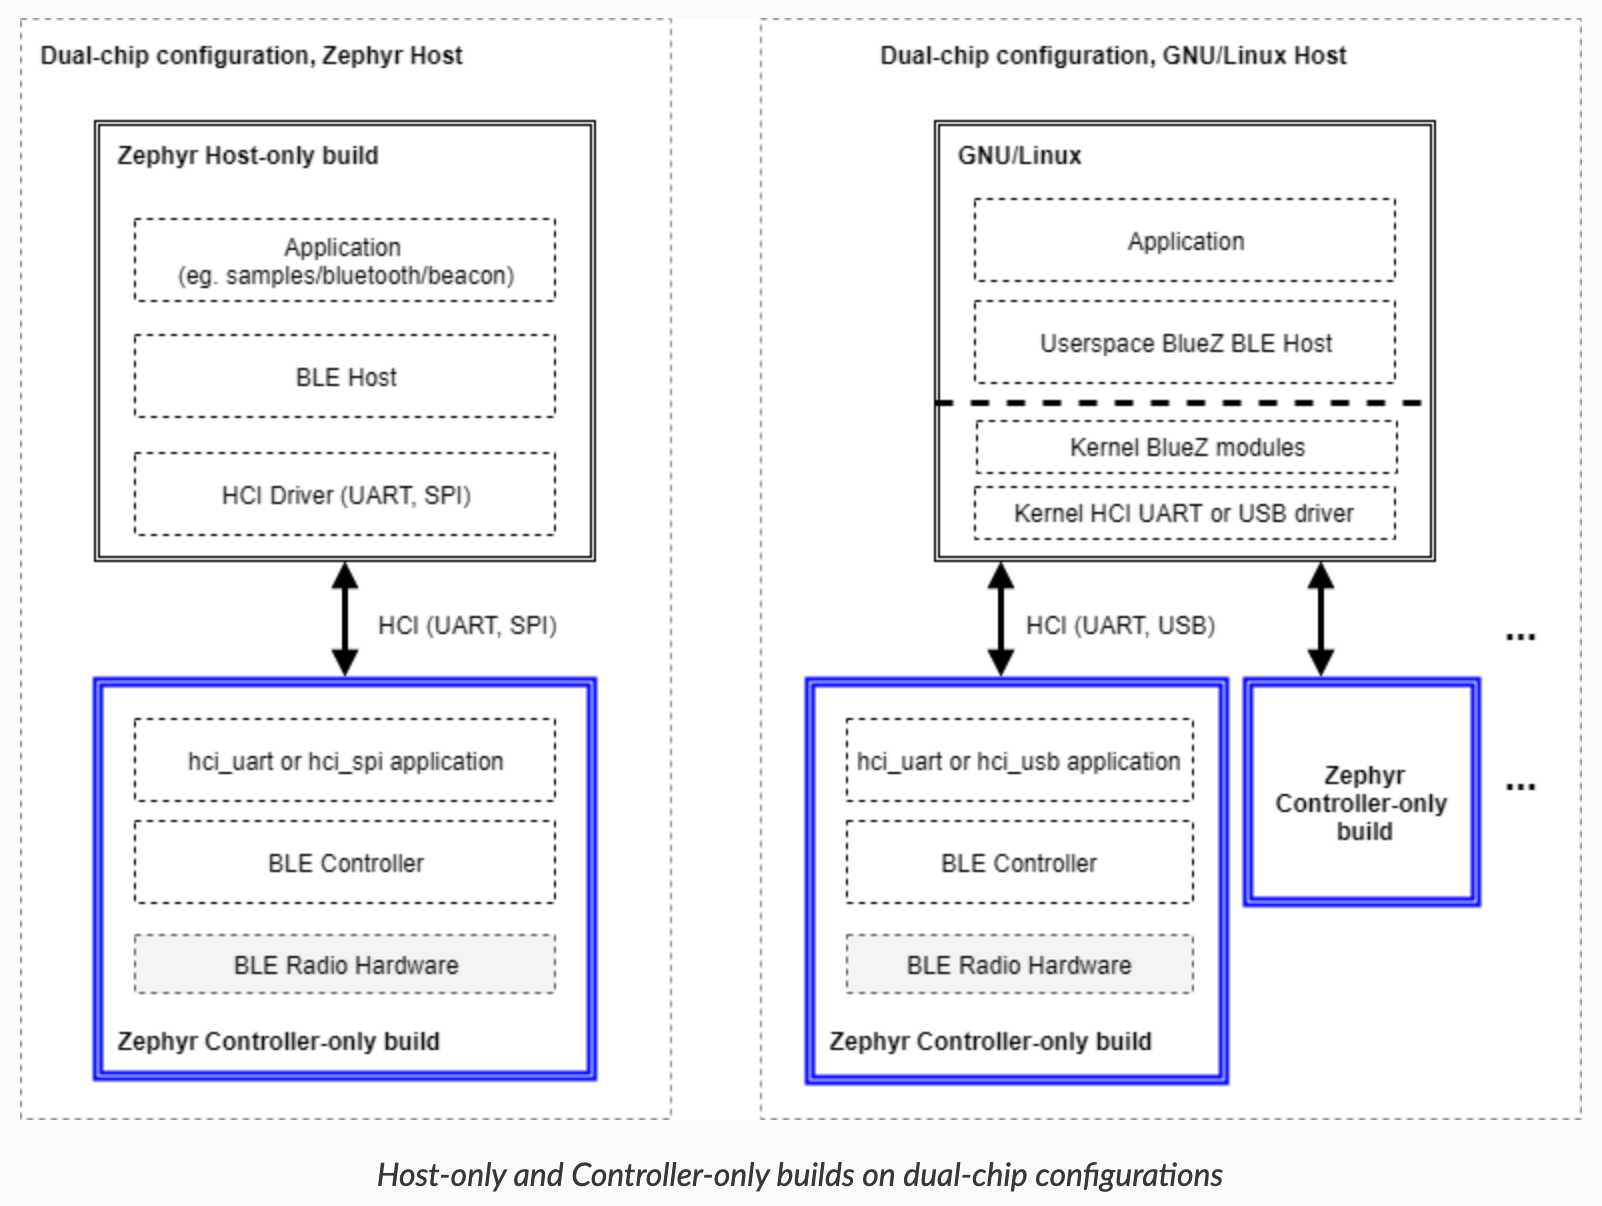
This is becoming the more popular configuration of the two. - Dual-chip configuration: in this case, the Controller and radio hardware are on a separate microcontroller from the Host (and Application). The HCI protocol is standardized per the Bluetooth specification document and ensures interoperability, and it allows a developer to choose whatever platform for the Bluetooth Host while choosing any other platform for the Bluetooth Controller. This means a solution could use a Zephyr-based Bluetooth LE Host with a non-Zephyr Bluetooth LE Controller and vice versa. HCI is standardized for UART, SPI, and USB interfaces between the Host and Controller.
Here are some diagrams that show examples of the different possible configurations (taken from Zephyr project's documentation):
The Zephyr stack is also qualified with the Bluetooth SIG, meaning you can qualify your Zephyr-based product without having to go through testing.
The Zephyr West tool
Zephyr includes a command-line tool called west which is used for various operations and purposes. It is called in the following format:
west [common-opts] <command> [opts] <args>One of the tool's important purposes is to handle managing the multiple Git repositories included within the Zephyr repository. The common parent directory of the included repositories is called a west installation. In the following, the parent directory zephyrproject is a west installation:
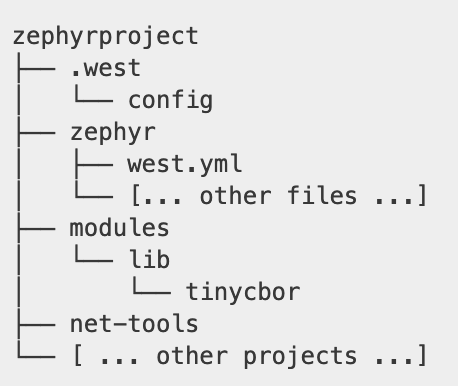
The directory zephyr that contains the west.yml file is called the manifest repository (this is the default for the upstream Zephyr repo, but can be configured differently). The west.yml file is the west manifest and along with the west configuration files controls the installation's behavior.
Installation and Setup
Zephyr development is supported on all the major operating systems including Windows, macOS, and Linux. We won't go through the detailed steps of the installation and setup – those are listed in the Zephyr project documentation:
https://docs.zephyrproject.org/latest/getting_started/index.html.
The documentation provides the steps for each of the different operating systems. The steps involve:
- Setting up the command-line development environment (including Python3, pip3, the west tool, the software development toolchain, and other dependencies)
- Obtaining the Zephyr source code
- Building, flashing and testing a sample example on one of the supported development boards
Troubleshooting
You may run into issues during the installation and setup process. The Zephyr documentation includes a section named "Beyond the Getting Started Guide" that I found myself referring to for troubleshooting and solving these issues. This documentation section can be found at:
https://docs.zephyrproject.org/latest/guides/beyond-GSG.html.
One example of an issue I ran into on macOS is an error while installing the Python dependencies for the Zephyr project using the pip3 command-line tool.

This can be solved by using the --user pip3 option:

Another issue on macOS is that the Zephyr SDK toolchain is not supported, and instead you will have to install the GNU Arm Embedded Toolchain (for Arm-based development). This is explained in the same "Beyond the Getting Started Guide" documentation section.
Once you have the toolchain installed on your system, you will need to set a couple of environment variables. In my case, I added the following to the ~/.bashrc file:

And another issue you may run into on macOS when building an example from the repo:
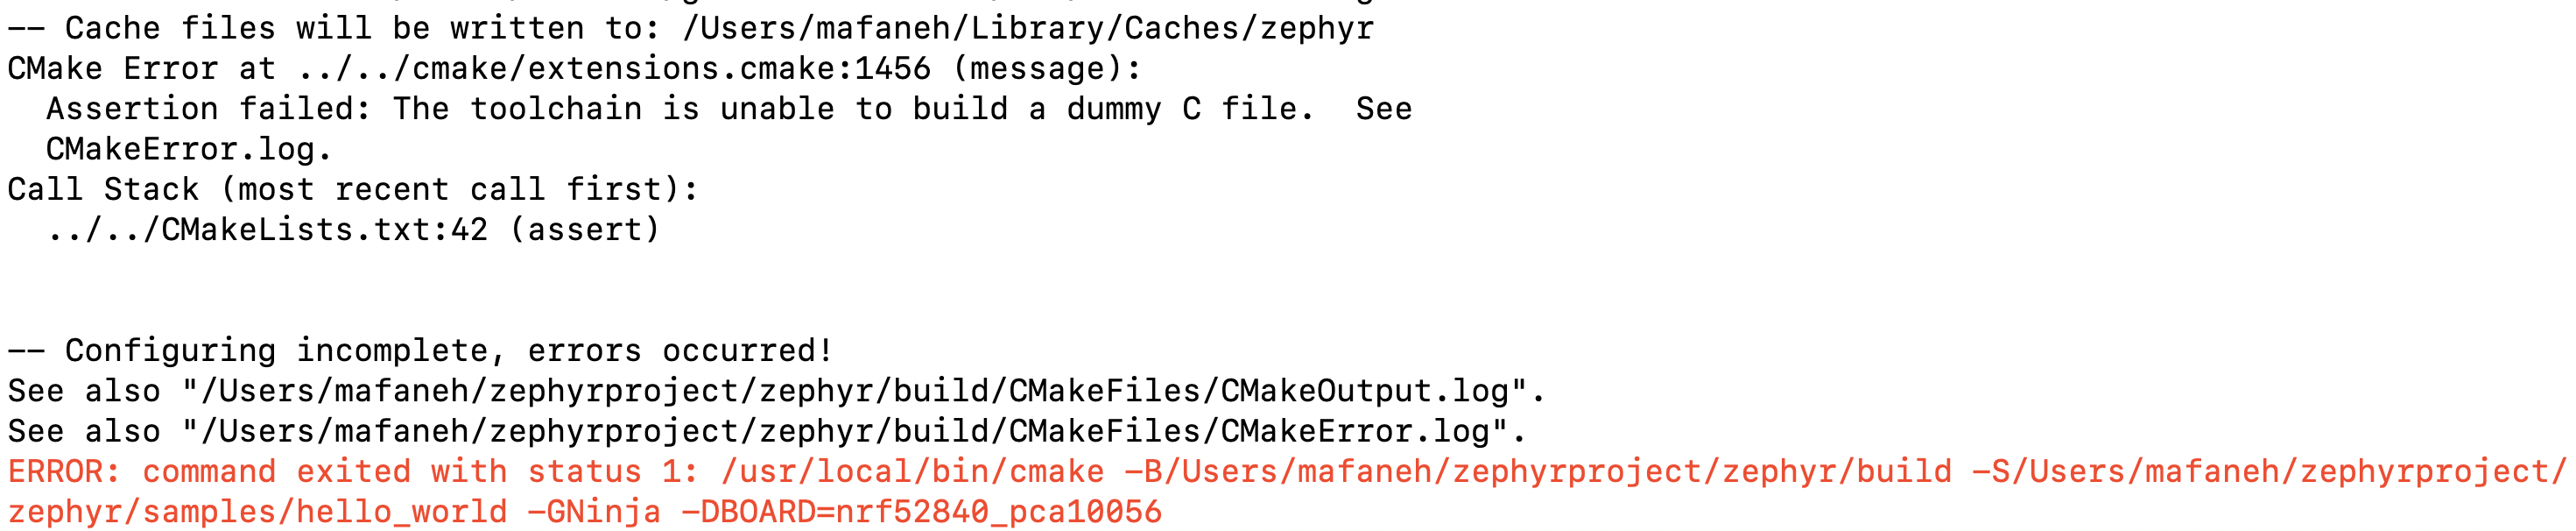
This can be solved by deleting the folder ~/Library/Caches/zephyr and rerunning the build command.
Building an Example
To verify that the installation is complete, let's build one of the included examples: the Blinky example.
When building any of the Zephyr examples, you'll need to specify the target board to be used. In the following example, I built the example for the nRF52840 DK board from Nordic Semiconductor.
To find out the identifier for a specific board you want to use, simply run the following command:
west boardsTo get a full list of the supported boards, refer to the Supported Boards section in the Zephyr documentation:
https://docs.zephyrproject.org/latest/boards/index.html#boards
To build the Blinky example on macOS, run the following commands (in a macOS Terminal):
cd ~/zephyrproject/zephyr source zephyr-env.sh west build -p auto -b nrf52840_pca10056 samples/basic/blinkyYou should see an output similar to the following:
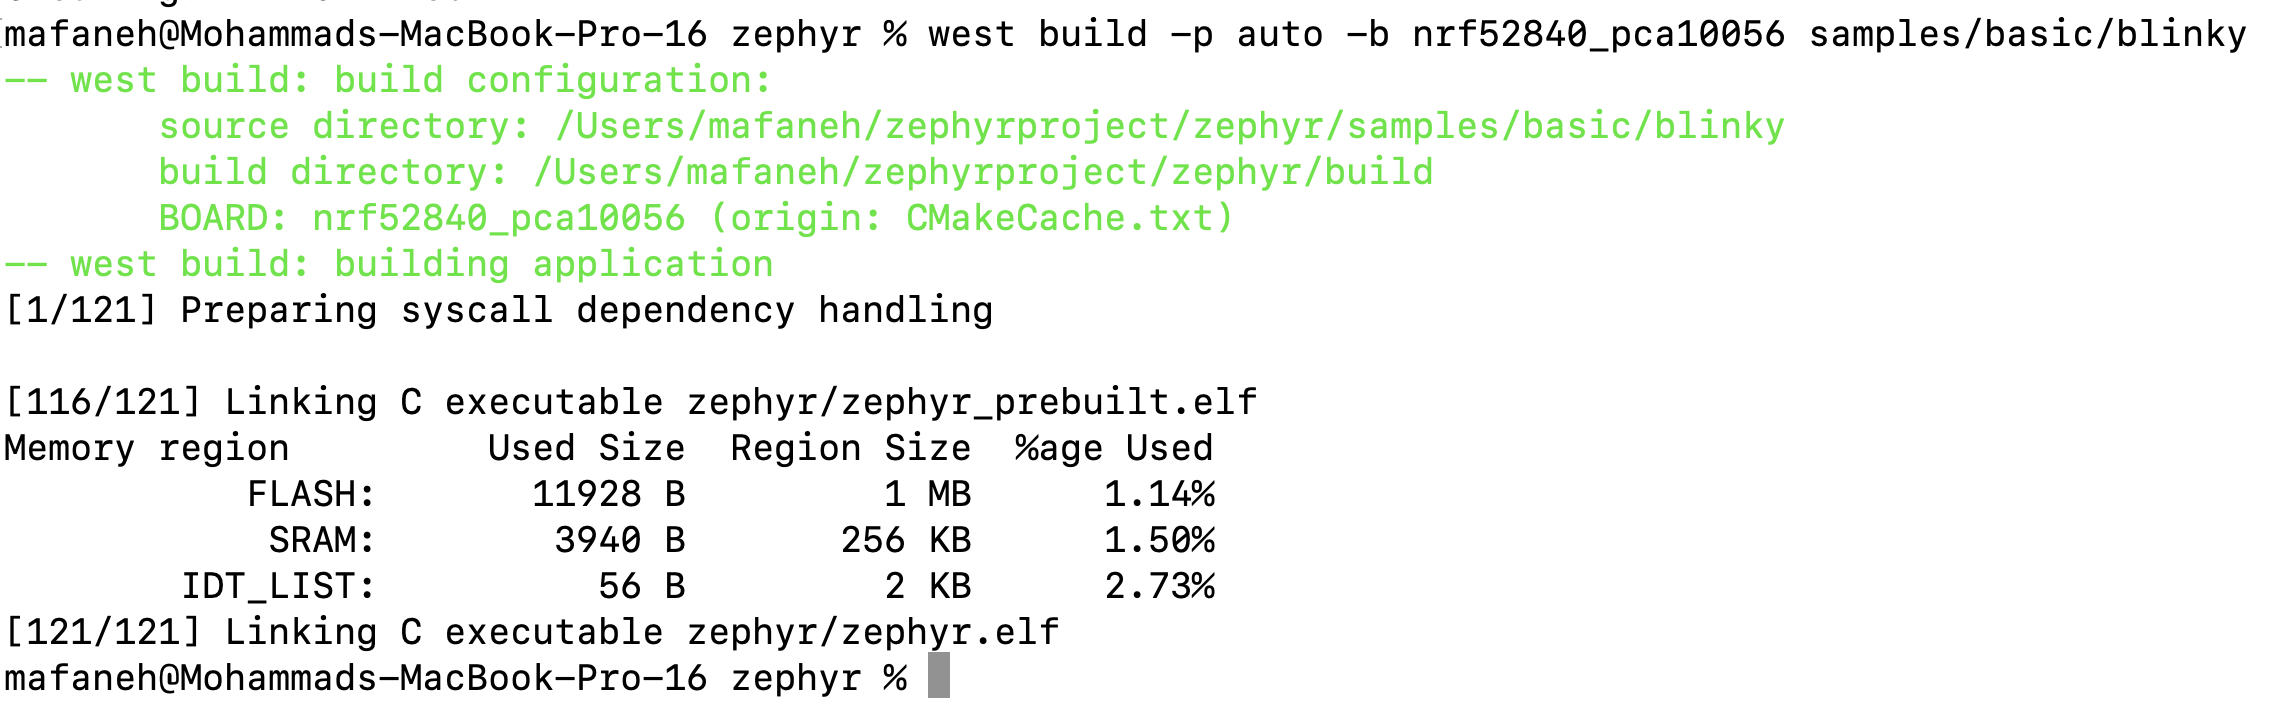
If you need to clean the build folder, run the following command:
west build -t cleanThe Zephyr Build System
Zephyr's build system is based on CMake. The build system is application-centric and requires Zephyr-based applications to initiate building the kernel source tree. The application build controls the configuration and build process of both the application and Zephyr itself, compiling them into a single binary. A Zephyr application in its simplest form will contain the following:
<home>/app
├── CMakeLists.txt
├── prj.conf
└── src
    └── main.c
The main files are:
- CMakeLists.txt: tells the build system where to find the other application files, and links the application directory with Zephyr’s CMake build system. This link provides features supported by Zephyr’s build system, such as board-specific kernel configuration files, the ability to run and debug compiled binaries on real or emulated hardware, and more.
- prj.conf: specifies application-specific values for one or more kernel configuration options. These application settings are merged with board-specific settings to produce a kernel configuration.
- Application code: all the application's source code files, generally included under the src folder. The simplest application will have just a single source file: main.c.
When building an application, the build artifacts are generated and placed in a build directory.
Devicetree
Zephyr uses the devicetree data structure to describe the hardware available on a development board, as well as its initial configuration in an application. The devicetree specification is available online at https://www.devicetree.org. Devicetree is used in the Linux kernel as well.
Zephyr uses a devicetree to generate code during the build process. It uses what's called devicetree bindings along with a set of rules to generate the C definitions. The C macros generated by this process all begin with DT_. The following diagram shows how the devicetree is used in Zephyr's build process:
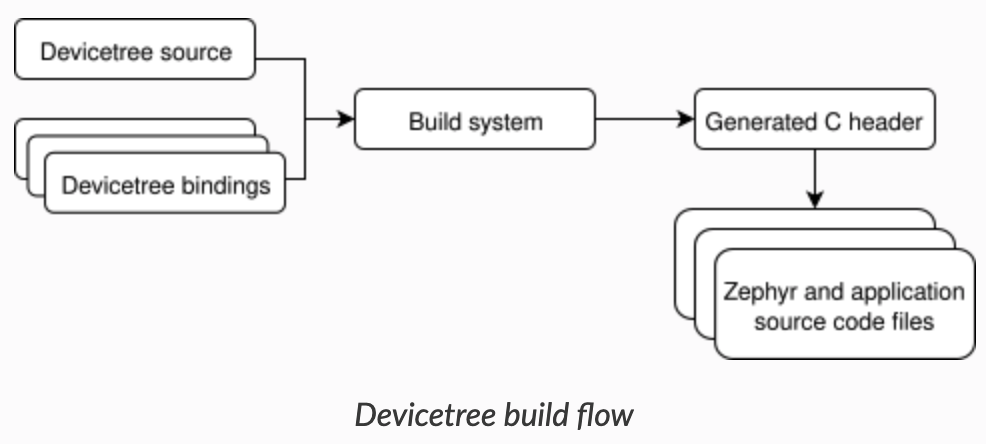
We won't get into the details of devicetrees in this post. To learn more about devicetrees and how they fit within the Zephyr build process, refer to the documentation at:
https://docs.zephyrproject.org/latest/guides/dts/index.html#device-tree.
The Blinky Example
Once you have everything set up from the previous lesson, you're now ready to build one of the examples included in the Zephyr repository. The simplest example is the Blinky example app.
Let's take a look at this example's source code to understand what a typical Zephyr application looks like.
If you take a look at the files in the Blinky example's folder zephyrproject/zephyr/samples/basic/blinky:
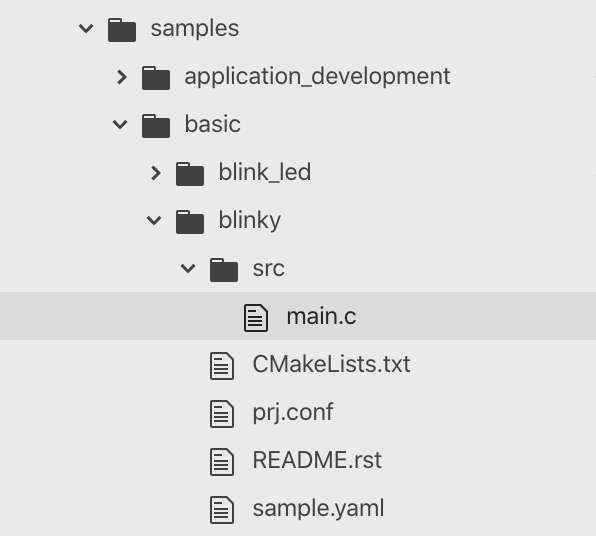
You'll notice the example is very simple with only one source file under the src folder: main.c.
In addition to that, you'll find the following files:
CMakeLists.txt: tells the build system where to find the other application files, and links the application directory with Zephyr’s CMake build system. This link provides features supported by Zephyr’s build system, such as board-specific kernel configuration files, the ability to run and debug compiled binaries on real or emulated hardware, and more.
# SPDX-License-Identifier: Apache-2.0 cmake_minimum_required(VERSION 3.13.1) include($ENV{ZEPHYR_BASE
}/cmake/app/boilerplate.cmake NO_POLICY_SCOPE) project(blinky) target_sources(app PRIVATE src/main.c)prj.conf: specifies application-specific values for one or more kernel configuration options. These application settings are merged with board-specific settings to produce a kernel configuration. This is where you would add the specific Zephyr features and modules that your application needs (e.g. Bluetooth LE support, GPIOs, etc.).
CONFIG_GPIO=yREADME.rst: a readme file that describes the application.
.. _blinky-sample:

Blinky Application
##################

Overview
********
The Blinky example shows how to configure GPIO pins as outputs which can also be
used to drive LEDs on the hardware usually delivered as "User LEDs" on many of
the supported boards in Zephyr.

Requirements
************
The demo assumes that an LED is connected to one of GPIO lines. The
sample code is configured to work on boards that have defined the led0
alias in their board devicetree description file. Doing so will generate
these variables:

- DT_ALIAS_LED0_GPIOS_CONTROLLER
- DT_ALIAS_LED0_GPIOS_PIN

Building and Running
********************
This samples does not output anything to the console. It can be built and
flashed to a board as follows:

.. zephyr-app-commands::
   :zephyr-app: samples/basic/blinky
   :board: reel_board
   :goals: build flash
   :compact:

After flashing the image to the board, the user LED on the board should start to
blink.sample.yaml: used for testing purposes.
sample:
  name: Blinky Sample
tests:
  sample.basic.blinky:
    tags: LED gpio
    filter: dt_compat_enabled_with_alias("gpio-leds", "led0")
    depends_on: gpio
    harness: led
Here's what main.c looks like:
/* * Copyright (c) 2016 Intel Corporation * * SPDX-License-Identifier: Apache-2.0 */
#include <zephyr.h>
#include <device.h>
#include <drivers/gpio.h>
#define LED_PORT    DT_ALIAS_LED0_GPIOS_CONTROLLER
#define LED        DT_ALIAS_LED0_GPIOS_PIN /* 1000 msec = 1 sec */
#define SLEEP_TIME    1000 void main(void) {
    u32_t cnt = 0;
    struct device *dev;
    dev = device_get_binding(LED_PORT);
    /* Set LED pin as output */ gpio_pin_configure(dev, LED, GPIO_DIR_OUT);
    while (1) {
        /* Set pin to HIGH/LOW every 1 second */ gpio_pin_write(dev, LED, cnt % 2);
        cnt++;
        k_sleep(SLEEP_TIME);
    }
}
In main.c, we:
- Included the necessary header files (lines 7-9)
- Defined the LED port and pin (lines 11-12)
The example assumes that an LED is connected to one of the GPIO lines. The sample code is configured to work on boards that have defined the led0 alias in their board devicetree description file. Doing so will generate the variables: DT_ALIAS_LED0_GPIOS_CONTROLLER and DT_ALIAS_LED0_GPIOS_PIN - Defined a sleep period (line 15)
- Implemented the main function which configured the LED pin and toggles the pin every second (lines 17-32)
Building the Blinky Example
Building the example is simple. All you have to do is run the following commands (for macOS and Linux. For Windows, refer to the Zephyr official documentation):
cd ~/zephyrproject/zephyr source zephyr-env.sh west build -p auto -b nrf52840_pca10056 samples/basic/blinkySourcing the zephyr-env.sh shell file is only needed once for each shell session. You could also add it to your shell init file (e.g. ~/.bashrc or ~/.bash_profile) to have it persist across different sessions.
Flashing the Blinky Example
Flashing the example is also simple. Just make sure the target development board is connected to your computer and run the command from the folder where the build folder exists:
west flash
If you have multiple applications and want to flash a specific build, run the following command:
west flash --build-dir path/to/build/directorySerial Output Debugging
For simple debugging by printing messages to the UART, you can use printk() to print out messages to the serial port. The serial port is the default backend for printing messages in Zephyr.
Let's modify our main.c to add a couple of log messages:
/* * Copyright (c) 2016 Intel Corporation * * SPDX-License-Identifier: Apache-2.0 */
#include <zephyr.h>
#include <device.h>
#include <drivers/gpio.h>
#define LED_PORT DT_ALIAS_LED0_GPIOS_CONTROLLER
#define LED DT_ALIAS_LED0_GPIOS_PIN /* 1000 msec = 1 sec */
#define SLEEP_TIME 1000 void main(void) {
u32_t cnt = 0;
struct device *dev;
printk("Configuring the LED port and pin\r\n");
dev = device_get_binding(LED_PORT);
/* Set LED pin as output */ gpio_pin_configure(dev, LED, GPIO_DIR_OUT);
printk("Blinky started\r\n");
while (1) {
/* Set pin to HIGH/LOW every 1 second */ gpio_pin_write(dev, LED, cnt % 2);
cnt++;
k_sleep(SLEEP_TIME);
}
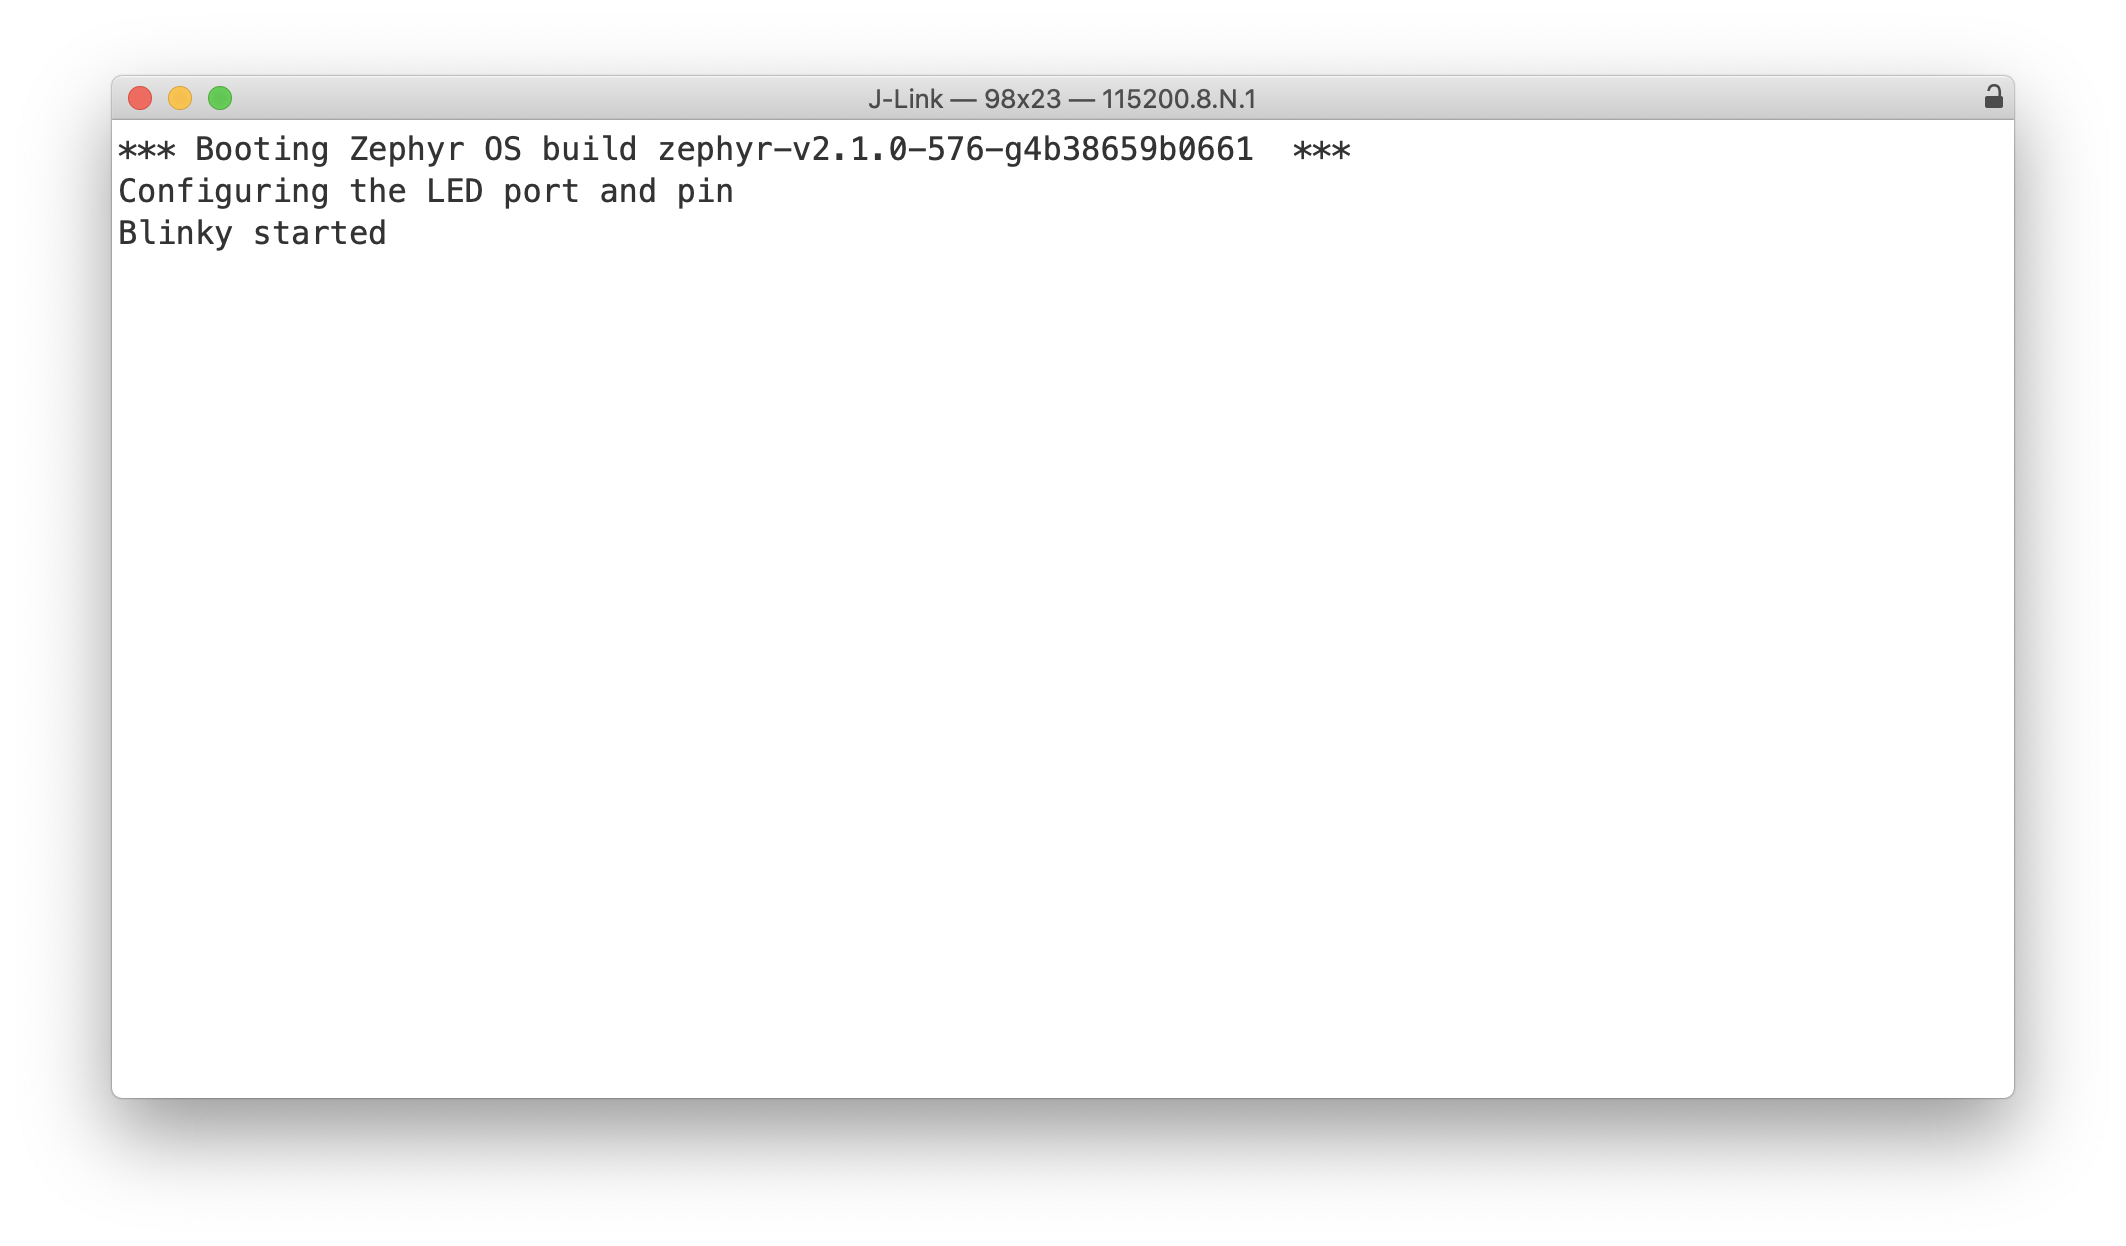
}Lastly, we recompile the application and flash it to the DK.
west build -p auto -b nrf52840_pca10056 west flashNow, we can simply run a serial terminal program, connect it to the J-Link interface and see the log messages:
Next Steps: Implement Custom GATT Services and Characteristics
Naturally, the next step would be to implement our own custom Services and Characteristics for our specific application.
Summary
In this post, we went over:
- An introduction to the Zephyr project
- Setup and installation steps
- Building and flashing an example Zephyr-based application (nRF52840 use case)
- Bluetooth LE development using Zephyr
Zephyr is a really exciting project, and it's gaining a lot of traction. Nordic Semiconductor, for example, has switched to using Zephyr for their latest products (nRF9160 and nRF5340), and I wouldn't be surprised if other vendors followed suit.
I believe it has the potential to become a dominant RTOS in the world of IoT device development. Imagine in a few years if Zephyr was used officially supported on most chipsets in the market (kind of like the embedded Linux for microcontroller-based systems)!
This means you could learn this new development platform and then apply that knowledge across many projects. I can't imagine a better time to start learning Zephyr than now!


