

You're probably aware that adding Bluetooth Low Energy (BLE) to your device is one of the best ways to achieve a great user experience for your IoT device.

Intro to Bluetooth Low Energy
Get the key concepts every developer needs before diving into Bluetooth LE development.
No spam. Unsubscribe with one click.
Why is that, you may ask?
Well, adding BLE allows your device to be connectable from a smartphone app. And we can all agree that smartphone apps have become very familiar to end-users and are very user-friendly.
However, designing BLE devices can be a confusing process!
You're probably thinking:
"Where do I even start?"
The one thing I wish I had when I started developing for BLE is more resources that walk you step-by-step on how to tackle the different phases of the system design and implementation.
The Bluetooth GATT (Generic Attribute Profile) is the foundation for the design of any BLE system and defines the way two BLE devices interact with each other.
Keep in mind that GATT is used exclusively after a connection has been established between the two devices, and not during the advertising/scanning states.
The Bluetooth SIG defines quite a few standard Profiles, Services, and Characteristics. However, many times you will find that none of these satisfies the use case you’re designing.
That’s where custom profiles, services, and characteristics come in.
Reader João Neves sent in a question asking about implementing a BLE MIDI controller:
I'm trying to be able to send MIDI over Bluetooth... I'm trying to advertise that device as a BLE MIDI controller...
There's not a lot of info on internet for this subject and I can't find any for the nRF52 DK.
In today’s tutorial, I’ll be covering a detailed step-by-step guide on how to design your custom GATT to satisfy your product’s requirements and go through a complete design and simplistic implementation of a MIDI device using the nRF52 platform.
Before explaining what services and characteristics are, we first need to cover two very important concepts: the Generic Attribute Profile (GATT) and the Attribute Protocol (ATT).
GATT stands for Generic Attribute Profile. To understand what GATT is, we first need to understand the underlying framework for GATT: the Attribute Protocol (ATT). The GATT only comes into play after a connection has been established between two BLE devices.
Attribute Protocol (ATT)
ATT defines how a server exposes its data to a client and how this data is structured. There are two roles within the ATT:
- Server:
This is the device that exposes the data it controls or contains, and possibly some other aspects of server behavior that other devices may be able to control. It is the device that accepts incoming commands from a peer device and sends responses, notifications, and indications.
For example, a thermometer device will behave as a server when it exposes the temperature of its surrounding environment, the unit of measurement, its battery level, and possibly the time intervals at which the thermometer reads and records the temperature. It can also notify the client (defined later) when a temperature reading has changed rather than have the client poll for the data waiting for a change to occur. - Client:
This is the device that interfaces with the server with the purpose of reading the server’s exposed data and/or controlling the server’s behavior. It is the device that sends commands and requests and accepts incoming notifications and indications. In the previous example, a mobile device that connects to the thermometer and reads its temperature value is acting in the Client role.
The data that the server exposes is structured as attributes. An attribute is the generic term for any type of data exposed by the server and defines the structure of this data. For example, services and characteristics (both described later) are types of attributes. Attributes are made up of the following:
- Attribute type (Universally Unique Identifier or UUID)
This is a 16-bit number (in the case of Bluetooth SIG-Adopted Attributes), or 128-bit number (in the case of custom attribute types defined by the developer, also sometimes referred to as vendor-specific UUIDs). For example, the UUID for a SIG-adopted temperature measurement attribute value is 0x2A1C. SIG-adopted attribute types (UUIDs) share all but 16 bits of a special 128-bit base UUID:00000000-0000-1000-8000-00805F9B34FB.
The published 16-bit UUID attribute values replace the 2 bytes in bold in the base UUID. A custom UUID, on the other hand, can be any 128-bit number that does not use the SIG-adopted base UUID. For example, a developer can define their own attribute type (UUID) for a temperature reading as: F5A1287E-227D-4C9E-AD2C-11D0FD6ED640.
One benefit of using a SIG-adopted UUID is the reduced packet size since it can be transmitted as the 16-bit representation instead of the full 128-bit value. - Attribute Handle
This is a 16-bit value that the server assigns to each of its attributes — think of it as an address. This value is used by the client to reference a specific attribute and is guaranteed by the server to uniquely identify the attribute during the life of the connection between two devices. The range of handles is 0x0001-0xFFFF, where the value of 0x0000 is reserved. - Attribute Permissions
Permissions determine whether an attribute can be read or written to, whether it can be notified or indicated, and what security levels are required for each of these operations. These permissions are not defined or discovered via the Attribute Protocol (ATT) but rather defined at a higher layer (GATT layer or Application layer).
The following figure shows a logical representation of an Attribute:

The Generic Attribute Profile (GATT)
Now that we’ve covered the concept of attributes, we’ll go over three important concepts in BLE that you will come across very often:
- Services
- Characteristics
- Profiles
These concepts are used specifically to allow hierarchy in the structuring of the data exposed by the Server. Services and characteristics are types of attributes that serve a specific purpose. Characteristics are the lowest level attribute within a database of attributes. Profiles are a bit different and are not discovered on a server — we will explain them later below.
GATT defines the format of services and their characteristics, and the procedures that are used to interface with these attributes such as service discovery, characteristic reads, characteristic writes, notifications, and indications.
GATT takes on the same roles as the Attribute Protocol (ATT). The roles are not set per device — rather they are determined per transaction (such as request-response, indication-confirmation, and notification).
So, in this sense, a device can act as a server serving up data for clients, and at the same time act as a client reading data served up by other servers (all during the same connection).
BLE Services and Characteristics
Services
A service is a grouping of one or more attributes, some of which are characteristics. It’s meant to group together related attributes that satisfy a specific functionality on the server. For example, the SIG-adopted Battery Service contains one characteristic called the Battery Level. Other types of services are the Device Information Service, Environment Sensing Service, and Power Management Service.
A service also contains other attributes (non-characteristics) that help structure the data within a service (such as service declarations, characteristic declarations, and others).
Here’s what a service looks like:
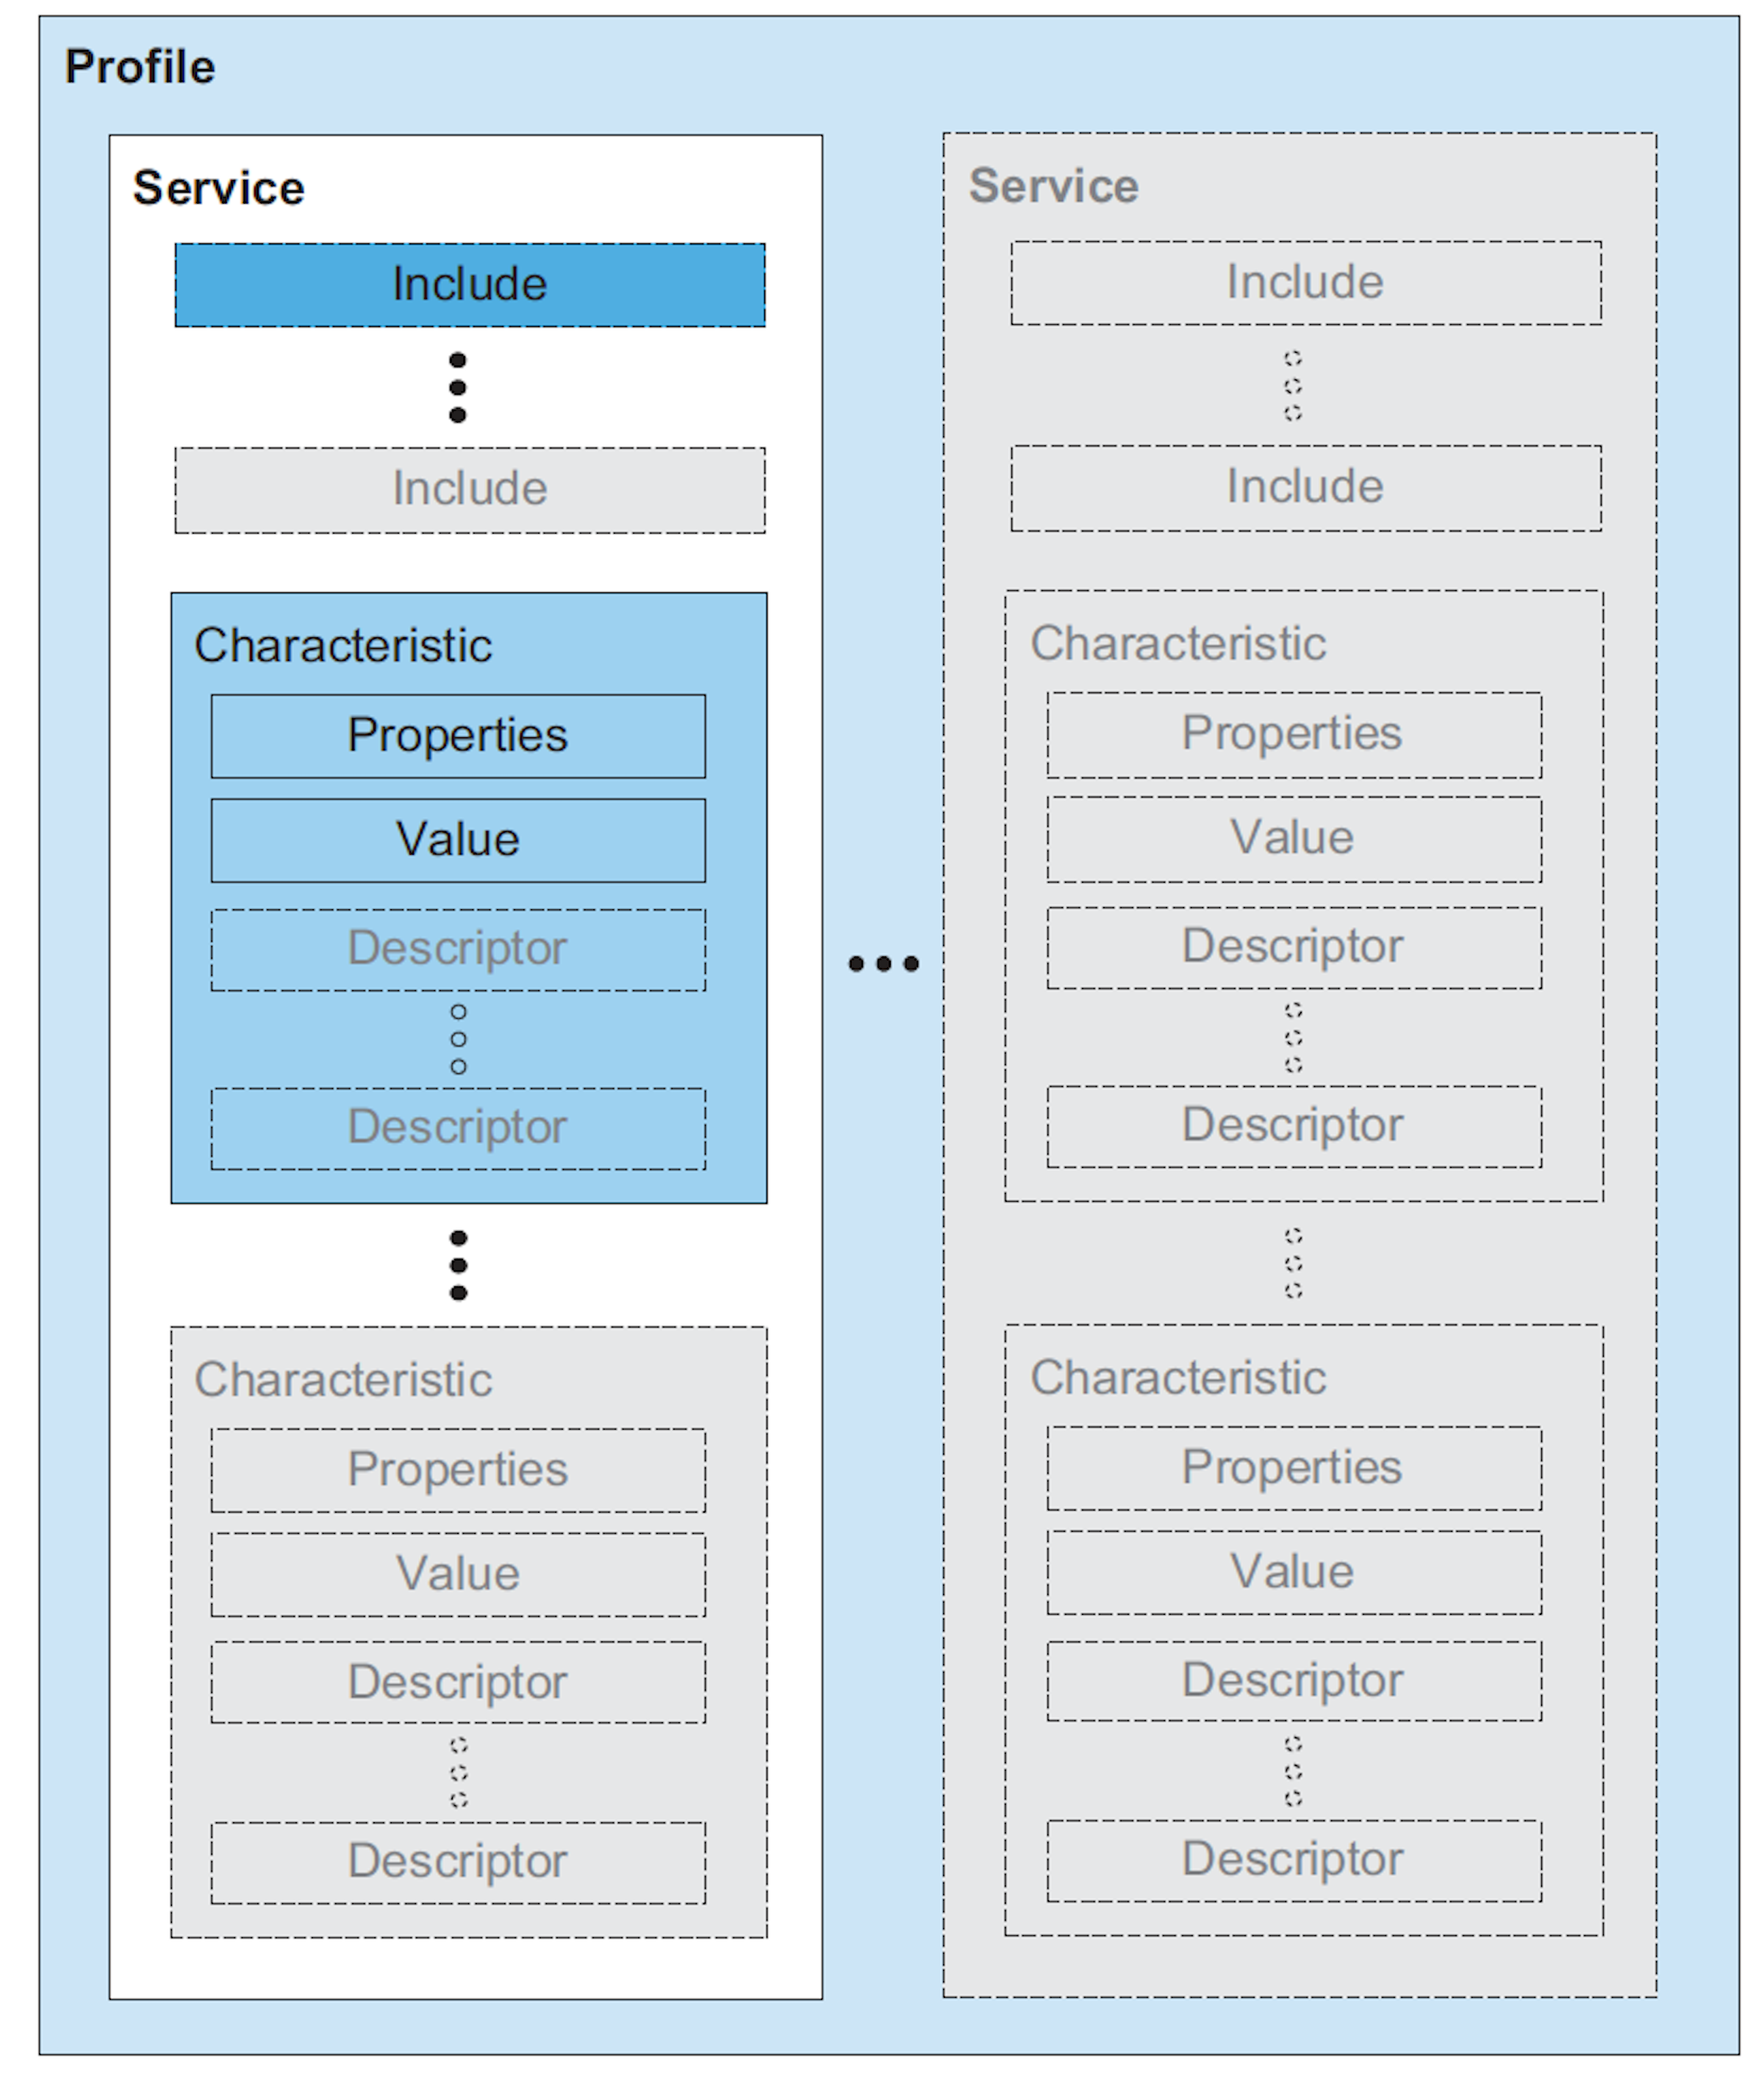
From the figure, we can see the different attributes a service is made up of:
- One or more include services
- One or more characteristics
- Characteristic properties
- A characteristic value
- Zero or more characteristic descriptors
An included service allows a service to refer to other services for purposes such as extending the included service. However, they are barely used in practice.
There are two types of services:
- Primary Service: represents the primary functionality of a device.
- Secondary Service: provides the auxiliary functionality of a BLE device and is referenced (included) by at least one other primary service on the device (it is rarely used and won't be discussed here).
Characteristics
A characteristic is always part of a service and it represents a piece of information/data that a server wants to expose to a client. For example, the battery level characteristic represents the remaining power level of a battery in a BLE device that can be read by a client. The characteristic contains other attributes that help define the value it holds:
- Properties: represented by a number of bits and which define how characteristic values can be used. Some examples include: read, write, write without response, notify, and indicate.
- Descriptors: used to contain related information about the characteristic value type. Some examples include: extended properties, user description, fields used for subscribing to notifications and indications, and a field that defines the presentation of the value such as the format and the unit of the value.
Understanding these concepts is important, however, as an application developer, you’ll probably interface with APIs provided by the chipset or mobile operating system SDK that abstract out many of these concepts.
For example, you may have an API for enabling notifications on a certain characteristic that you can simply call (you don’t necessarily need to know that the stack ends up writing a value of 0x0001 to the characteristic’s Client Characteristic Configuration Descriptor (CCCD) on a server to enable notifications).
It’s important to keep in mind that while there are no restrictions or limitations on the characteristics contained within a service; services are meant to group together related characteristics that define a specific functionality within a BLE device.
For example, even though it’s technically possible — it does not make sense to create a service called the humidity service that includes both a humidity characteristic and a temperature characteristic. Instead, it would make more sense to have two separate services specific to each of these two distinct functionalities (temperature reading, and humidity reading).
It’s worth mentioning that the SIG has adopted quite a few services and characteristics that satisfy a good number of common use cases. For these adopted services, specification documents exist to help developers implement them along with ensuring conformance and interoperability with this service.
If a BLE device claims conformance to a service, it must be implemented according to the service specification published by the Bluetooth SIG. This is essential if you want to develop a device that is guaranteed to be connectable with third-party devices from other vendors. The SIG-adopted services make the connection specification “pre-negotiated” between different vendors.
You can find the list of adopted services and characteristics here and their respective specifications here.
Profiles
Profiles are much broader in definition than services. They are concerned with defining the behavior of both the client and server when it comes to services, characteristics, and even connections and security requirements. Services and their specifications, on the other hand, deal with the implementation of these services and characteristics on the server side only.
Just like in the case of services, there are also SIG-adopted profiles that have published specifications. In a profile specification, you will generally find the following:
- Definition of roles and the relationship between the GATT server and the client.
- Required Services.
- Service requirements.
- How the required services and characteristics are used.
- Details of BLE connection establishment requirements including advertising and connection parameters.
- Security considerations.
Following is an example of a diagram taken from the Blood Pressure Profile specification document. It shows the relationship between the roles (server, client), services, and characteristics within the profile.
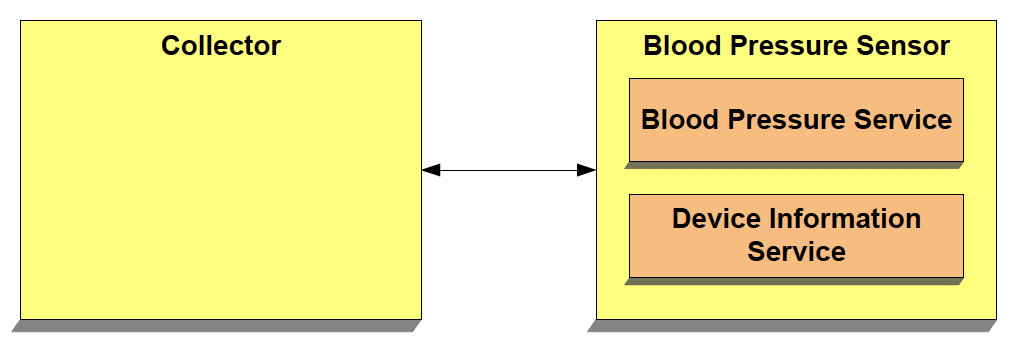
The roles are represented by the yellow boxes, whereas the services are represented by the orange boxes. You can find the list of SIG-adopted profiles here.
Intro to Bluetooth Low Energy
Get the key concepts every developer needs before diving into Bluetooth LE development.
No spam. Unsubscribe with one click.
Example GATT
Let’s look at an example of a GATT implementation. For this example, we’ll look at an example GATT.xml file that’s used by the Silicon Labs Bluetooth Low Energy development framework (BGLib).
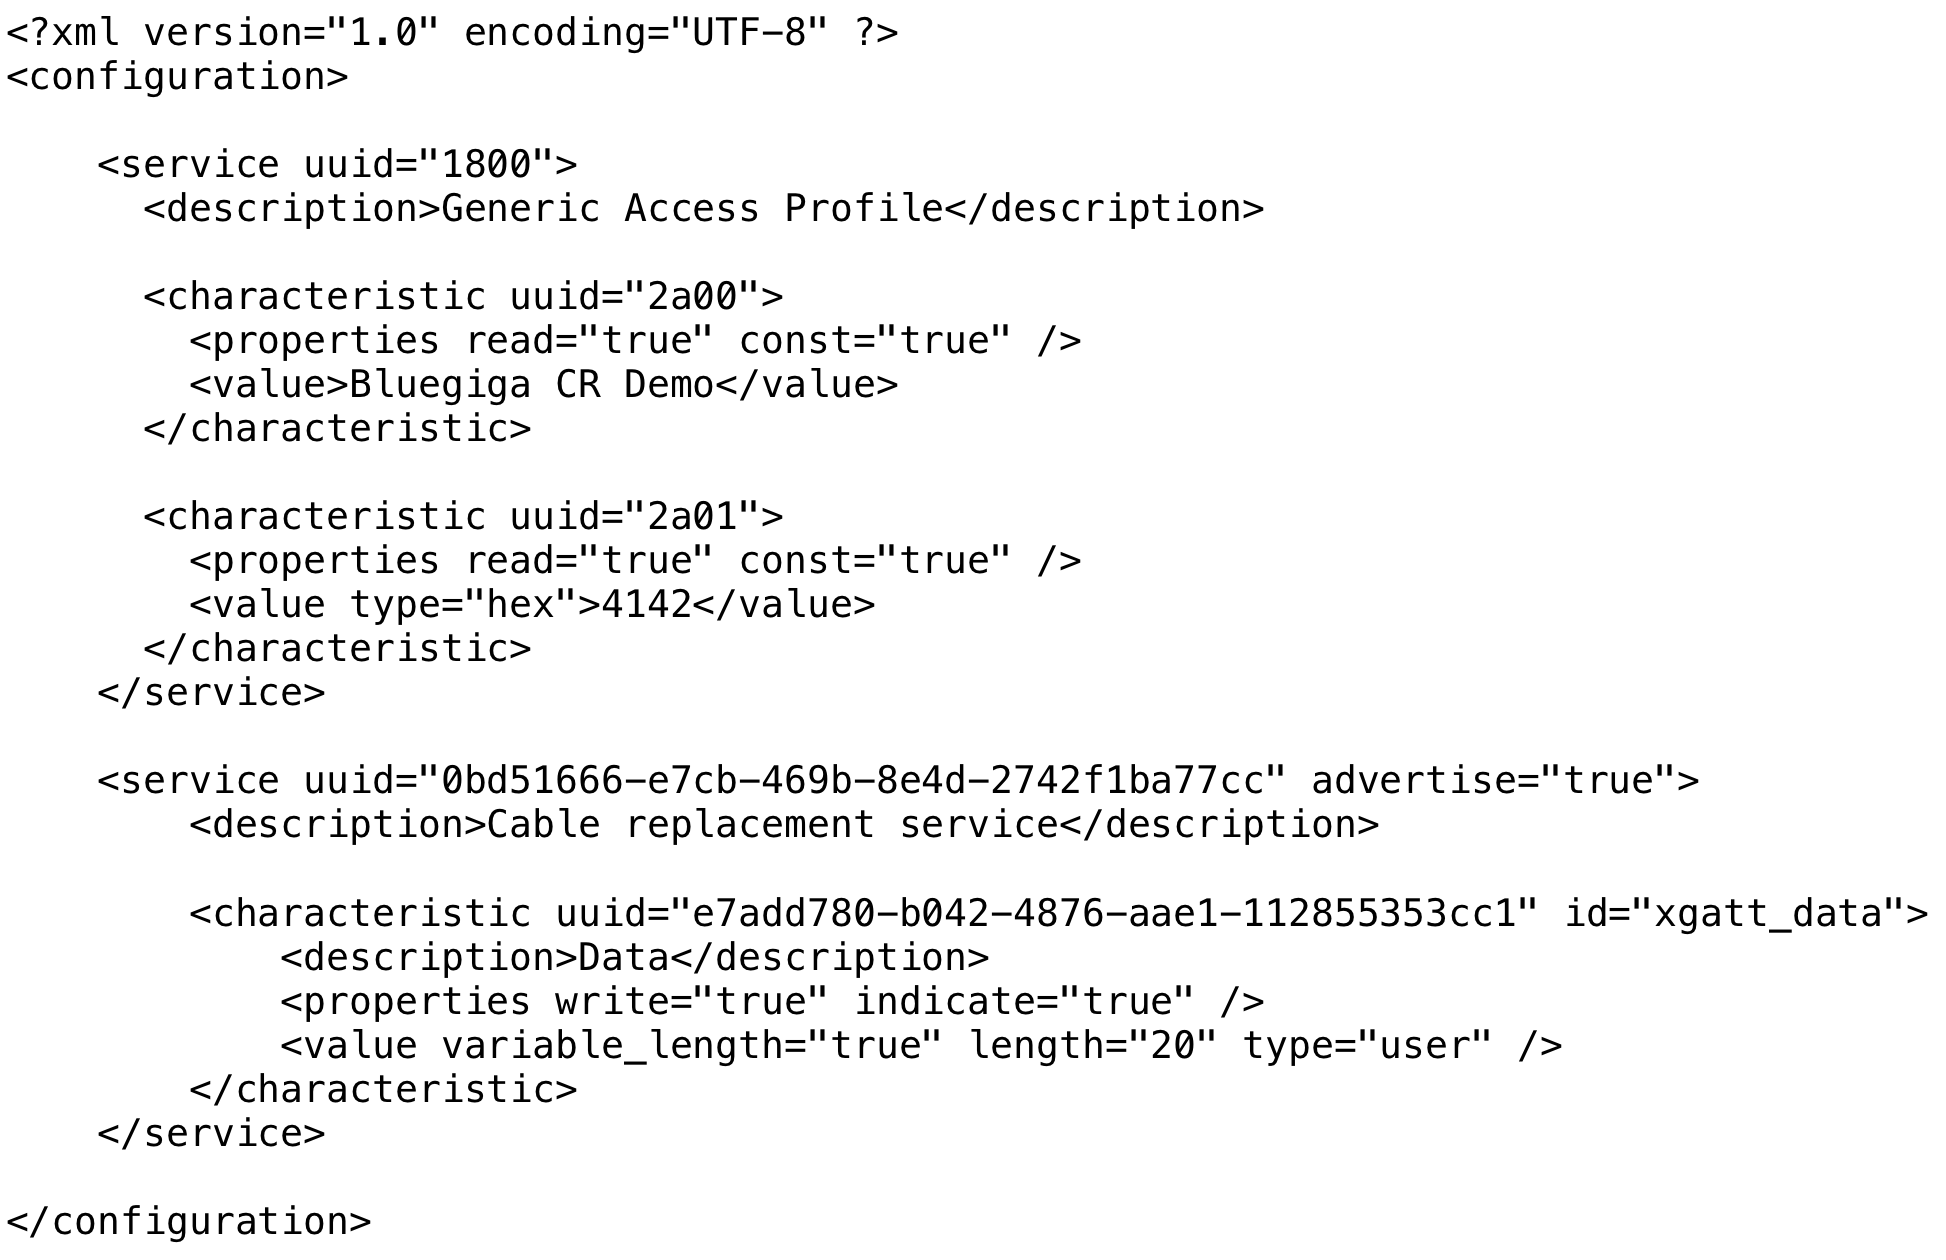
In this XML, you’ll notice the following:
- There are two services defined:
- Generic Access Profile (GAP) service with UUID: 0x1800 (SIG-adopted service).
- Cable Replacement service with UUID: 0bd51666-e7cb-469b-8e4d-2742f1ba77cc (a custom or vendor-specific service).
- The Generic Access service is mandatory per the spec, and it includes the following mandatory characteristics:
- Name with UUID 0x2a00 and value: Bluegiga CR Demo.
- Appearance with UUID 0x2a01 and value 0x4142.
Note: the creation and inclusion of this Service are usually handled by the chipset’s SDK, and usually APIs are provided to simply set the Name and Appearance values.
- The Cable Replacement service has one characteristic named data
- The data characteristic has a UUID: e7add780-b042-4876-aae1-112855353cc1
- It has both writes and indications enabled.
GATT Design Guidelines
While GATT is a pretty flexible framework, there are a few general guidelines to follow when designing it and creating the services and characteristics within it. Following are some recommendations:
- Make sure to implement the following mandatory service and its characteristics:
- Generic Access Profile (GAP) service.
- Name and Appearance characteristics within the GAP service.
- One thing to keep in mind is that vendor SDKs usually do not require you to explicitly implement this service, but rather they provide APIs for setting the name and appearance. The SDK then handles creating the GAP service and setting the characteristics according to the user-provided values.
- Utilize the Bluetooth SIG-adopted profiles, services, and characteristics in your design whenever possible. This has the following benefits:
- You get the benefit of reducing the size of data packets involving UUIDs for services and characteristics (including advertisement packets, discovery procedures, and others) — since 16-bit UUID values are used instead of 128-bit values.
- Bluetooth chipset and module vendors usually provide implementations of these profiles, services, and characteristics in their SDKs — reducing development time considerably.
- Interoperability with other third-party devices and applications, allowing more devices to interface with your BLE device and provide a richer user experience.
- Group characteristics that serve related functionality within a single service.
- Avoid having services with too many characteristics. A good separation of services makes it faster to discover certain characteristics and leads to a better GATT design that’s modular and user-friendly.
Step 1: Document the different user scenarios and data points
Even though the GATT is usually more focused on the peripheral role (since a peripheral is usually the server exposing the data), the central can still act as the server in some cases for specific data points it needs to expose. Also, if you're designing both ends (central and peripheral), it helps to think in terms of what needs to happen from each side since this could affect some aspects of the system and GATT design.
In this step, you’ll think about your system from a high level in terms of data elements that need to be exposed on the Server device. It helps to not think too much about the technical aspects of BLE.
Instead, focus on the following:
- Defining the data elements that the server needs to expose to the Client.
- Defining whether each of these elements will be available for: Read, Write, and Notifications of value changes back to the Client.
- Thinking about eliminating any redundant data elements. This is important for two reasons:
- It reduces the amount of data being transferred, which in turn reduces power consumption.
- It makes the design simpler and easier to understand and update later on.
- Grouping the data elements into a meaningful number of groups based on related functionality. This encourages clarity in design and also helps others (within your team or outside) understand your design. It also helps in making maintenance and future updates easier.
Step 2: Define the services, characteristics, and access permissions
The next step is to group the characteristics into meaningful groups (services) based on their functionalities and define the access permissions for each of these characteristics.
Step 3: Re-use Bluetooth SIG-adopted services & characteristics
Take a look at the data elements and data groups you brainstormed in the previous step. Now refer to the standard Services and Characteristics and see which ones match the data elements you came up with within the design. This is not mandatory per the Bluetooth spec since users are given the freedom to create custom Services and Characteristics. However, there are two benefits to this approach:
- Allowing your BLE device to be interoperable with other devices.
- Vendors usually provide many examples that utilize the standard Services and Characteristics, which makes your development work easier.
Step 4: Assign UUIDs to Custom Services and Characteristics
For any custom services and characteristics within the GATT, we can use an online tool to generate UUIDs such as the Online GUID Generator.
A common practice is to choose a base UUID for the custom service and then increment the 3rd and 4th Most Significant Bytes (MSB) within the UUID of each included characteristic.
For example, we could choose the UUID:
00000001-1000-2000-3000-111122223333
for a specific service and then
0000000[N]-1000-2000-3000-111122223333, (where N > 1) for each of its characteristics.
So, in this case, the service and its characteristics' UUIDs would look something like this:
Service A: 00000001-1000-2000-3000-111122223333
|---- Characteristic 1: 00000002-1000-2000-3000-111122223333
|---- Characteristic 2: 00000003-1000-2000-3000-111122223333
|....
|---- Characteristic n: 0000000[n-1]-1000-2000-3000-111122223333
The only restriction for choosing UUIDs for custom BLE services and characteristics is that they must not collide with the Bluetooth SIG base UUID:
XXXXXXXX-0000-1000-8000-00805F9B34FB
You could also randomly choose a unique UUID for each element (including services and characteristics). However, following the previously mentioned common practice makes it a bit easier to relate services and their characteristics to one another.
For a step-by-step guide on how to do to choose a single UUID, refer to my blog post: How do I choose a UUID for my custom services and characteristics?
Step 5: Implement your GATT using the framework and APIs provided by the BLE solution vendor
The solutions provided by the different vendors vary widely, so this step will be specific to the BLE module and development framework that you end up choosing. I'll be using the nRF52 APIs in the next section which goes over a full design and implementation example.
Example using nRF52 Development Kit [MIDI device use case]
Let's take a look at the definitions for services and characteristics within the MIDI BLE Specification (found here: BLE MIDI Specification):
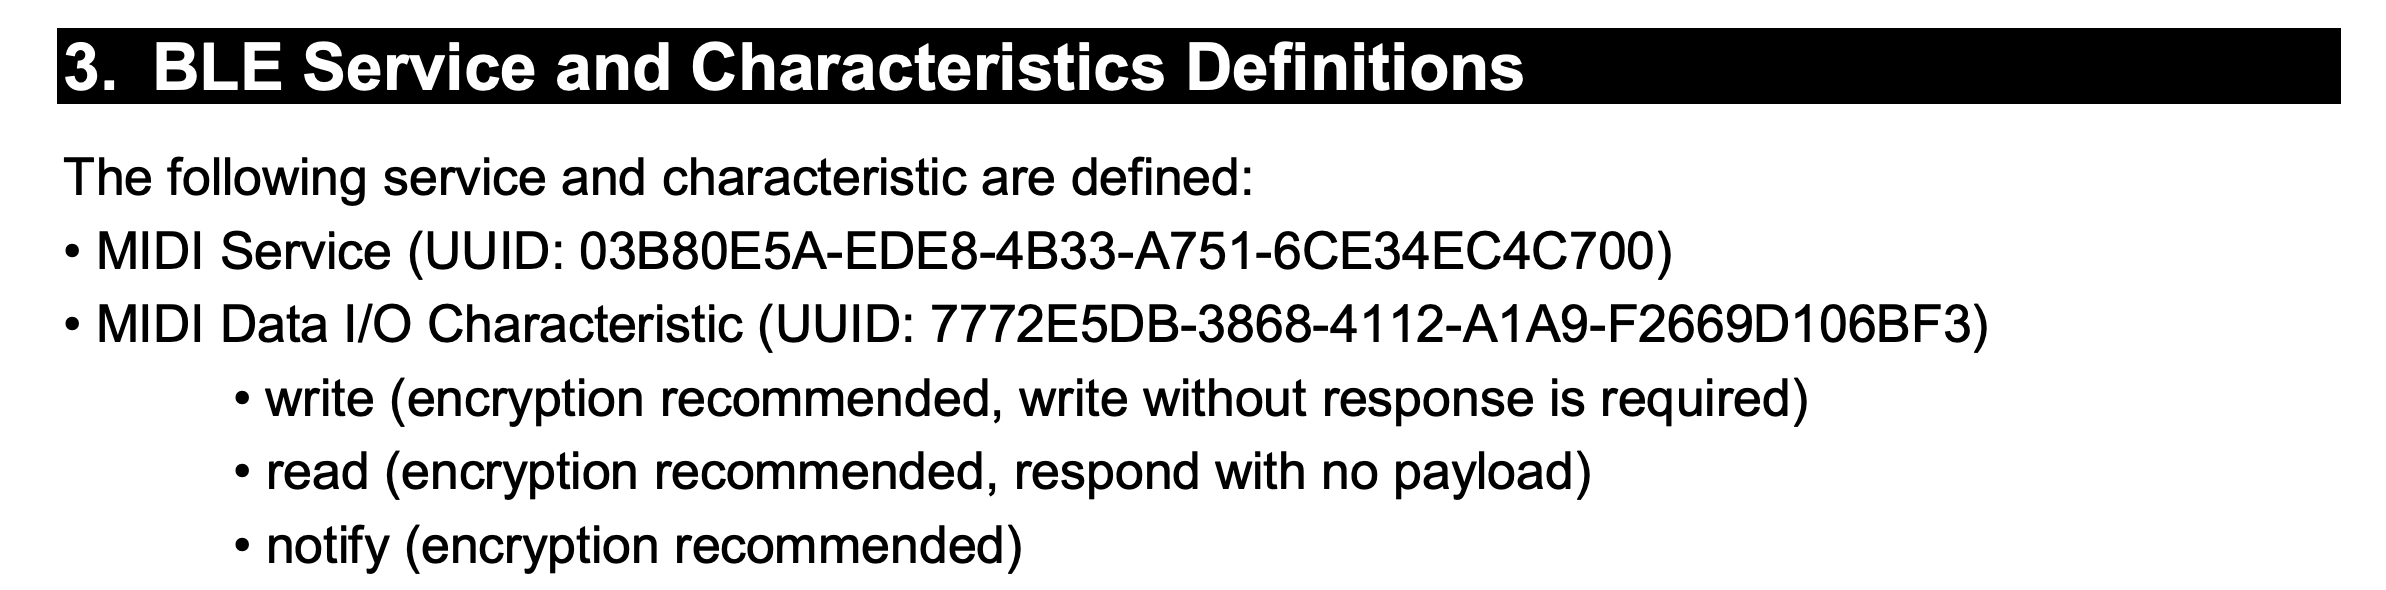
We notice that there is one service and one characteristic defined:
- MIDI Service (UUID: 03B80E5A-EDE8-4B33-A751-6CE34EC4C700)
- MIDI Data I/O Characteristic (UUID: 7772E5DB-3868-4112-A1A9-F2669D106BF3)
- write (encryption recommended, write without response is required)
- read (encryption recommended, respond with no payload)
- notify (encryption recommended)
- MIDI Data I/O Characteristic (UUID: 7772E5DB-3868-4112-A1A9-F2669D106BF3)
Since the services and characteristics for a standardized MIDI device are already defined, we can simply skip all the steps except for step #5 where we implement it for the nRF52 development kit.
Then, upon successful implementation, you will be able to scan for the device, connect it, discover its Services and Characteristics, and verify that the GATT structure matches the MIDI spec.
Before you follow along with the implementation, make sure you have:
- An nRF52840 development kit (the nRF52832 could be used instead, but the companion source code will have to be modified to be compatible with this chipset. Alternatively, you could follow the steps and modify the project example for the nRF52832 chipset).
- The development environment set up and ready to interface with the development kit.
The steps we will go through:
- Use the ble_app_template example provided in the nRF52 SDK (version 15.0.0 or the latest 17.1.0).
- Open the project in Segger Embedded Studio and add the necessary files to the project.
- Modify the example to add the MIDI Service and Characteristic (according to the spec).
- Compile the code and flash it to the nRF52840 development kit.
- Scan for the device via a Client emulator app such as the Nordic nRF Connect App (iOS, Android, or desktop).
- Connect to the device and discover the Services and Characteristics.
- Verify that the GATT matches the MIDI spec.
Let’s get started!
Step 1: Setup
If you haven’t already done so, you will want to follow the tutorial step-by-step to get your development and debugging environment set up:
The complete cross-platform nRF development tutorial
Note: You can use SDK version 15.0.0 or the latest 17.1.0 version to run this example.
Step 2: Project Setup
Once you have SES (Segger Embedded Studio) installed, open the example project located at <nRF SDK>/examples/ble_peripheral/ble_app_template.
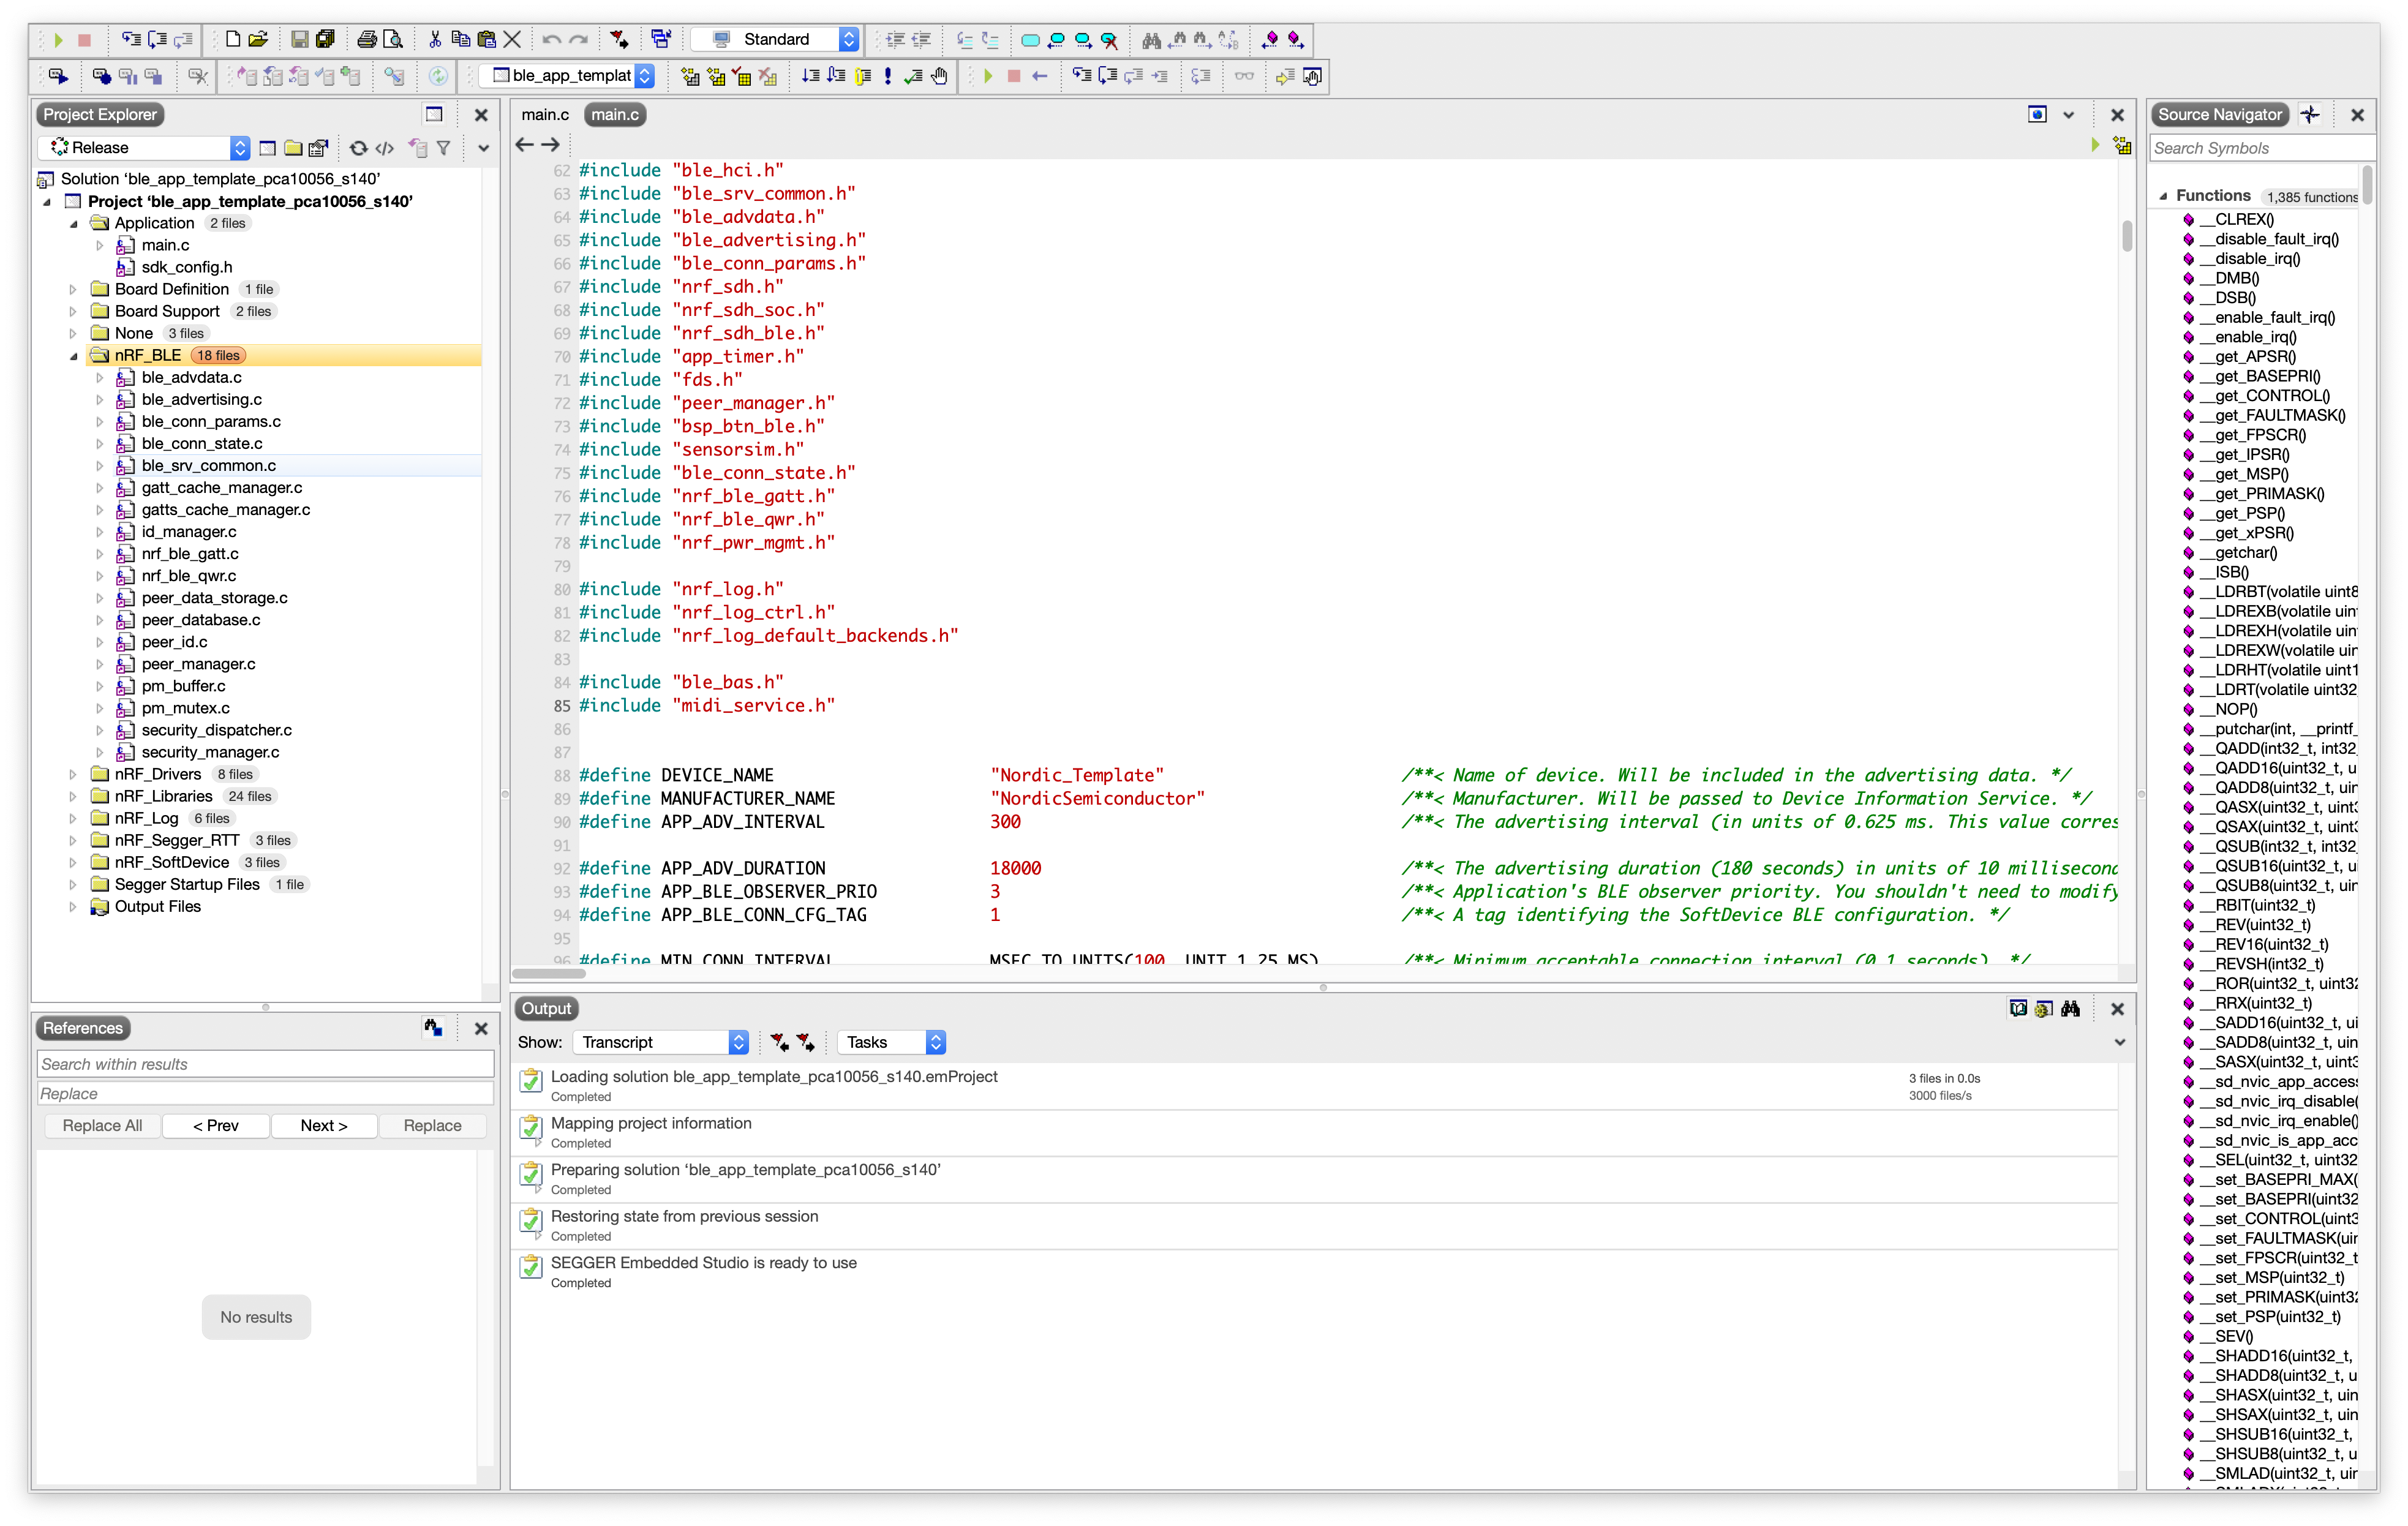
Now that you have the project open, we'll take the following steps:
- Enable Debug messages to show up in the debug terminal (using the Segger RTT backend).
- Modify the vendor-specific UUID count to 2 (one for the MIDI service, and one for the MIDI Data I/O characteristic).
- Add the
midi_service.handmidi_service.cfiles to the project under the Application folder. - Make any necessary changes to the section placement macros in the project.
Let's go through each of these steps.
- Enable Debug messages to show up in the debug terminal (using the Segger RTT backend).
First, right-click on thesdk_config.hfile under the Applications folder, and click on CMSIS Configuration Wizard.
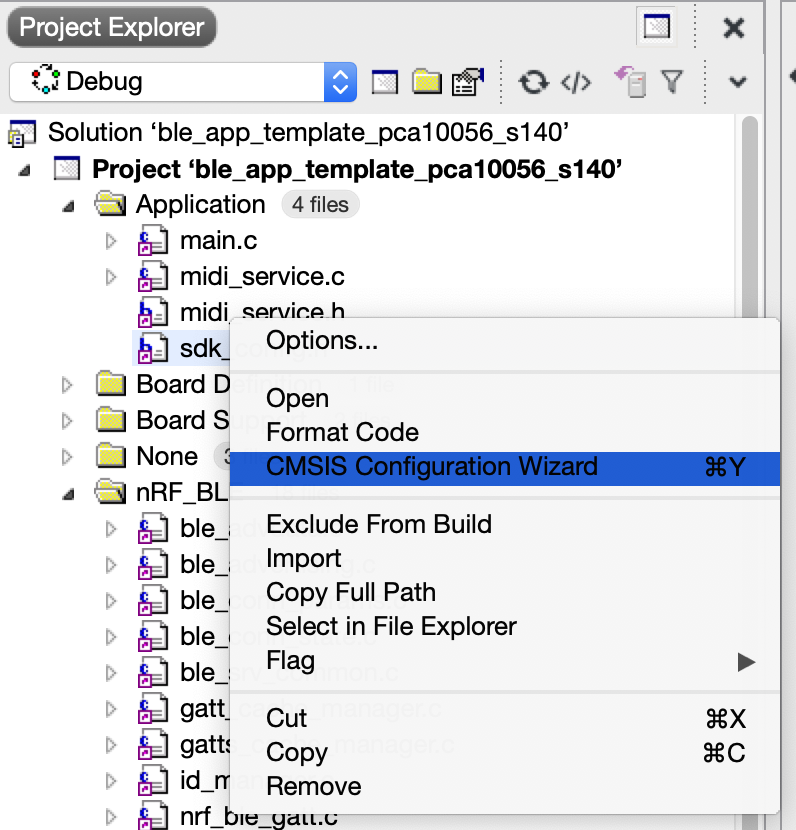
Navigate to nRF_Log --> NRF_LOG_BACKEND_RTT_ENABLED and make sure it is checked [✓].
Make sure you hit the save button (File icon).
- Modify the vendor-specific UUID count to 2 (one for the MIDI service, and one for the MIDI Data I/O characteristic).
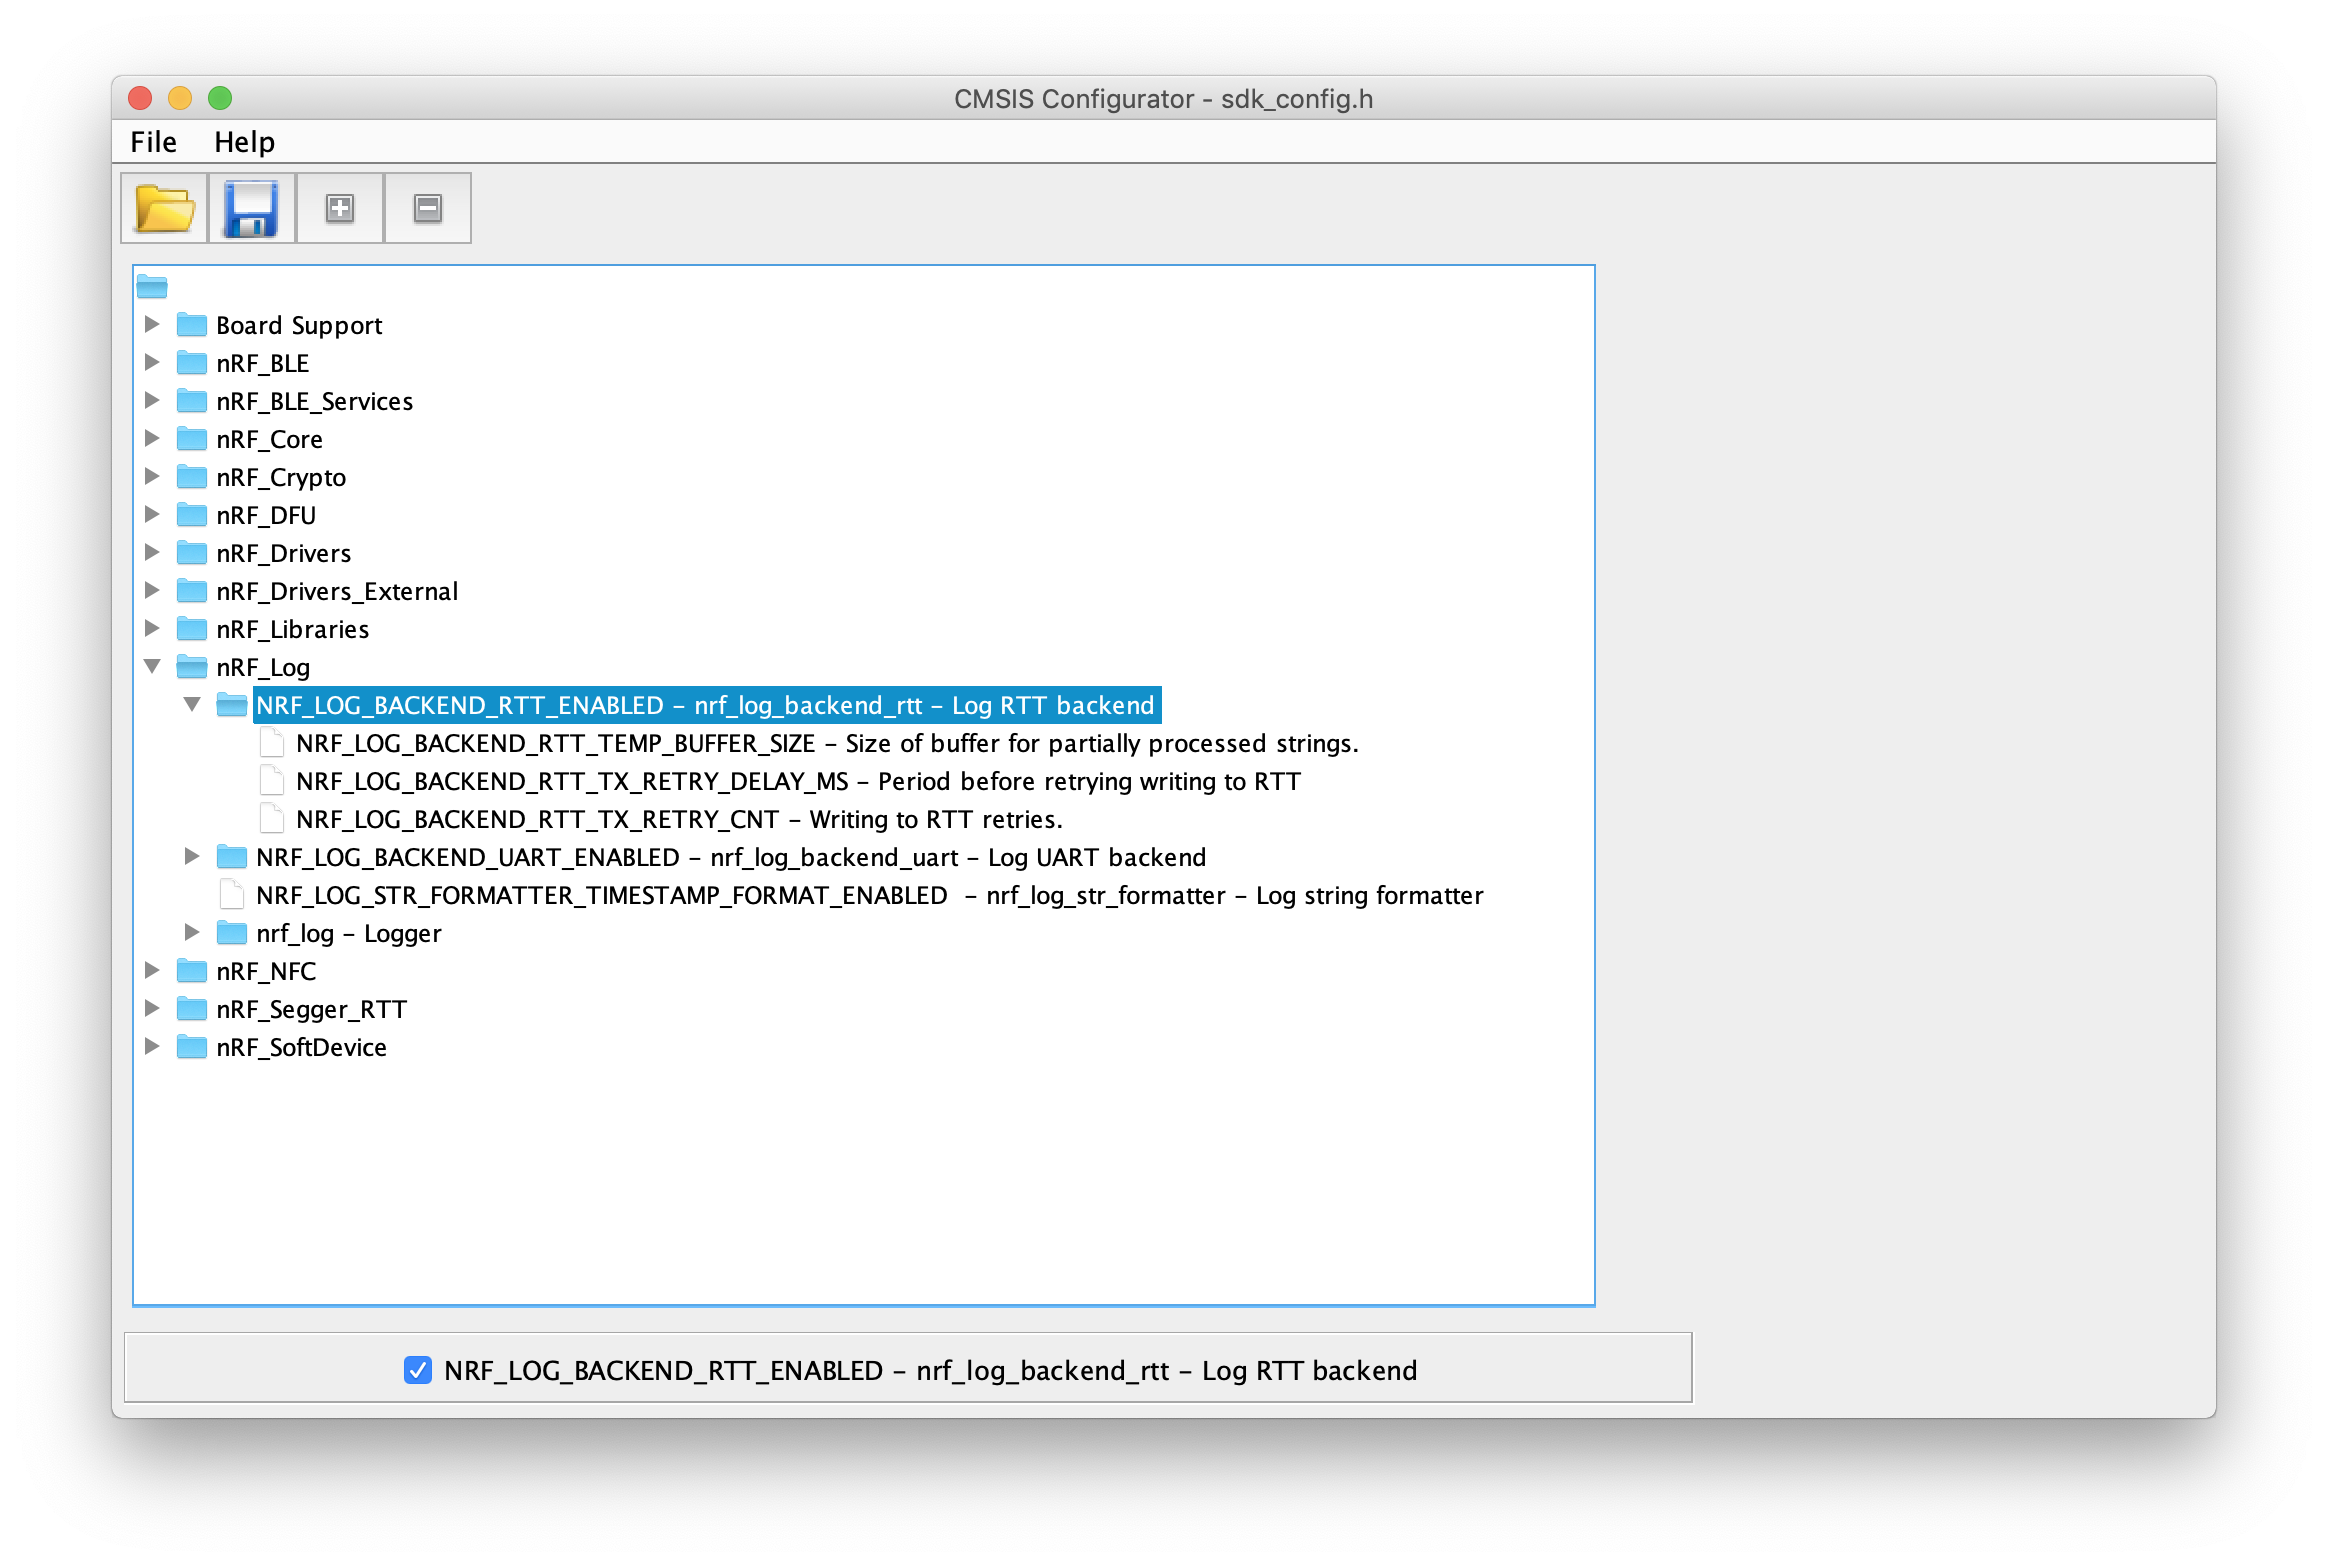
- Right-click on the sdk_config.h file under the Applications folder, and click on CMSIS Configuration Wizard.
- Navigate to nRF_SoftDevice --> NRF_SDH_BLE_ENABLED --> BLE Stack configuration --> NRF_SDH_BLE_VS_UUID_COUNT, and make sure it is set to 2.
- Make sure you hit the save button (File icon).
- Add the midi_service.h and midi_service.c files to the project under the Application folder.
Right-click on the Applications folder, then click "Add New File..."

Choose C File (.c) and type midi_service in the Name field. Also, make sure the location is appropriate (I suggest putting it in the root folder of the project).
Repeat the same steps for midi_service.h (but choose Header File (.h) instead).
- Make any necessary changes to the section placement macros in the project.
- To make sure the section placement macros values are set correctly, compile and flash the project (in Debug mode) to the development kit.
- If the macros need adjusting, a debug message will be displayed prompting you to use different values:
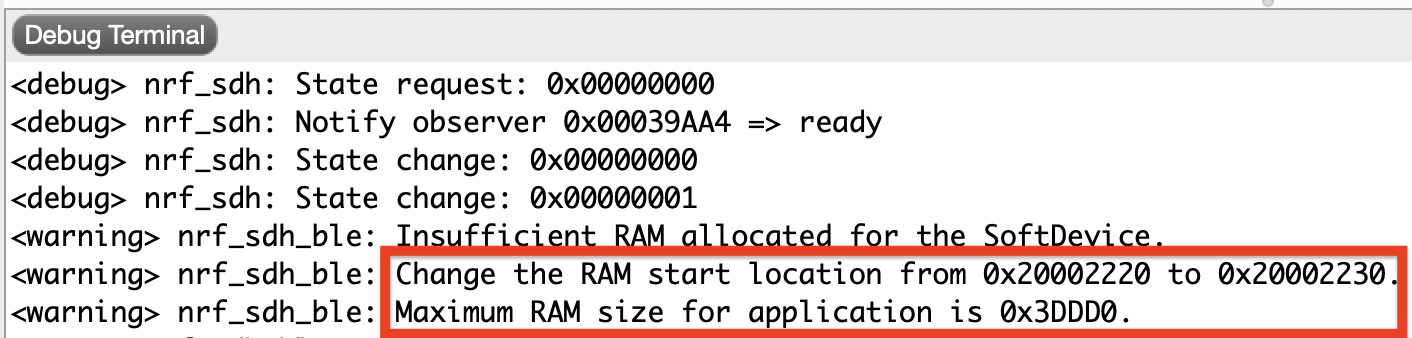
If you get the debug message, copy the values for the RAM start location and Maximum RAM size and adjust the macros accordingly.
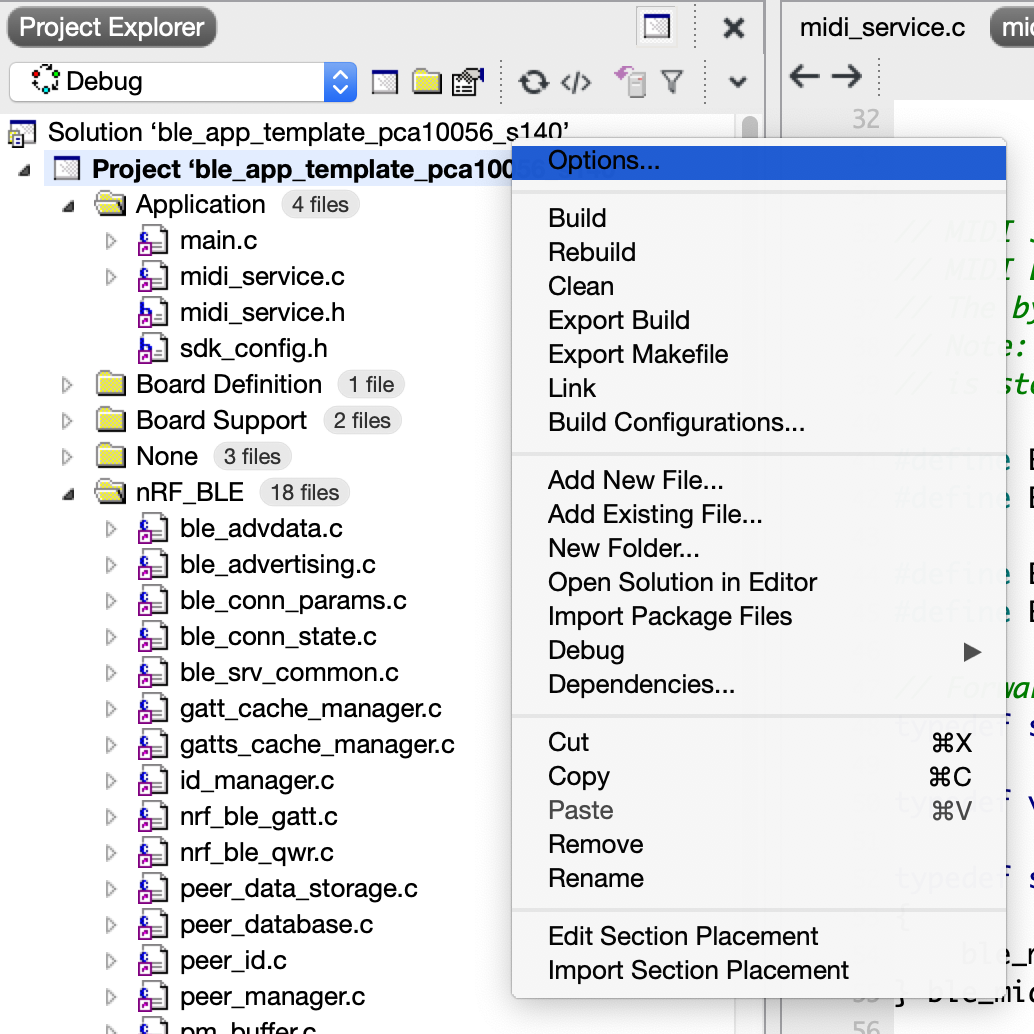
You can do so by right-clicking on the Project (not Solution), then clicking on Options:
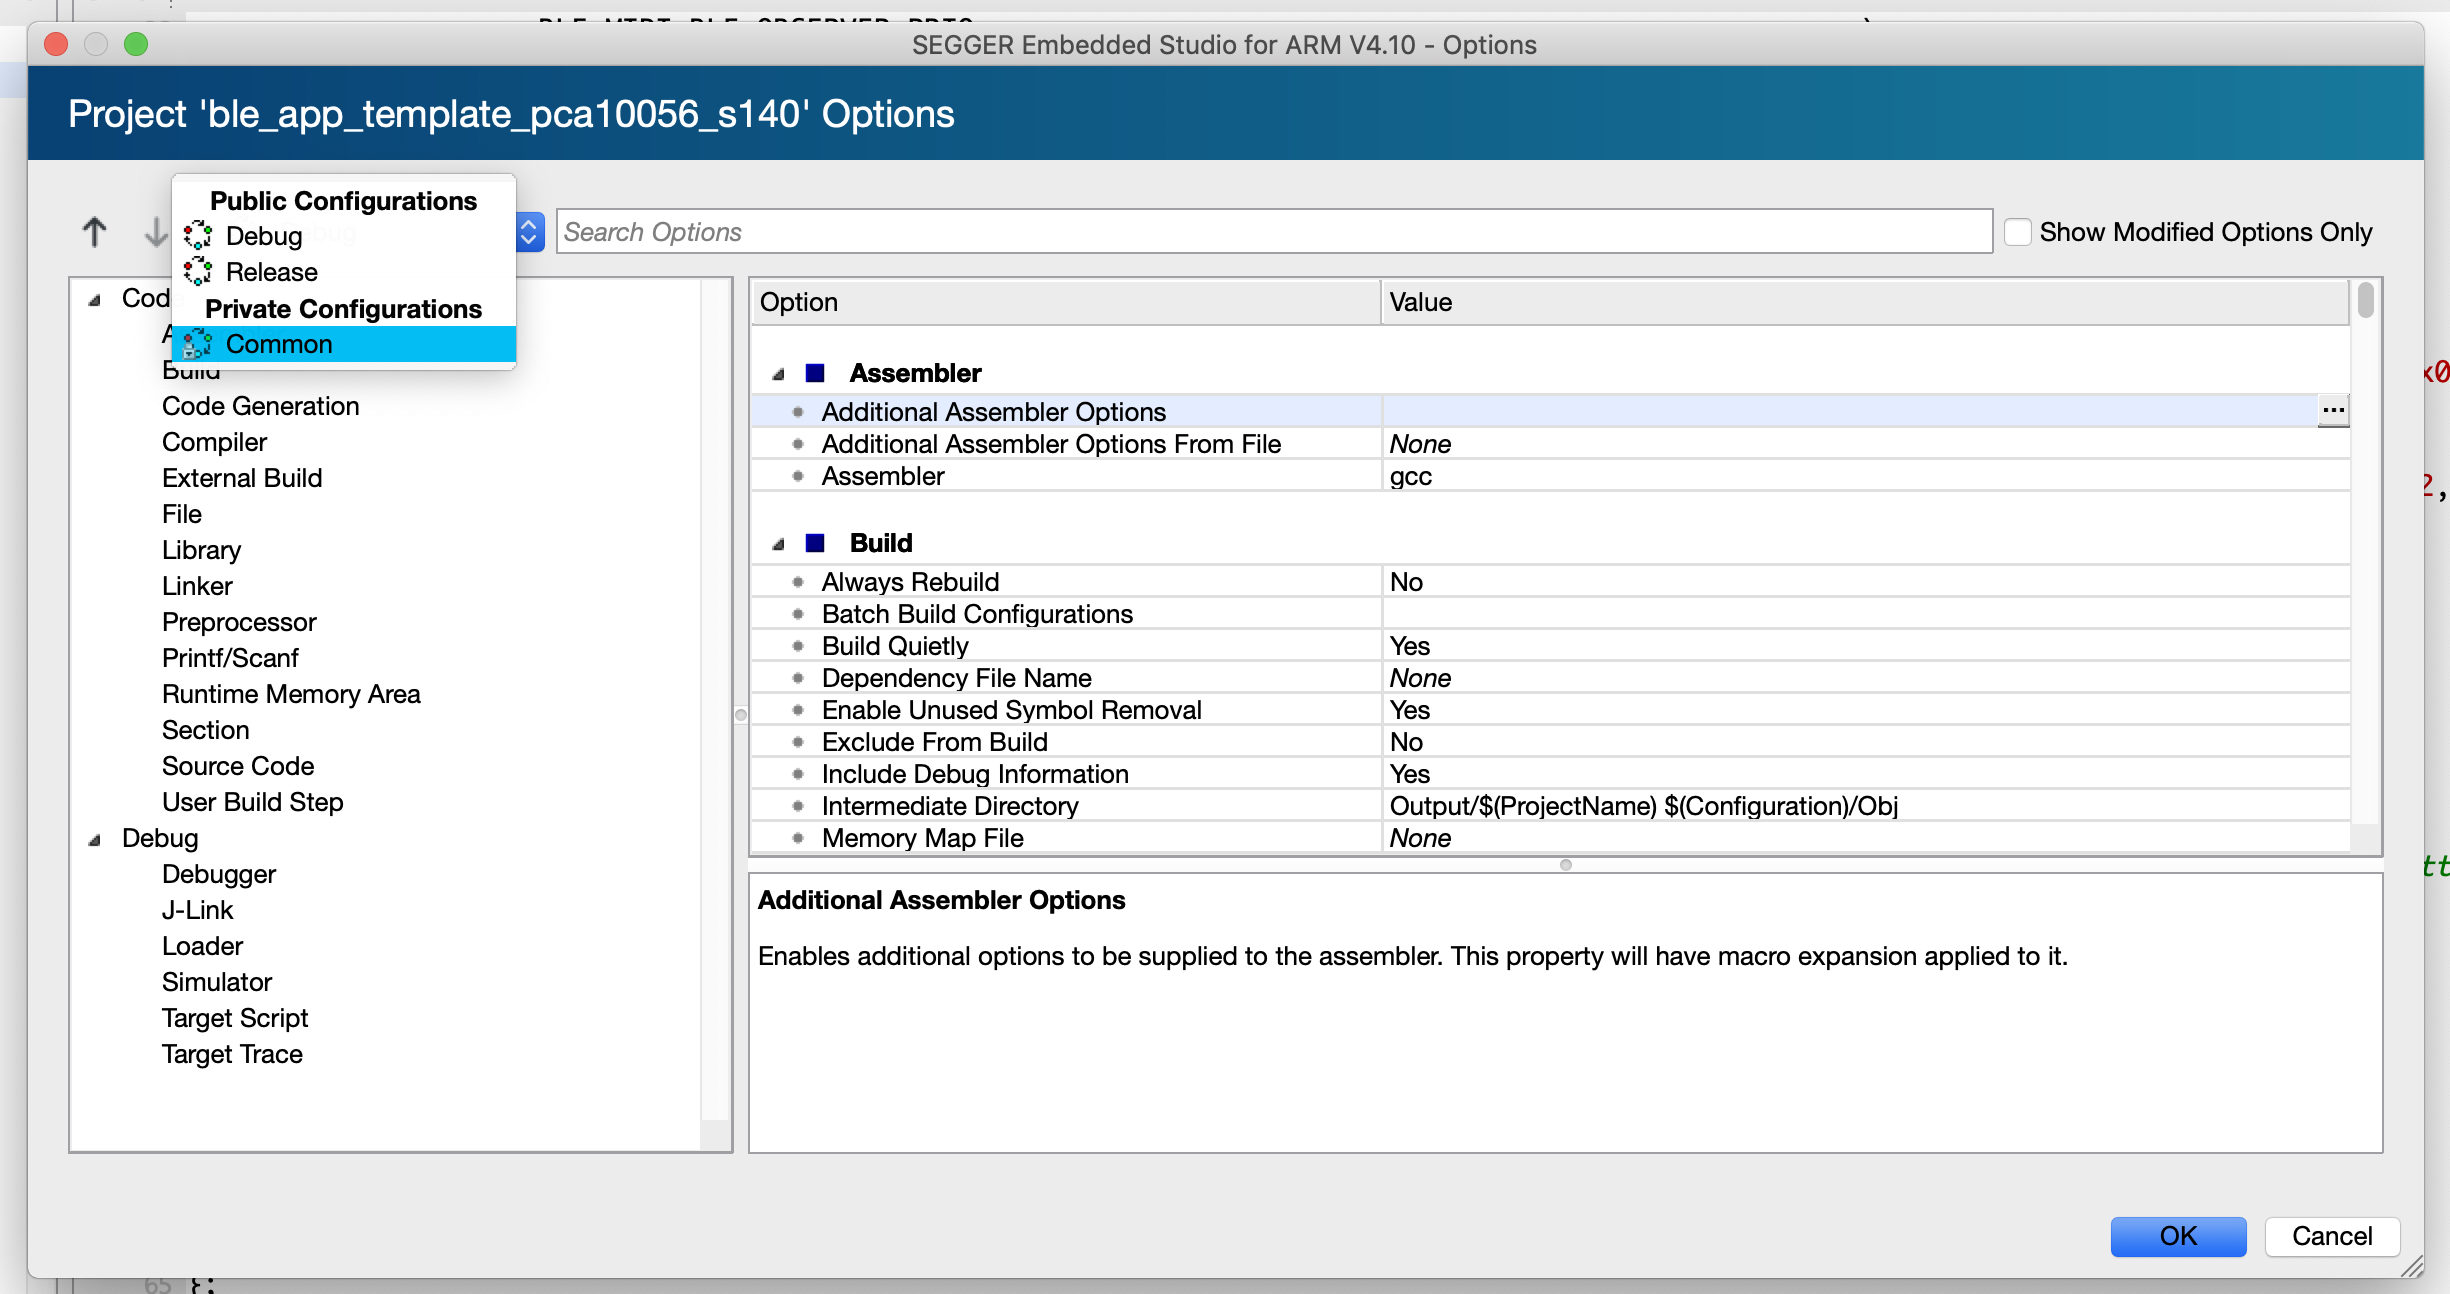
Then choose Common from the configuration drop-down menu
Next, choose Linker under Code:
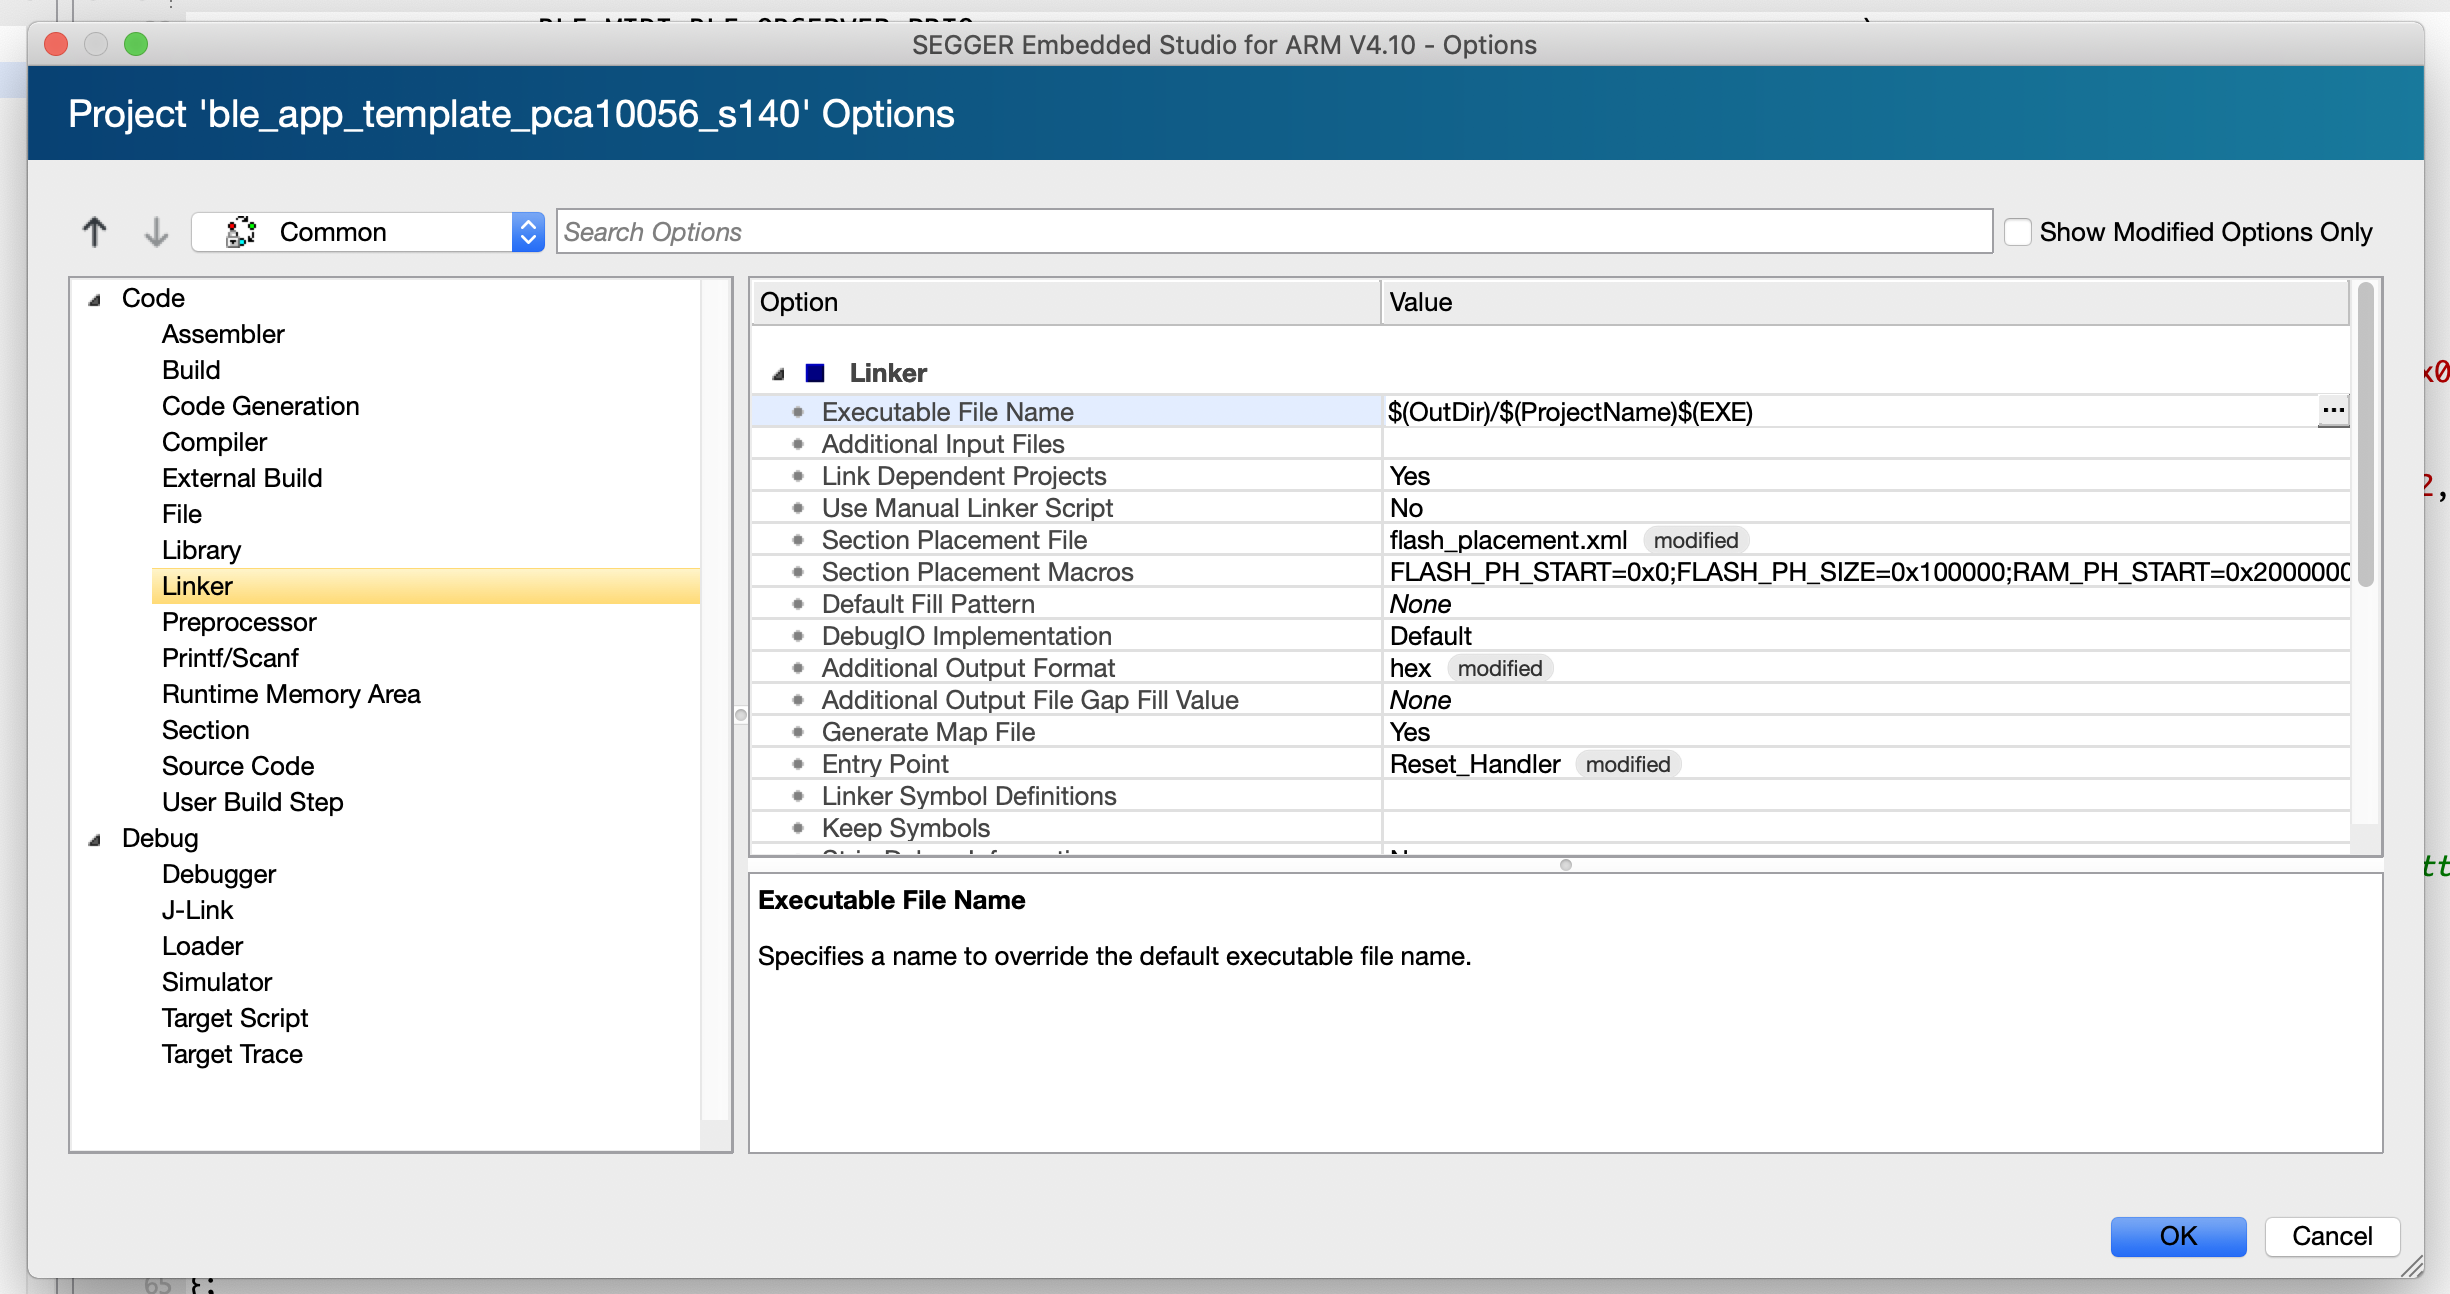
On the right-hand side, double-click on Section Placement Macros
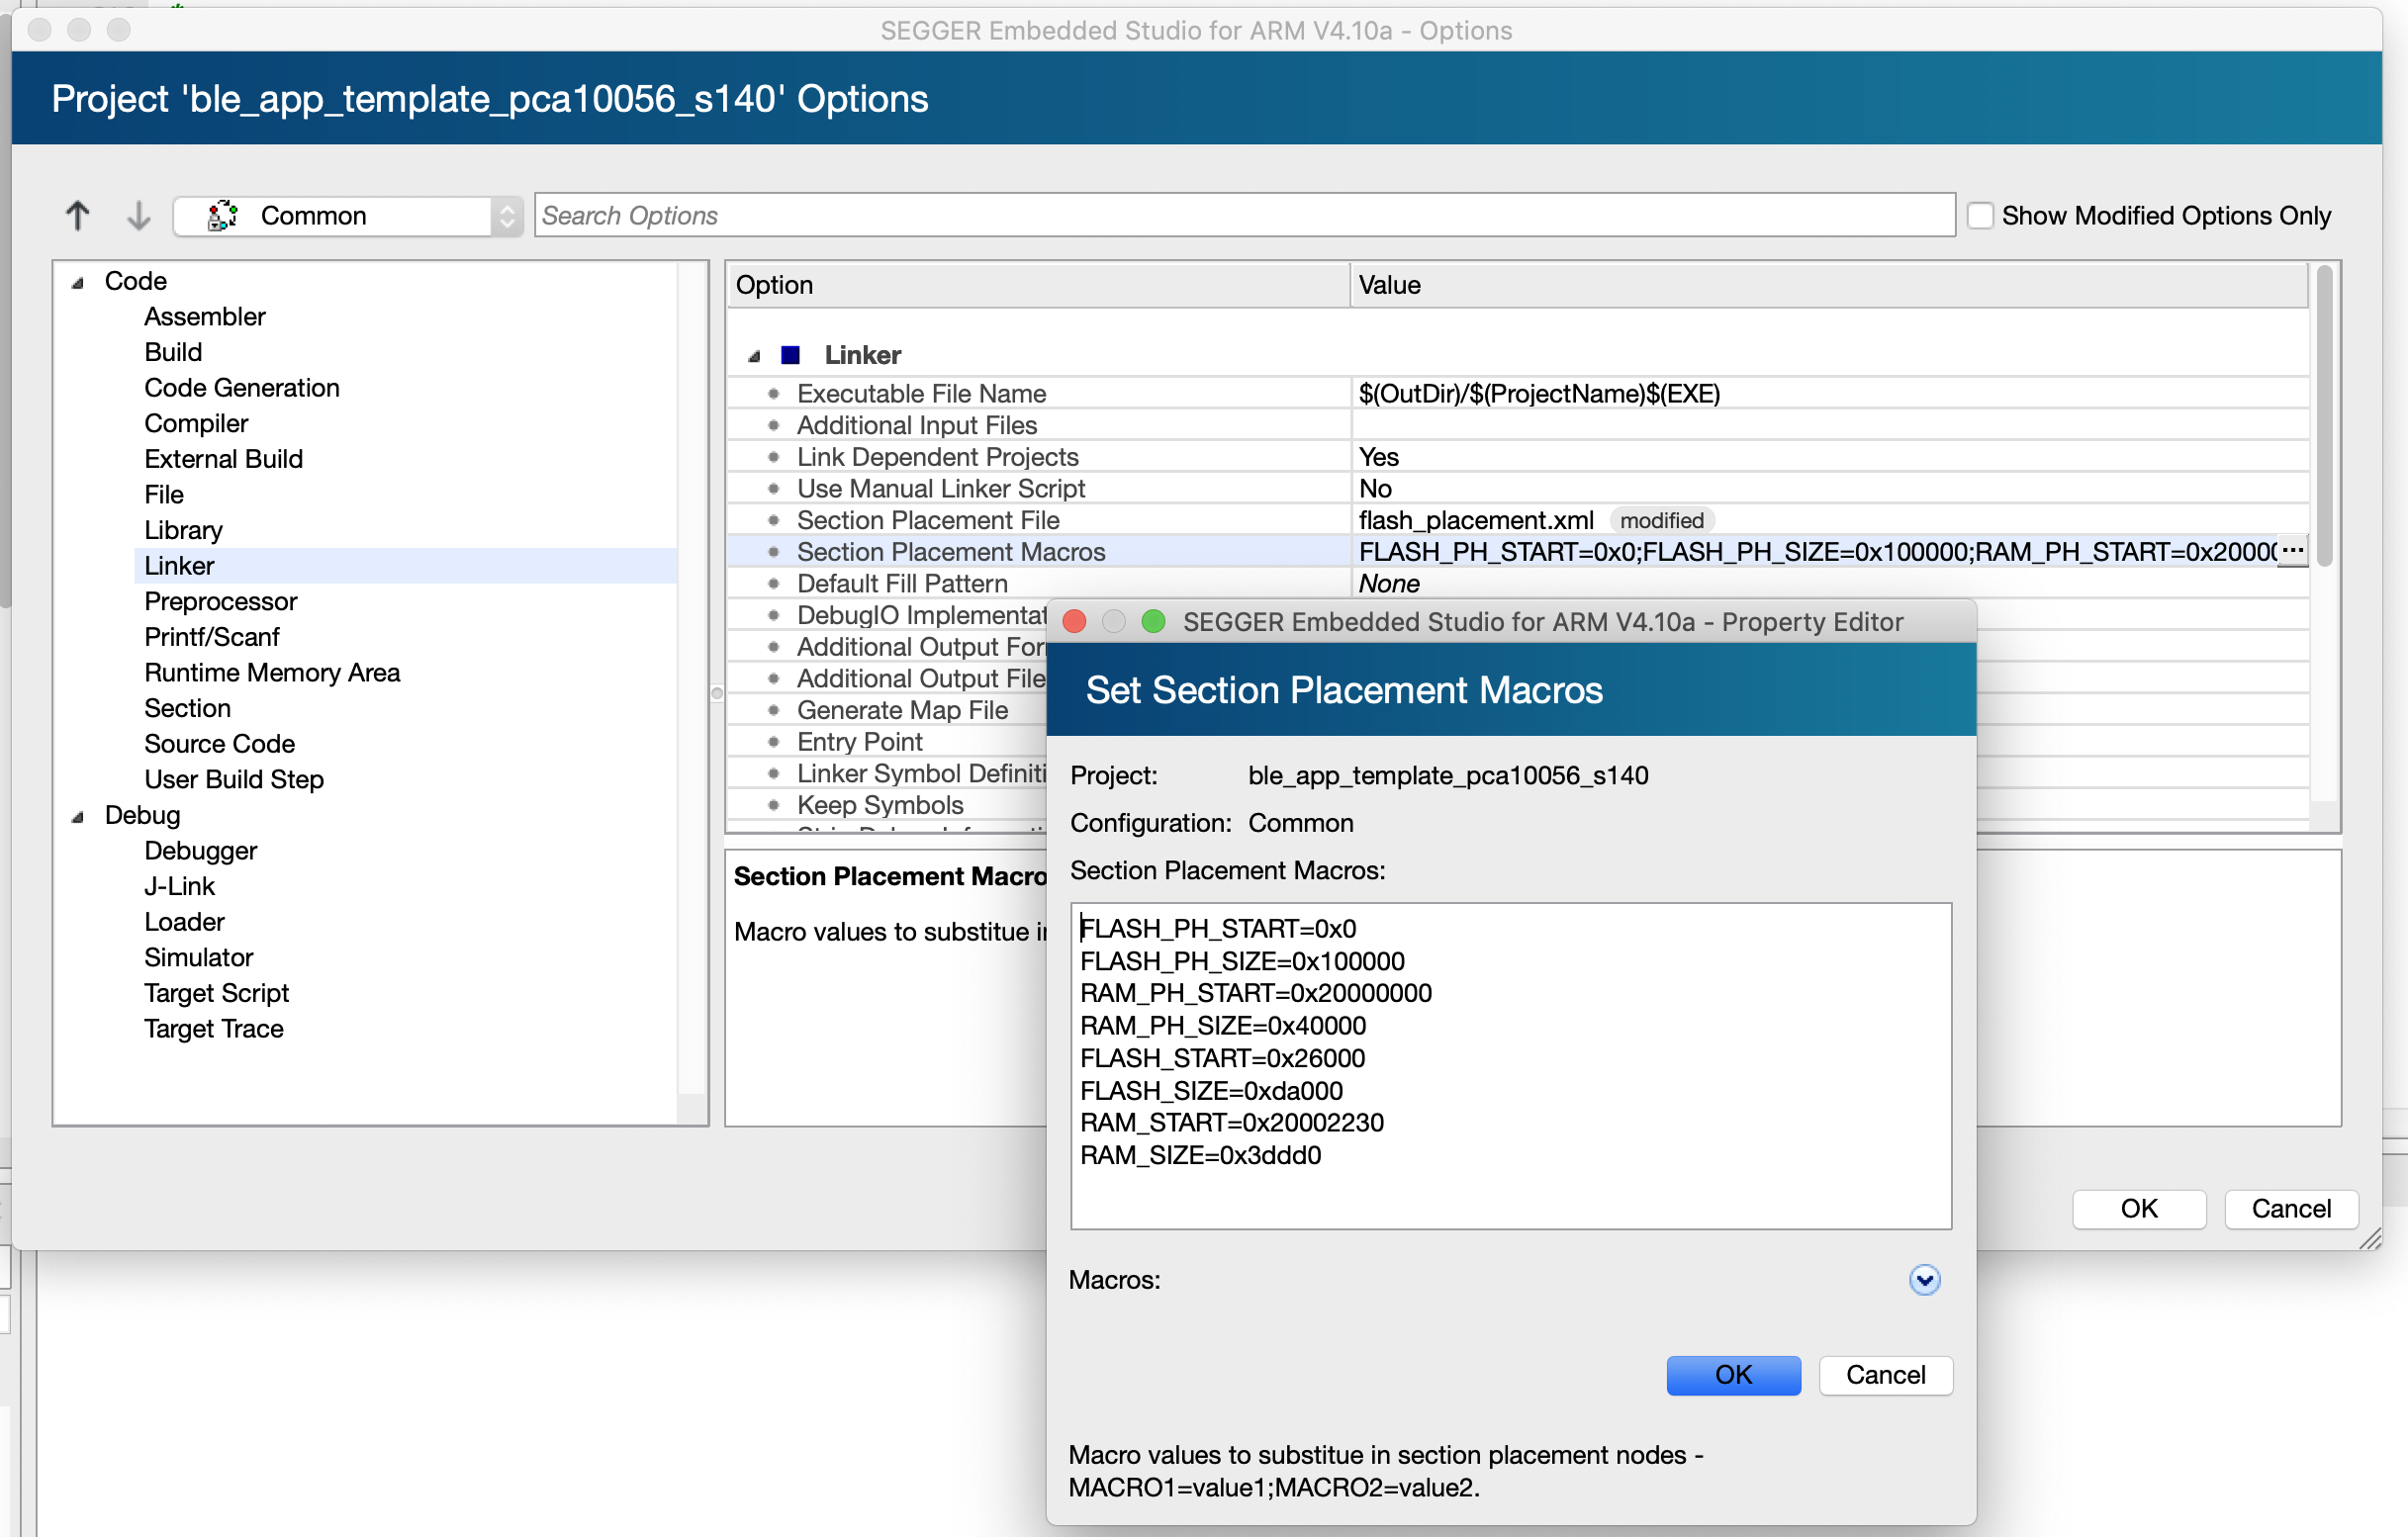
Now, modify the macros RAM_START and RAM_SIZE to match the values displayed in the debug message.
Step 3: Source Code Modifications
Now that we have made all the project modifications necessary, we're ready to write the code for the MIDI service (and its characteristic) and the code needed to initialize them in main.c.
midi_service.h
The header file will define the data structures and function prototypes needed to implement the MIDI service.
Let's go through implementing it line by line.
Add the conditional macro and the necessary #include files:
#ifndef MIDI_SERVICE_H
#define MIDI_SERVICE_H
#include <stdint.h>
#include <stdbool.h>
#include "ble.h"
#include "ble_srv_common.h"
Add the macro used for instantiating and defining the service object:
/**@brief   Macro for defining a ble_midi_service instance. * * @param   _name   Name of the instance. * @hideinitializer */
#ifndef BLE_MIDI_BLE_OBSERVER_PRIO
#define BLE_MIDI_BLE_OBSERVER_PRIO 2
#endif
#define BLE_MIDI_DEF(_name)                                                                         \ static ble_midi_service_t _name;                                                                    \ NRF_SDH_BLE_OBSERVER(_name ## _obs,                                                                 \ BLE_MIDI_BLE_OBSERVER_PRIO,                                                    \ ble_midi_service_on_ble_evt, &_name)
Now, we add the macros that define the UUIDs for the service and the characteristic. These values are defined in the BLE MIDI spec, so we don't have to come up with our own values. Following the spec, we define the following:
// MIDI Service UUID: 03B80E5A-EDE8-4B33-A751-6CE34EC4C700
// MIDI Data I/O Characteristic UUID: 7772E5DB-3868-4112-A1A9-F2669D106BF3
// The bytes need to be in reverse order to match the UUID from the spec
// Note: They are stored in little endian, meaning that the Least Significant Byte
// is stored first.
#define BLE_UUID_MIDI_SERVICE_BASE_UUID  {0x00, 0xC7, 0xC4, 0x4E, 0xE3, 0x6C, 0x51, 0xA7, 0x33, 0x4B, 0xE8, 0xED, 0x5A, 0x0E, 0xB8, 0x03}
#define BLE_UUID_MIDI_SERVICE_UUID        0x0E5A
#define BLE_UUID_MIDI_DATA_IO_CHAR_BASE_UUID {0xF3, 0x6B, 0x10, 0x9D, 0x66, 0xF2, 0xA9, 0xA1, 0x12, 0x41, 0x68, 0x38, 0xDB, 0xE5, 0x72, 0x77}
#define BLE_UUID_MIDI_DATA_IO_CHAR_UUID       0xE5DB
Define the different MIDI event types and a data structure to represent a MIDI event.
/**@brief MIDI Service event type. */
typedef enum {
    BLE_DATA_IO_EVT_NOTIFICATION_ENABLED,                             /**< Custom value notification enabled event. */
    BLE_DATA_IO_EVT_NOTIFICATION_DISABLED,                            /**< Custom value notification disabled event. */
}
ble_midi_evt_type_t;
/**@brief MIDI Service event. */
typedef struct{
    ble_midi_evt_type_t evt_type;
}
ble_midi_evt_t;
Forward-declare the MIDI service data structure:
// Forward declaration of the ble_midi_service_t type. typedef struct ble_midi_service_s ble_midi_service_t;Define the MIDI Data I/O write handler function:
typedef void (*ble_midi_evt_handler_t) (ble_midi_service_t * p_midi_service, ble_midi_evt_t * p_evt);Define the init data structure that is used to configure a callback function that can be called back to the main application:
typedef struct {
    ble_midi_evt_handler_t evt_handler;  /**< Event handler to be called when a MIDI event occurs. */
}
ble_midi_service_init_t;
Define the main MIDI Service data structure that contains the service handle, any characteristic handles, the UUID type, the connection handle, and more:
/**@brief MIDI Service structure. This contains various status information for the service. */
struct ble_midi_service_s {
    uint16_t                    service_handle;
    ble_gatts_char_handles_t    data_io_char_handles;
    uint8_t                     uuid_type;
    uint16_t                    conn_handle;
    ble_midi_evt_handler_t      evt_handler;
};
Define the function prototype for the initializer function. This function gets called from the main application to initialize the service:
/**@brief Function for initializing the MIDI Service. * * @param[out]  p_midi_service   MIDI Service structure. This structure will have to be supplied by *                               the application. It will be initialized by this function, and will later *                               be used to identify this particular service instance. * @param[in]   p_midi_service_init  Information needed to initialize the service. * * @return      NRF_SUCCESS on successful initialization of service, otherwise an error code. */
uint32_t ble_midi_service_init(ble_midi_service_t * p_midi_service, const ble_midi_service_init_t * p_midi_service_init);
Define the BLE event handler for the MIDI service. This will get called by the stack whenever a BLE event is reported and may need to be processed by the MIDI service:
/**@brief Function for handling the Application's BLE Stack events. * * @details Handles all events from the BLE stack of interest to the MIDI Service. * * * @param[in]   p_midi_service      LED Button Service structure. * @param[in]   p_ble_evt  Event received from the BLE stack. */
void ble_midi_service_on_ble_evt(ble_evt_t const * p_ble_evt, void * p_context);
Close the conditional macro for the header file:
#endif /* MIDI_SERVICE_H */midi_service.c
The source .c file will handle the implementation of the service including initialization, the creation of services and characteristics, as well as event handling.
Let's go through implementing it line-by-line.
Add the necessary #include for header files:
#include "midi_service.h"
#include "nordic_common.h"
#include "ble_srv_common.h"
#include "app_util.h"
#include "nrf_log.h"
Implement the function that handles the connection event. The function simply sets and stores the connection handle:
/**@brief Function for handling the Connect event. * * @param[in]   p_midi_service   LED Button Service structure. * @param[in]   p_ble_evt        Event received from the BLE stack. */
static void on_connect(ble_midi_service_t * p_midi_service, ble_evt_t const * p_ble_evt) {
    p_midi_service->conn_handle = p_ble_evt->evt.gap_evt.conn_handle;
}
Implement the function that handles the disconnection event. The function simply resets the connection handle associated with the service:
/**@brief Function for handling the Disconnect event. * * @param[in]   p_midi_service   LED Button Service structure. * @param[in]   p_ble_evt        Event received from the BLE stack. */
static void on_disconnect(ble_midi_service_t * p_midi_service, ble_evt_t const * p_ble_evt) {
    UNUSED_PARAMETER(p_ble_evt);
    p_midi_service->conn_handle = BLE_CONN_HANDLE_INVALID;
}
Implement the write handler function that processes the write event and verifies that it's valid. The implementation/processing is left to the developer.
It also handles the case where notifications are enabled/disabled and passes this event back up to the main application (via the event handler that was set in the initialization function).
/**@brief Function for handling the Write event. * * @param[in]   p_midi_service   LED Button Service structure. * @param[in]   p_ble_evt        Event received from the BLE stack. */
static void on_write(ble_midi_service_t * p_midi_service, ble_evt_t const * p_ble_evt) {
    ble_gatts_evt_write_t * p_evt_write = (ble_gatts_evt_write_t *) &p_ble_evt->evt.gatts_evt.params.write;
    if ((p_evt_write->handle == p_midi_service->data_io_char_handles.value_handle) && (p_evt_write->len == 1) && (p_midi_service->evt_handler != NULL)) {
        // Handle what happens on a write event to the characteristic value
    }
// Check if the Custom value CCCD is written to and that the value is the appropriate length, i.e 2 bytes. if ((p_evt_write->handle == p_midi_service->data_io_char_handles.cccd_handle) && (p_evt_write->len == 2) ) {
    // CCCD written, call application event handler if (p_midi_service->evt_handler != NULL) {
        ble_midi_evt_t evt;
        if (ble_srv_is_notification_enabled(p_evt_write->data)) {
            evt.evt_type = BLE_DATA_IO_EVT_NOTIFICATION_ENABLED;
        } else {
        evt.evt_type = BLE_DATA_IO_EVT_NOTIFICATION_DISABLED;
    }
p_midi_service->evt_handler(p_midi_service, &evt);
}
}
}
Implement the BLE event handler function.
This function gets called automatically by the SoftDevice and is set up by the BLE_MIDI_DEF macro we defined at the top of the midi_service.h file.
It processes the BLE event and hands it off to the appropriate function to be processed. It handles the connection event, the disconnection event, and the write event:
void ble_midi_service_on_ble_evt(ble_evt_t const * p_ble_evt, void * p_context) {
    ble_midi_service_t * p_midi_service = (ble_midi_service_t *) p_context;
    NRF_LOG_INFO("BLE event received. Event type = %d\r\n", p_ble_evt->header.evt_id);
    if (p_midi_service == NULL || p_ble_evt == NULL) {
        return;
    }
switch (p_ble_evt->header.evt_id) {
    case BLE_GAP_EVT_CONNECTED: on_connect(p_midi_service, p_ble_evt);
    break;
    case BLE_GAP_EVT_DISCONNECTED: on_disconnect(p_midi_service, p_ble_evt);
    break;
    case BLE_GATTS_EVT_WRITE: on_write(p_midi_service, p_ble_evt);
    break;
    default:
    // No implementation needed. break;
}
}
Now, we'll implement the function for creating and adding the data I/O characteristic as part of the MIDI service.
/**@brief Function for adding the Data I/O characteristic. * */
static uint32_t data_io_char_add(ble_midi_service_t * p_midi_service, const ble_midi_service_init_t * p_midi_service_init) {
    uint32_t   err_code;
    ble_gatts_char_md_t char_md;
    ble_gatts_attr_md_t cccd_md;
    ble_gatts_attr_t    attr_char_value;
    ble_uuid_t          ble_uuid;
    ble_gatts_attr_md_t attr_md;
    // Configure the CCCD which is needed for Notifications and Indications memset(&cccd_md, 0, sizeof(cccd_md));
    BLE_GAP_CONN_SEC_MODE_SET_OPEN(&cccd_md.read_perm);
    BLE_GAP_CONN_SEC_MODE_SET_OPEN(&cccd_md.write_perm);
    cccd_md.vloc = BLE_GATTS_VLOC_STACK;
    // Configure the characteristic metadata. memset(&char_md, 0, sizeof(char_md));
    char_md.char_props.read          = 1;
    char_md.char_props.write_wo_resp = 1;
    char_md.char_props.notify        = 1;
    char_md.p_char_user_desc         = NULL;
    char_md.p_char_pf                = NULL;
    char_md.p_user_desc_md           = NULL;
    char_md.p_cccd_md                = &cccd_md;
    char_md.p_sccd_md                = NULL;
    // Add the MIDI Data I/O Characteristic UUID ble_uuid128_t base_uuid = {BLE_UUID_MIDI_DATA_IO_CHAR_BASE_UUID};
    err_code = sd_ble_uuid_vs_add(&base_uuid, &p_midi_service->uuid_type);
    if (err_code != NRF_SUCCESS) {
        return err_code;
    }
ble_uuid.type = p_midi_service->uuid_type;
ble_uuid.uuid = BLE_UUID_MIDI_DATA_IO_CHAR_UUID;
// Configure the characteristic value's metadata memset(&attr_md, 0, sizeof(attr_md));
BLE_GAP_CONN_SEC_MODE_SET_OPEN(&attr_md.read_perm);
BLE_GAP_CONN_SEC_MODE_SET_OPEN(&attr_md.write_perm);
attr_md.vloc       = BLE_GATTS_VLOC_STACK;
attr_md.rd_auth    = 0;
attr_md.wr_auth    = 0;
attr_md.vlen       = 0;
// Configure the characteristic value memset(&attr_char_value, 0, sizeof(attr_char_value));
attr_char_value.p_uuid       = &ble_uuid;
attr_char_value.p_attr_md    = &attr_md;
attr_char_value.init_len     = sizeof(uint8_t);
attr_char_value.init_offs    = 0;
attr_char_value.max_len      = sizeof(uint8_t);
attr_char_value.p_value      = NULL;
return sd_ble_gatts_characteristic_add(p_midi_service->service_handle, &char_md, &attr_char_value, &p_midi_service->data_io_char_handles);
}
Next, we will write the service initializer function: ble_midi_service_init().
uint32_t ble_midi_service_init(ble_midi_service_t * p_midi_service, const ble_midi_service_init_t * p_midi_service_init) {
    uint32_t   err_code;
    ble_uuid_t ble_uuid;
    // Initialize service structure p_midi_service->conn_handle = BLE_CONN_HANDLE_INVALID;
    p_midi_service->evt_handler = p_midi_service_init->evt_handler;
    // Add service ble_uuid128_t base_uuid = {BLE_UUID_MIDI_SERVICE_BASE_UUID};
    err_code = sd_ble_uuid_vs_add(&base_uuid, &p_midi_service->uuid_type);
    if (err_code != NRF_SUCCESS) {
        return err_code;
    }
ble_uuid.type = p_midi_service->uuid_type;
ble_uuid.uuid = BLE_UUID_MIDI_SERVICE_UUID;
err_code = sd_ble_gatts_service_add(BLE_GATTS_SRVC_TYPE_PRIMARY, &ble_uuid, &p_midi_service->service_handle);
if (err_code != NRF_SUCCESS) {
    return err_code;
}
err_code = data_io_char_add(p_midi_service, p_midi_service_init);
if (err_code != NRF_SUCCESS) {
    return err_code;
}
return NRF_SUCCESS;
}
The last function we want to implement is one to handle updating the data I/O sending notifications to the client whenever the data I/O characteristic value is updated.
uint32_t ble_midi_data_io_value_update(ble_midi_service_t * p_midi_service, uint8_t data_io_value) {
    if (p_midi_service == NULL) {
        return NRF_ERROR_NULL;
    }
uint32_t err_code = NRF_SUCCESS;
ble_gatts_value_t gatts_value;
// Initialize value struct. memset(&gatts_value, 0, sizeof(gatts_value));
gatts_value.len     = sizeof(uint8_t);
gatts_value.offset  = 0;
gatts_value.p_value = &data_io_value;
// Update database. err_code = sd_ble_gatts_value_set(p_midi_service->conn_handle, p_midi_service->data_io_char_handles.value_handle, &gatts_value);
if (err_code != NRF_SUCCESS) {
    return err_code;
}
// Send value if connected and notifying. if ((p_midi_service->conn_handle != BLE_CONN_HANDLE_INVALID)) {
    ble_gatts_hvx_params_t hvx_params;
    memset(&hvx_params, 0, sizeof(hvx_params));
    hvx_params.handle = p_midi_service->data_io_char_handles.value_handle;
    hvx_params.type   = BLE_GATT_HVX_NOTIFICATION;
    hvx_params.offset = gatts_value.offset;
    hvx_params.p_len  = &gatts_value.len;
    hvx_params.p_data = gatts_value.p_value;
    err_code = sd_ble_gatts_hvx(p_midi_service->conn_handle, &hvx_params);
    NRF_LOG_INFO("sd_ble_gatts_hvx result: %x. \r\n", err_code);
} else {
err_code = NRF_ERROR_INVALID_STATE;
NRF_LOG_INFO("sd_ble_gatts_hvx result: NRF_ERROR_INVALID_STATE. \r\n");
}
return err_code;
}
main.c
So far, we've written the code to implement the MIDI service (both header (.h) and source (.c) files), but we haven't modified the main application to initialize the service. We also need to make some other modifications to the main.c.
Let's go through each of them.
We first need to #include the header file for the MIDI service.
#include "midi_service.h"Next, we want to modify the advertised Device Name to indicate this is the MIDI example.
#define DEVICE_NAME "Nordic_MIDI" /**< Name of device. Will be included in the advertising data. */We instantiate the MIDI Service via the macro we defined in midi_service.h (highlighted line below):
BLE_MIDI_DEF(m_midi_service);We can delete the following block of code:
/**@brief Function for handling the YYY Service events. * YOUR_JOB implement a service handler function depending on the event the service you are using can generate * * @details This function will be called for all YY Service events which are passed to *          the application. * * @param[in]   p_yy_service   YY Service structure. * @param[in]   p_evt          Event received from the YY Service. static void on_yys_evt(ble_yy_service_t p_yy_service, ble_yy_service_evt_t p_evt) {
    switch (p_evt->evt_type) {         case BLE_YY_NAME_EVT_WRITE: APPL_LOG("[APPL]: charact written with value %s. ", p_evt->params.char_xx.value.p_str);
        break;
        default:
        // No implementation needed. break;
    }
}
*/
Instead, we replace it with a function to handle MIDI events in our main application:
static void midi_evt_handler(ble_midi_service_t * p_midi_service, ble_midi_evt_t * p_evt) {
    // Action to perform when the Data I/O characteristic notifications are enabled
    // Add your implementation here if (p_evt->evt_type == BLE_DATA_IO_EVT_NOTIFICATION_ENABLED) {
        // Possibly save to a global variable to know that notifications are ENABLED NRF_LOG_INFO("Notifications ENABLED on Data I/O Characteristic");
    } else if (p_evt->evt_type == BLE_DATA_IO_EVT_NOTIFICATION_DISABLED) {
    // Possibly save to a global variable to know that notifications are DISABLED NRF_LOG_INFO("Notifications DISABLED on Data I/O Characteristic");
}
// Handle any other events necessary...
}
Next, let's modify the services_init() function to initialize the MIDI service:
/**@brief Function for initializing services that will be used by the application. */
static void services_init(void) {
    ret_code_t         err_code;
    ble_midi_service_init_t midi_init;
    nrf_ble_qwr_init_t qwr_init = {0};
    // Initialize Queued Write Module. qwr_init.error_handler = nrf_qwr_error_handler;
    err_code = nrf_ble_qwr_init(&m_qwr, &qwr_init);
    APP_ERROR_CHECK(err_code);
    // Initialize the MIDI service memset(&midi_init, 0, sizeof(midi_init));
    midi_init.evt_handler = midi_evt_handler;
    err_code = ble_midi_service_init(&m_midi_service, &midi_init);
    NRF_LOG_INFO("Done with services_init()\r\n");
    APP_ERROR_CHECK(err_code);
}
The final change to main.c is to change the debug output for the name of the example (in the main() function):
NRF_LOG_INFO("MIDI example started.");Step 4: Build and flash the updated project
Now that we've made all the source code changes necessary, it's time to build the project and flash it to the development board.
Compile and flash the updated project.
Refer to the previous The complete cross-platform nRF development tutorial for step-by-step instructions on how to do this.
Note 1: Sometimes you may want to clean and rebuild the project from scratch to make sure you don't have any stale code. You can do so by right-clicking the Project and then selecting the Clean option.
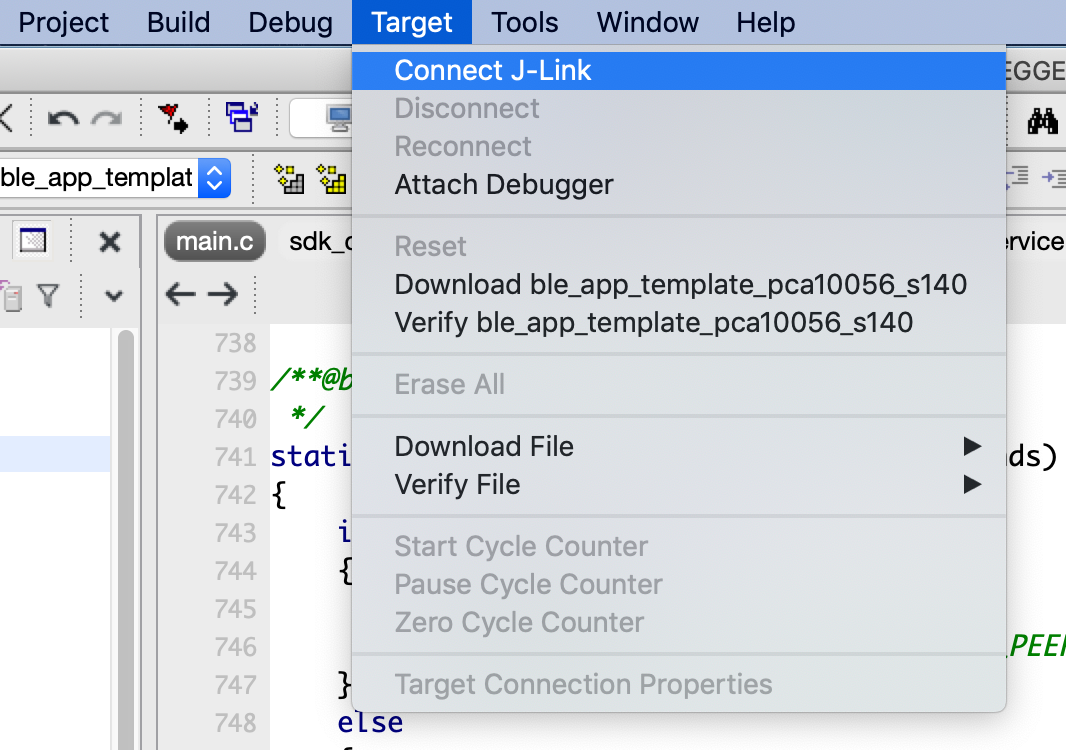
Note 2: If you run into issues and your application does not run. you may want to perform an Erase All to the development board.
You can do this by navigating to Target --> Connect J-Link.
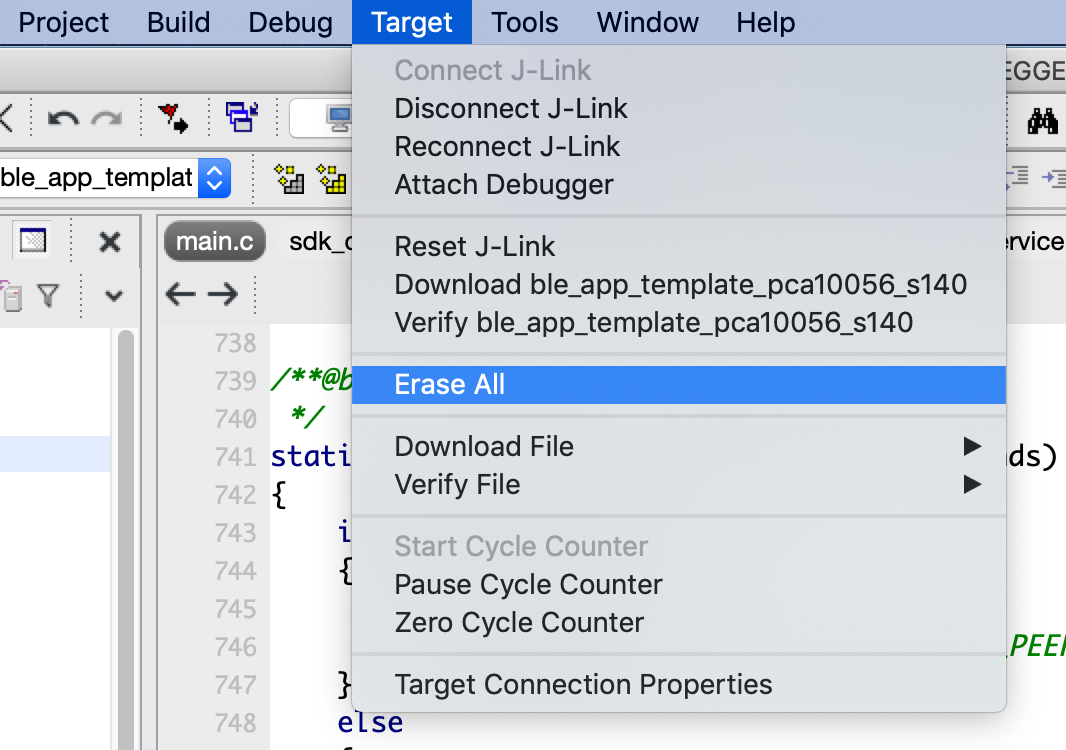
Once it's connected, click on Target --> Erase All.
Now, flash the project to the board.
Testing
Steps 5 & 6:
Run the nRF Connect or LightBlue app on your smartphone and start a Scan:

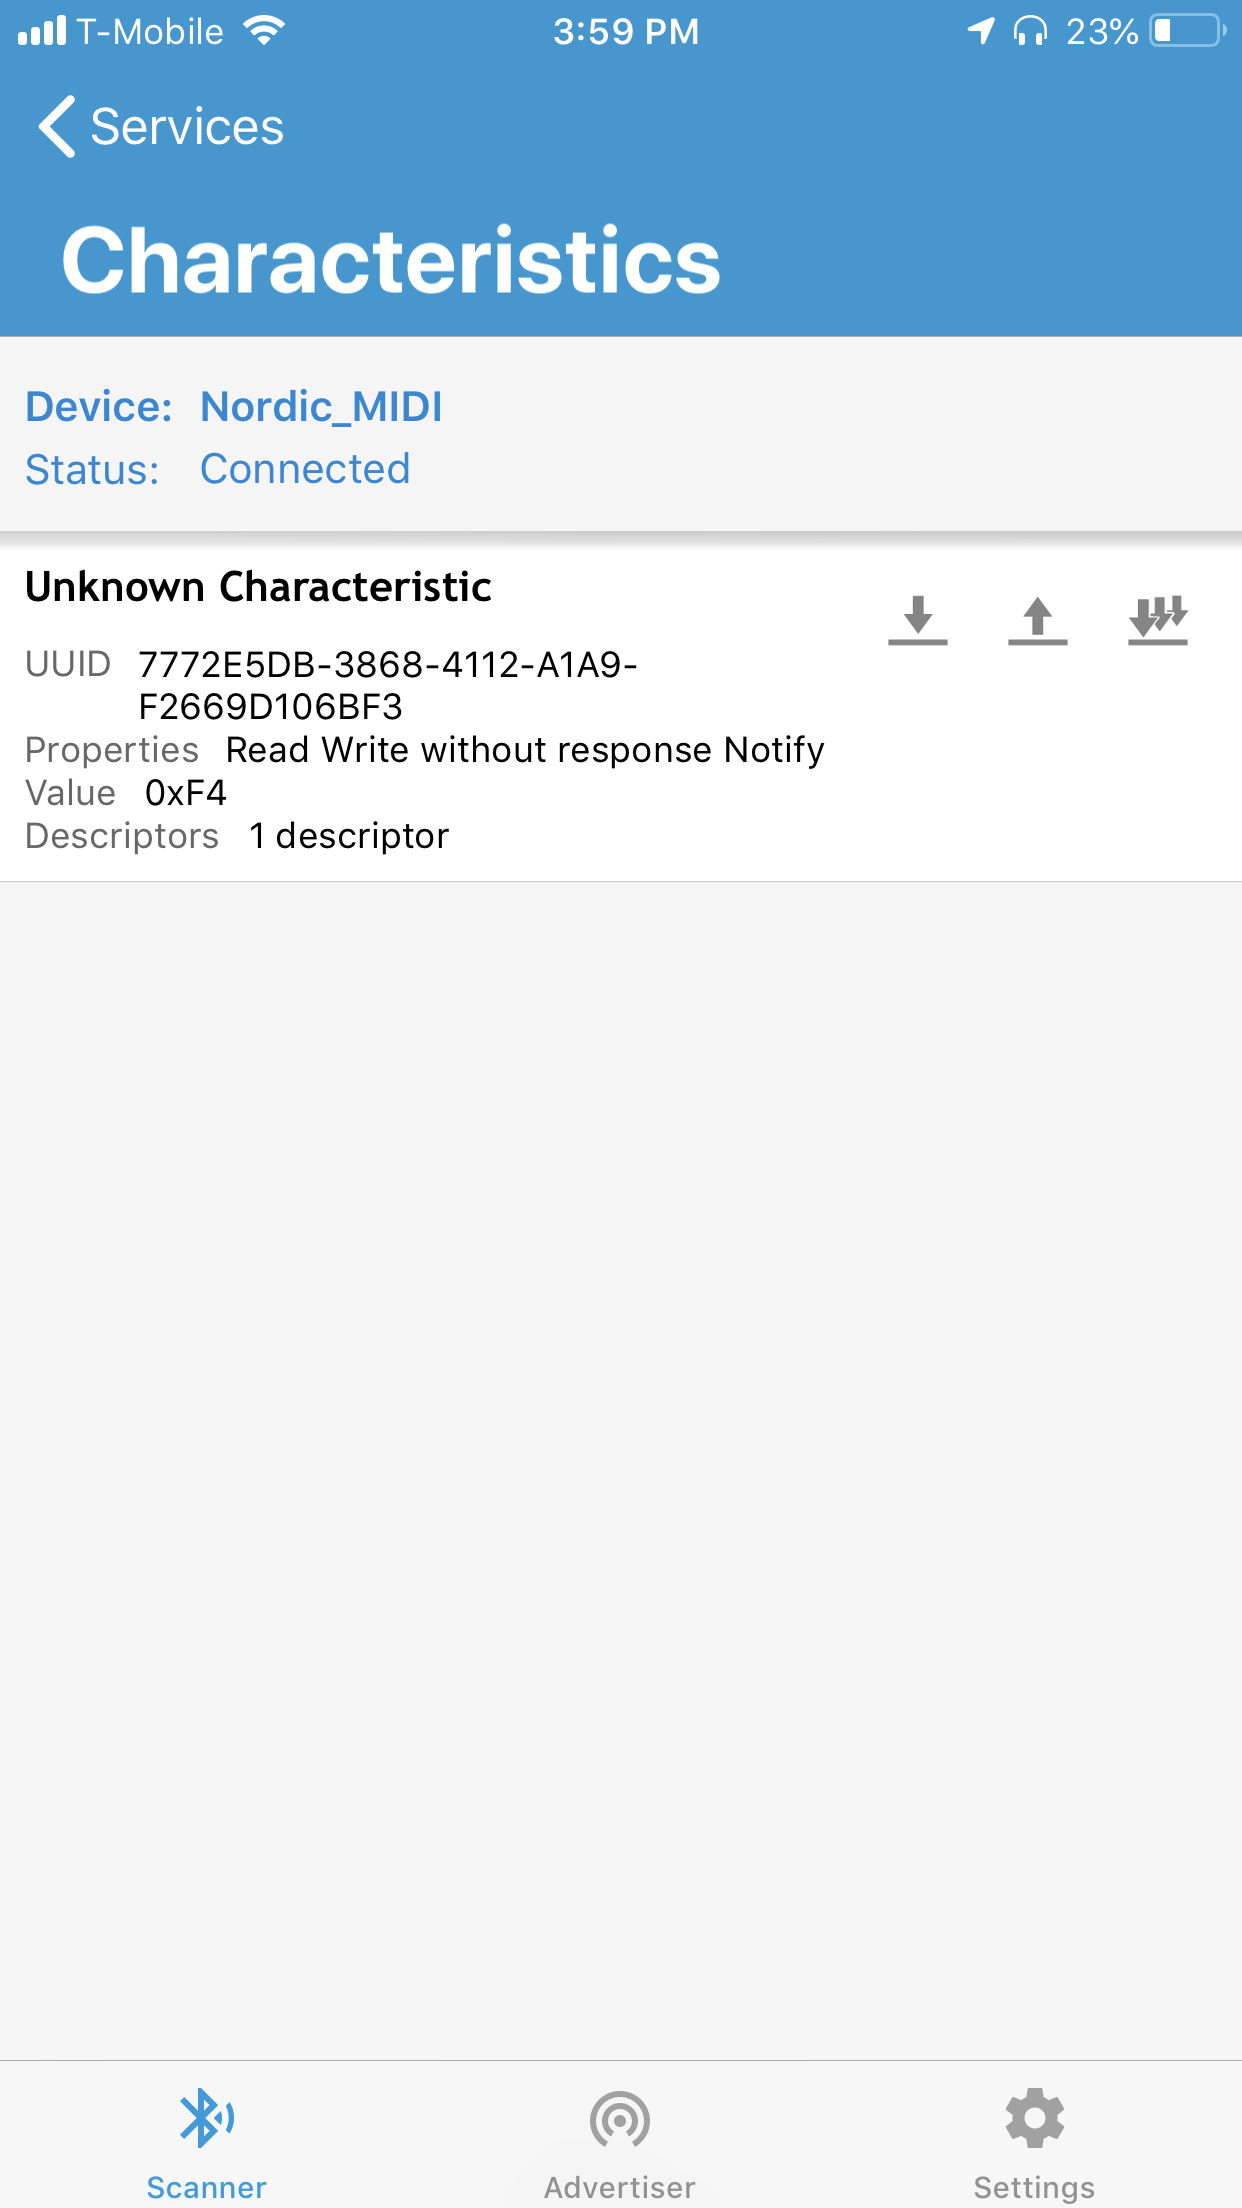
Locate and connect to the device named Nordic_MIDI, and verify that the Services listed match the following:
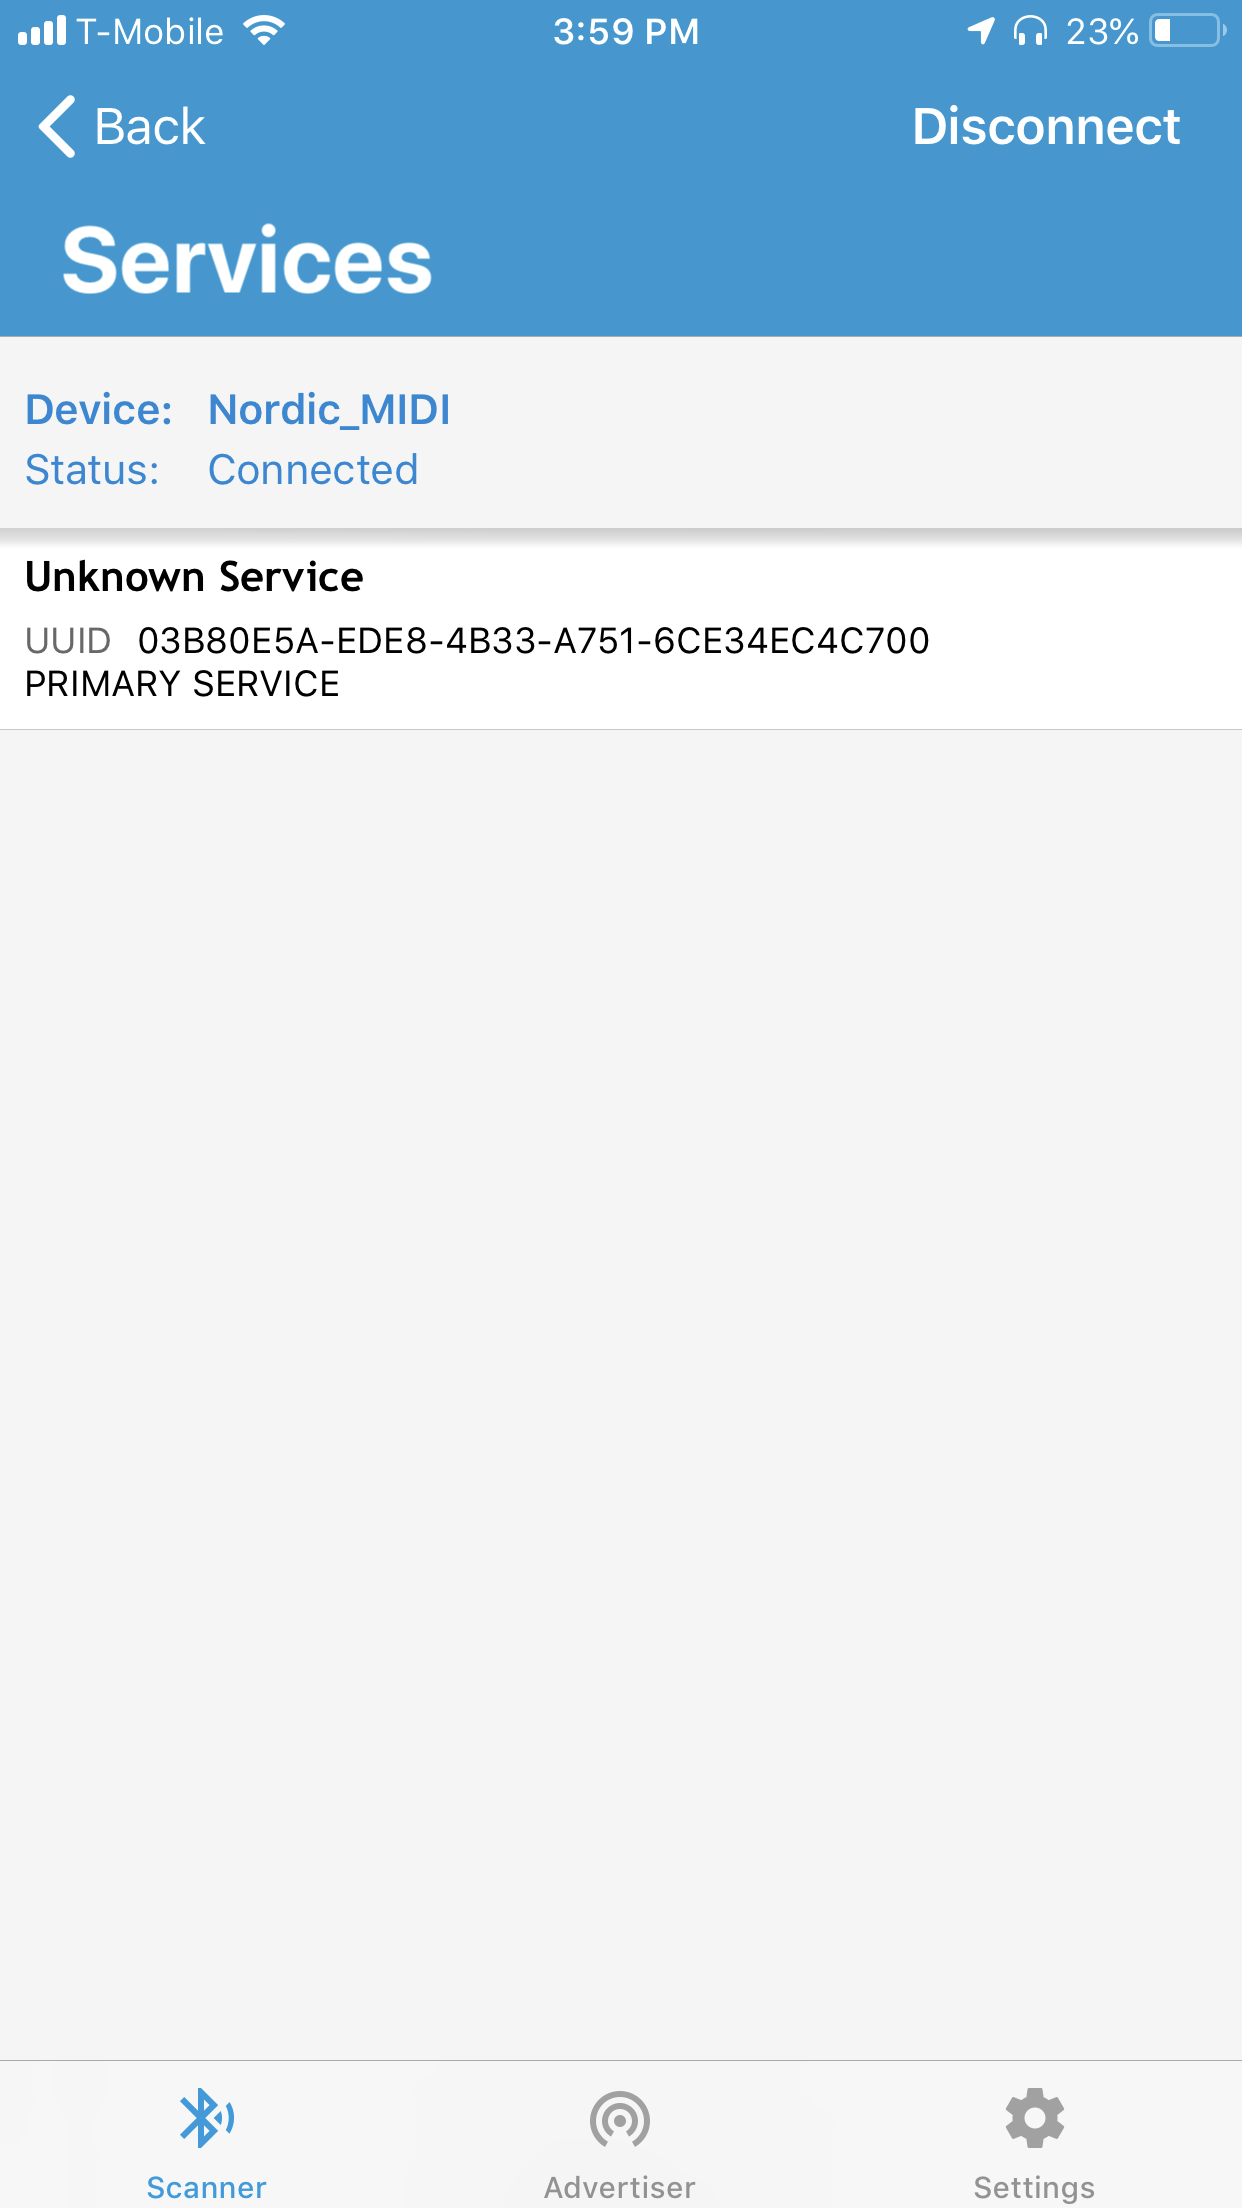
Click on the Unknown Service (which matches the MIDI Service), and verify that the Characteristic matches the following.
Also, notice the properties for the characteristic and that they match what we defined in the nRF application: read, write without response, and notify.
That’s it! You have just implemented a custom BLE device with a custom GATT that matches the MIDI spec!
Summary & Conclusion
In this tutorial we covered the following:
- Attribute Protocol (ATT) and the Generic Attribute Profile (GATT).
- Profiles, Services, and Characteristics.
- How to Design your custom GATT (step-by-step).
- Implementation of a custom GATT using a real-life example of a MIDI device (including full source code).
- Testing and verification using the nRF Connect mobile application.
I hope you’ve enjoyed this tutorial and found it helpful.
Continue Learning
Frequently Asked Questions
What is a Bluetooth UUID?
A UUID (Universally Unique Identifier) is a 128-bit number that uniquely identifies services, characteristics, and descriptors. The Bluetooth SIG defines 16-bit short UUIDs for adopted services (like 0x180D for Heart Rate). For custom implementations, use full 128-bit UUIDs to avoid collisions.
What is the difference between a service and a characteristic?
A service groups related characteristics that represent a device feature (e.g., Heart Rate Service). A characteristic holds the actual data value within that service (e.g., heart rate measurement). Services organize; characteristics expose data.
How do I create a custom GATT service?
Define your data elements and group them logically. Assign unique 128-bit UUIDs (avoiding the SIG base UUID range). Set characteristic properties (read, write, notify). Then implement using your SDK — this tutorial walks through the full process with Nordic's nRF5 SDK.
What is the difference between notifications and indications?
Both are server-initiated updates. Notifications are unacknowledged (faster, no confirmation required). Indications are acknowledged (the client confirms receipt, adding latency but ensuring delivery). Notifications are more common for high-frequency sensor data.
Can a device be both a GATT server and client?
Yes. A single Bluetooth LE device can act as both simultaneously. For example, a fitness tracker can serve heart rate data to a phone while reading the phone's time service. GATT roles are independent of GAP central/peripheral roles.
Want a solid foundation in Bluetooth LE?
Get the free Intro to Bluetooth Low Energy eBook — or grab the expanded 2nd Edition in print.


