

In Bluetooth HID: An Introduction to Human Interface Devices with BLE, we tackled the theory behind the communications of HID Devices with Hosts and how specific standards can simplify the design of new products in this segment.
But now, let’s put aside the abstract concepts and focus on the fun part of the development by designing a simple yet fully functioning HID device! 🖱️ ⌨️
Designing a Bluetooth LE HID device requires a combination of expertise, ranging from Product Design to Mechanical, Electronics, and Software Engineering. Let’s start with some basic principles of HID device design.
Basic principles
Leverage vendor-specific usage table for proprietary messages
One of the great things about HID is that it won’t force the developers to create parallel channels for proprietary data targeting specific Host applications (e.g., a product companion app).You will be able instead to define one or more Vendor specific pipes in the Report Map, assigning an arbitrary size (e.g., 20 bytes), and decide at runtime how to fill that data.
This means that a custom protocol can be framed within the HID framework and that it can naturally coexist with the rest of the communication meant to be used by any Host. Pretty cool, right? 🔥
Beware of the resolution assigned to any input fields
The Report Map characteristic defines the range of accepted values precisely for each input. If you assign 8 bits to the description of an axis movement, packing an out-of-range value will lead to inconsistent results!Remember: always sanitize your inputs before using raw data to update a characteristic 🧼
Make the best use of the information received from the Host
If the Host is correctly using the HID Control Point characteristic, as simple as it may seem, the Device can easily optimize its operations. For instance, it could tune its internal power mode accordingly (saving precious battery 🔋). The same applies to any other data flowing in the Host → Device direction.
Beware of latency and benchmark your target
During active communication, latency, which is the amount of time elapsed from the physical signal to its desired effect (e.g., click on an icon), is affected by many factors. One parameter to remember here is the connection interval: the Profile spec states that, after encryption and bonding with the Host, the Device can request the intervals (min and max) that “best suit its use case.”Thus, if you need your Device to be as reactive as possible, always remember to update the min interval to 7.5 ms 🚀
Designing a basic input device: HW & SW Requirements
Now that we’ve covered some basic principles, we can begin our project! The first requirement, as for any embedded project, is getting the right Hardware equipment 🧑🔧. I will be using the Nordic nRF52840 DK to develop the application for the example, but any equivalent Nordic kit will do the job.
The second need is the choice of the Software development environment 🧑💻. We could use the classic Nordic SoftDevice architecture (+ nRF5 SDK), but why not opt for the more generic and abstracted Zephyr-based Nordic Connect SDK?
A major benefit of this choice is that the application code will be architecture / SoC independent by design so that it will be re-usable (with minimal changes) for other BLE-enabled boards, not necessarily based on the Nordic chips.
Last but not least, the project goals are: building a basic mouse 🖱️, which can move the cursor across the Host screen (being it a Windows, macOS, or any other HID-ready host) in all four directions, click with two buttons (left and right) and scroll up & down.
In case this is the first Nordic Connect SDK (or Zephyr) application you’re writing, we suggest you have a look at Nordic's DevAcademy course on nRF Connect SDK Fundamentals first so that it will be easier for you to follow and understand the code snippets described.
Registering the GATT Service
Ready to jump into code? I really hope you are!
The first thing to take care of is registering the GATT Service via the Zephyr Bluetooth API.
The most memory-efficient way to achieve this is using Zephyr C macros that statically (at build time) allocate the memory needed to add the Service and its Characteristics & Descriptors into the GATT table.
A more versatile way of registering a GATT Service in Zephyr is using a dynamic (runtime) registration by leveraging the dedicated API.
Static definition & registration
A first skeleton describing our service should look like this:
/* HID Service Definition */
BT_GATT_SERVICE_DEFINE(simplemouse_svc,
    BT_GATT_PRIMARY_SERVICE(BT_UUID_HIDS),
    …
);
At the moment, the Service definition (encapsulated into a hidden variable containing the simplemouse_svc identifier) is just declaring a Primary Service with HID Service UUID.
Without going into too much detail, implementing the macro BT_GATT_SERVICE_DEFINE will reserve enough memory for the Service by binding the symbol to a specific memory region defined in the linker script, which is scanned at boot time by the Bluetooth subsystem libraries to populate the Attribute Table.
We’ll add more entities inside the definition in the following section.
Runtime registration
There may be reasons for an application to dynamically change GATT Services implemented at runtime, for instance, when switching to a specific operational mode.
This functionality for Zephyr needs to be explicitly enabled via KConfig:
# KConfig
…
BT_GATT_DYNAMIC_DB=y
…
In this case, it will be possible at any time to register or unregister the Service:
// main.c

/* Register the service */
bt_gatt_service_register(&simplemouse_runtime_svc);

...
/* system running */
...

/* Unregister the service */
bt_gatt_service_unregister(&simplemouse_runtime_svc);
Keep in mind that in this case, possible memory benefits of unregistering a service at runtime are achievable only when using dynamic allocations, which increases the complexity of the application and can be a source of a lot of headaches in the long run.
Mouse HID Service: Characteristics and configuration
Given that we are more interested in the Bluetooth aspect of the project, let’s aim for simplicity and proceed with the static Service definition.
This is the list of the Characteristics we’ll need to implement:
- HID Information, HID Control Point, and Report Map as they’re mandatory for any HID Service implementation
- Protocol Mode and Boot Mouse Input Report, as we want to develop a legit HID mouse
- 1 x Input Report that will be used as a main streaming channel for Device → Host communication
We can now, quite literally, “fill the dots” in the code and add the blueprint for the Characteristics needed in the Service:
/* HID Service Definition */
BT_GATT_SERVICE_DEFINE(simplemouse_svc,
    BT_GATT_PRIMARY_SERVICE(BT_UUID_HIDS),

    /* Information Characteristic */
    BT_GATT_CHARACTERISTIC(
        BT_UUID_HIDS_INFO,
        BT_GATT_CHRC_READ,
        BT_GATT_PERM_READ_ENCRYPT,
        s_read_info, NULL, NULL),

    /* Control Point Characteristic */
    BT_GATT_CHARACTERISTIC(
        BT_UUID_HIDS_CTRL_POINT,
        BT_GATT_CHRC_WRITE_WITHOUT_RESP,
        BT_GATT_PERM_WRITE_ENCRYPT,
        NULL, s_write_ctrl_point, NULL),

    /* Report Map Characteristic */
    BT_GATT_CHARACTERISTIC(
        BT_UUID_HIDS_REPORT_MAP,
        BT_GATT_CHRC_READ,
        BT_GATT_PERM_READ_ENCRYPT,
        s_read_report_map, NULL, NULL),

    /* Protocol Mode Characteristic */
    BT_GATT_CHARACTERISTIC(
        BT_UUID_HIDS_PROTOCOL_MODE,
        BT_GATT_CHRC_READ | BT_GATT_CHRC_WRITE_WITHOUT_RESP,
        BT_GATT_PERM_READ_ENCRYPT | BT_GATT_PERM_WRITE_ENCRYPT,
        s_read_prot_mode, s_write_prot_mode, NULL),

    /* Boot Mouse Input Report Characteristic */
    BT_GATT_CHARACTERISTIC(
        BT_UUID_HIDS_BOOT_MOUSE_IN_REPORT,
        BT_GATT_CHRC_READ | BT_GATT_CHRC_NOTIFY,
        BT_GATT_PERM_READ_ENCRYPT,
        s_read_report, NULL,
        (hids_report_info_t *)&mse_boot_input_rep_info),
    BT_GATT_CCC(s_mse_boot_input_rep_ccc_changed,
        BT_GATT_PERM_READ | BT_GATT_PERM_WRITE_ENCRYPT),

    /* Mouse Input Report Characteristic (+ descriptor) */
    BT_GATT_CHARACTERISTIC(
        BT_UUID_HIDS_REPORT,
        BT_GATT_CHRC_READ | BT_GATT_CHRC_NOTIFY,
        BT_GATT_PERM_READ_ENCRYPT,
        s_read_report, NULL,
        (hids_report_info_t *)&mse_input_rep_info),
    BT_GATT_CCC(s_mse_input_rep_ccc_changed,
        BT_GATT_PERM_READ | BT_GATT_PERM_WRITE_ENCRYPT),
    BT_GATT_DESCRIPTOR(
        BT_UUID_HIDS_REPORT_REF,
        BT_GATT_PERM_READ,
        s_read_report_desc, NULL,
        (hids_report_desc_t *)&mse_input_desc),
);
Let’s try to dissect the highlights of the code:
- For each Characteristic added to the Service we are describing, in order:
- Its UUID
- Its Properties; expressed as bitflags
- Its Permissions; expressed as bitflags
- A Read operation callback, if supported by its Properties
- A Write operation callback, if supported by its Properties
- An optional pointer to user data passed to the operations callbacks
- Properties and Permissions of each added Characteristic take into account the functional and security requirements for the HID Profile we highlighted in Part 1 of this article
- Input Reports (Boot and Custom) also include a special descriptor that lets the Client control the Notifications generation (CCCD)
- The Mouse Input Report also includes an additional Descriptor helpful to recognize the ID of the HID report and its type (Input, Output, or Feature), as dictated by the HID Service specification (Report Reference)
The Simplemouse application: runtime operations
Connection establishment
Even before designing the interactions between the Device and the Host when connected, we’ll need to make sure the BLE Advertising is appropriately configured for any interested Host to detect our mouse when in range.
All the details about suggestions and mandatory requirements regarding before & after connection establishment are described in the HID-over-GATT Profile specification.
In practice, these are the parameters we are going to use:
| Parameter | Value |
|---|---|
| Advertising Data | Appearance as a mouse Connection flags as Limited Discoverable List of UUID16 services implemented containing HIDS, BAS, and DIS |
| Scan Response Data | Complete name of the Device |
| Advertising Interval | 30 ms to 50 ms |
| Advertising type (when not bonded) | Regular advertising |
| Advertising type (when bonded) | Directed advertising until first timeout, regular advertising afterward |
| Advertising Timeout | 180 secs |
| Connection Parameters | For the first 5 seconds after connection, the Device will accept any set of parameters from the Host. Afterward, it will request once to change to its preferred connection parameters: Minimum interval: 7.5 ms, Maximum interval: 22.5 ms, Peripheral Latency: 10, and Connection Supervision Timeout: 2 secs |
And the code to set them is below (in the prj.conf file):
# KConfig
...
CONFIG_BT_PERIPHERAL=y
CONFIG_BT_LIM_ADV_TIMEOUT=180
CONFIG_BT_SMP=y
CONFIG_BT_DEVICE_NAME="Simplemouse"

# Mouse appearance = 0x352
# (see https://www.bluetooth.com/specifications/assigned-numbers/)
CONFIG_BT_DEVICE_APPEARANCE=962

CONFIG_BT_PERIPHERAL_PREF_MIN_INT=6     # 7.5ms
CONFIG_BT_PERIPHERAL_PREF_MAX_INT=18    # 22.5ms
CONFIG_BT_PERIPHERAL_PREF_LATENCY=10    # 10 cycles
CONFIG_BT_PERIPHERAL_PREF_TIMEOUT=200   # 2 secs
CONFIG_BT_GAP_AUTO_UPDATE_CONN_PARAMS=y
...
// main.c
#define DEVICE_NAME CONFIG_BT_DEVICE_NAME
#define DEVICE_NAME_LEN (sizeof(DEVICE_NAME) - 1)
#define BT_ADV_INT_MIN 48 /* 0.625ms units --> 30ms */
#define BT_ADV_INT_MAX 80 /* 0.625ms units --> 50ms */
...
/* Advertising Data */
static const struct bt_data ad[] = {
/* Appearance */
BT_DATA_BYTES(BT_DATA_GAP_APPEARANCE,
(CONFIG_BT_DEVICE_APPEARANCE >> 0) & 0xff,
(CONFIG_BT_DEVICE_APPEARANCE >> 8) & 0xff),
/* Flags */
BT_DATA_BYTES(BT_DATA_FLAGS,
(BT_LE_AD_LIMITED | BT_LE_AD_NO_BREDR)),
/* List of UUID16 Services Implemented */
BT_DATA_BYTES(BT_DATA_UUID16_ALL,
BT_UUID_16_ENCODE(BT_UUID_HIDS_VAL),
BT_UUID_16_ENCODE(BT_UUID_BAS_VAL),
BT_UUID_16_ENCODE(BT_UUID_DIS_VAL)),
};
/* Scan Response Data */
static const struct bt_data sd[] = {
BT_DATA(BT_DATA_NAME_COMPLETE, DEVICE_NAME, DEVICE_NAME_LEN),
};
...
int err;
struct bt_le_adv_param adv_param;
/* Directed advertising if bonding is present
and we did not already timed out */
if ((bonded_addr_present) && (!dir_adv_timeout)) {
char addr_buf[BT_ADDR_LE_STR_LEN];
adv_param = *BT_LE_ADV_CONN_DIR(&bonded_addr);
adv_param.options |= BT_LE_ADV_OPT_DIR_ADDR_RPA;
err = bt_le_adv_start(&adv_param, NULL, 0, NULL, 0);
if (err) {
printk("Directed advertising failed to start\n");
return;
}
bt_addr_le_to_str(&bonded_addr, addr_buf, BT_ADDR_LE_STR_LEN);
printk("Direct advertising to %s started\n", addr_buf);
}
/* Regular advertising if no bonding is present */
else {
adv_param = *BT_LE_ADV_CONN;
adv_param.interval_min = BT_ADV_INT_MIN;
adv_param.interval_max = BT_ADV_INT_MAX;
adv_param.options |= BT_LE_ADV_OPT_ONE_TIME | BT_LE_ADV_OPT_SCANNABLE;
err = bt_le_adv_start(&adv_param, ad, ARRAY_SIZE(ad), sd, ARRAY_SIZE(sd));
if (err) {
printk("Advertising failed to start (err %d)\n", err);
return;
}
printk("Regular advertising started\n");
}Note: for this implementation, we respected all the mandatory requirements and some of the suggested ones; we’ll leave it as an exercise for the reader to find out which other guidelines we may have followed 😄.
Input mode selection
Provided that, naturally, any general-purpose development kit won’t let us design a real-mouse experience for the user once connected to a Host, we’ll have to find a workaround to test different kinds of inputs with the limited HW capabilities available.
This is the basic idea behind the system behavior:
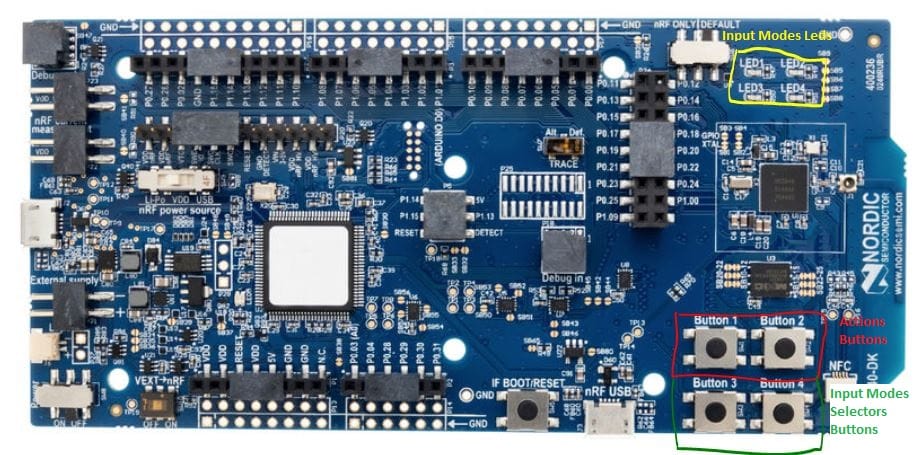
- Buttons 1 & 2 will represent our action inputs, which will result in different reports produced depending on the active Input Mode.
- Buttons 3 & 4 will be just used as Input Mode selectors, letting the user scroll a circular list of implemented modes in order to test different kinds of inputs with the action buttons. In other words, pressing on these buttons won’t generate any HID report.
See below the list of Input Modes we are going to implement:
- Click (Left & Right)
- X-Axis Movement (Left & Right)
- Y-Axis Movement (Up & Down)
- Vertical Scrolling (Up & Down)
The respective onboard LED (1…4) will be set accordingly to the active Input Mode.
Notifications to the Client
Upon connection, our Device will just wait for user inputs on the action buttons by periodically monitoring their states:
if (INPUT_MODE_CLICK == curr_input_mode) {
    /* Proceed notifying the new button state only if
       one of the 2 action buttons did change */
    if ((has_changed & KEY_LEFT_UP_MASK) ||
        (has_changed & KEY_RIGHT_DOWN_MASK)) {
        send_mouse_notification(
            button_state & (KEY_LEFT_UP_MASK | KEY_RIGHT_DOWN_MASK),
            0, 0, 0);
    }
} else if (INPUT_MODE_MOVEX == curr_input_mode) {
    if (button_state & KEY_LEFT_UP_MASK) {
        send_mouse_notification(0, -(MOVE_STEP_SIZE), 0, 0);
    } else if (button_state & KEY_RIGHT_DOWN_MASK) {
        send_mouse_notification(0, MOVE_STEP_SIZE, 0, 0);
    }
}
// Other input modes handled here...
The utility send_mouse_notification() will simply transform the parameters into a data blob to be sent over-the-air, using the Simplemouse HID Service public API:
static void send_mouse_notification(uint8_t buttons_bitmask,
                                    int16_t move_x,
                                    int16_t move_y,
                                    int8_t scroll_v) {
    simplemouse_hids_prot_mode_t currProtMode =
        simplemouse_hids_get_prot_mode();

    if (simplemouse_hids_is_mouse_report_writable()) {
        if (SIMPLEMOUSE_HIDS_PM_REPORT == currProtMode) {
            simplemouse_hids_report_mouse_t mse_report = {
                .buttons_bitmask = buttons_bitmask,
                .move_x_lsb = (uint8_t)move_x,
                .move_x_msb = (uint8_t)(move_x >> 8) & 0xFF,
                .move_y_lsb = (uint8_t)move_y,
                .move_y_msb = (uint8_t)(move_y >> 8) & 0xFF,
                .scroll_v = scroll_v
            };
            simplemouse_hids_mouse_notify_input(
                &mse_report,
                sizeof(simplemouse_hids_report_mouse_t));
        } else if (SIMPLEMOUSE_HIDS_PM_BOOT == currProtMode) {
            simplemouse_hids_report_mouse_boot_t mse_boot_report = {
                .buttons_bitmask = buttons_bitmask,
                .move_x = move_x,    // implicit cast to 8 bits
                .move_y = move_y,    // implicit cast to 8 bits
                .scroll_v = scroll_v
            };
            simplemouse_hids_mouse_notify_boot(
                &mse_boot_report,
                sizeof(simplemouse_hids_report_mouse_boot_t));
        }
    }
}
Aside from the Mouse Boot Report, which is by definition a 4-byte packet, the other Input Report defined in our Service shall follow a format dictated by the Report Map:
// simplemouse_hids.c

/* Report map */
static const uint8_t report_map[] = {
    /* MOUSE INPUT REPORT MAP */
    0x05, 0x01,                 // Usage Page (Generic Desktop Ctrls)
    0x09, 0x02,                 // Usage (Mouse)
    0xA1, 0x01,                 // Collection (Application)
    0x85, HIDS_REPORT_ID_MOUSE, //   Report ID (1)
    0x09, 0x01,                 //   Usage (Pointer)
    0xA1, 0x00,                 //   Collection (Physical)
    0x95, 0x02,                 //     Report Count (2)
    0x75, 0x01,                 //     Report Size (1)
    0x15, 0x00,                 //     Logical Minimum (0)
    0x25, 0x01,                 //     Logical Maximum (1)
    0x05, 0x09,                 //     Usage Page (Button)
    0x19, 0x01,                 //     Usage Minimum (0x01)
    0x29, 0x02,                 //     Usage Maximum (0x02)
    0x81, 0x02,                 //     Input (Data,Var,Abs,No Wrap...)
    0x95, 0x01,                 //     Report Count (1)
    0x75, 0x06,                 //     Report Size (6)
    0x81, 0x03,                 //     Input (Cnst, Var, Abs)
    0x05, 0x01,                 //     Usage Page (Generic Desktop Ctrls)
    0x16, 0x00, 0x80,           //     Logical Minimum (-32768)
    0x26, 0xFF, 0x7F,           //     Logical Maximum (32767)
    0x75, 0x10,                 //     Report Size (16)
    0x95, 0x02,                 //     Report Count (2)
    0x09, 0x30,                 //     Usage (X)
    0x09, 0x31,                 //     Usage (Y)
    0x81, 0x06,                 //     Input (Data,Var,Rel,No Wrap...)
    0x15, 0x81,                 //     Logical Minimum (-127)
    0x25, 0x7F,                 //     Logical Maximum (127)
    0x75, 0x08,                 //     Report Size (8)
    0x95, 0x01,                 //     Report Count (1)
    0x09, 0x38,                 //     Usage (Wheel)
    0x81, 0x06,                 //     Input (Data,Var,Rel,No Wrap...)
    0xC0,                       //   End Collection
    0xC0,                       // End Collection
};

// simplemouse_hids_def.h

/* Mouse Input Report format is defined according to
 * the Report Map characteristic:
 *  8 bits  - pressed buttons bitmask (2 LSB used + 6 MSB padding)
 *  16 bits - x movement
 *  16 bits - y movement
 *  8 bits  - vertical wheel rotation (device specific)
 */
typedef struct {
    uint8_t buttons_bitmask;
    uint8_t move_x_lsb;
    uint8_t move_x_msb;
    uint8_t move_y_lsb;
    uint8_t move_y_msb;
    uint8_t scroll_v;
} __packed simplemouse_hids_report_mouse_t;
Write operations on Characteristics handling
As we already know, the communication between the Device and the Host is not unidirectional: some of the Characteristics are meant to be used as a communication channel in the direction Host → Device.
For instance, setting the Protocol Mode is a typical operation that the Host may need to perform.
If we zoom in on the Service definition described earlier, we find that we registered a callback to handle this kind of operation:
…
/* Protocol Mode Characteristic */
BT_GATT_CHARACTERISTIC(
    BT_UUID_HIDS_PROTOCOL_MODE,
    BT_GATT_CHRC_READ | BT_GATT_CHRC_WRITE_WITHOUT_RESP,
    BT_GATT_PERM_READ_ENCRYPT | BT_GATT_PERM_WRITE_ENCRYPT,
    s_read_prot_mode, s_write_prot_mode, NULL),
…
As such, we’ll need to write a robust implementation for s_write_prot_mode():
static ssize_t s_write_prot_mode(
    struct bt_conn *conn,
    const struct bt_gatt_attr *attr,
    const void *buf,
    uint16_t len,
    uint16_t offset,
    uint8_t flags) {

    uint8_t *const prot_mode_ref = (uint8_t *const)&prot_mode;
    const simplemouse_hids_prot_mode_t newPm =
        *((const simplemouse_hids_prot_mode_t *)buf);

    /* Validate flags */
    if (!(flags & BT_GATT_WRITE_FLAG_CMD)) {
        /* Only write without response accepted */
        return BT_GATT_ERR(BT_ATT_ERR_WRITE_REQ_REJECTED);
    }

    /* Validate length */
    if ((offset + len) > sizeof(prot_mode)) {
        return BT_GATT_ERR(BT_ATT_ERR_INVALID_OFFSET);
    }

    /* Validate value received */
    if (newPm >= SIMPLEMOUSE_HIDS_PM_N) {
        return BT_GATT_ERR(BT_ATT_ERR_NOT_SUPPORTED);
    }

    memcpy(prot_mode_ref + offset, buf, len);
    return len;
}
This way, the internal representation of the Protocol Mode is updated (prot_mode variable) in the module implementing the Service, and each new call to simplemouse_hids_get_prot_mode() will return its most updated value.
A real-life demo
Development Tips & Tricks
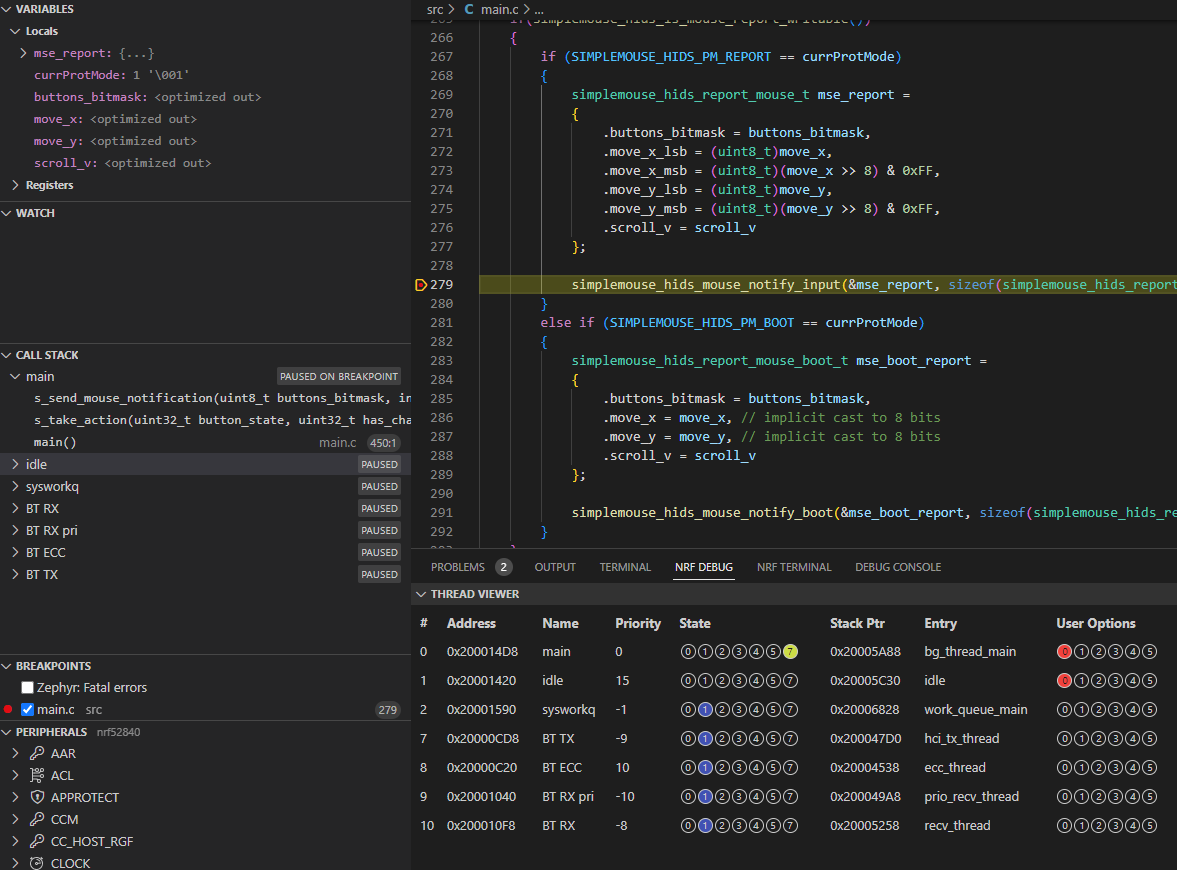
The Simplemouse application has been developed using the following facilities:
- Visual Studio Code as the main editor / IDE
- nRF Connect for VS Code Extension Pack installed locally on the Windows Host
- Nordic Connect SDK 2.0.0 is installed on the Host.
Actually, it is fair to say that the peripheral_hids_mouse sample represented the starting point for our application 😉
The extensions provided by Nordic significantly reduce the time spent to get the ball rolling, especially when it comes to writing & browsing the code with Intellisense enabled, inspecting KConfig options, building with different configurations, flashing the binaries on target, and, most of all, debugging!
Simplemouse in action
You’ll soon find out that it’s not that hard to test a common HID Device such as a mouse: it’s very likely that any general-purpose computer in your proximity already comes with the needed drivers!
In our case, the tests have been carried out on connecting the Nordic DK with a Windows 10 Host.
And here we have a full sequence, demonstrating the four different Input Modes available in action just after the connection and pairing are established with the Host:
Further improvements to the application
Last but least, here for you some starting points for reflections that may help you design a better version of our Simplemouse or your own BLE product based on Zephyr:
- Notifications Control Flow
Our code is just blindly sending out notifications when new data is ready. However, most HID devices will need to be careful and implement a control flow based on the following: - the size of the internal buffer used by the BT stack to queue notifications
and - events confirming that notifications already queued have been sent.
- Synchronization between application and Radio activities
As we know, all BLE communications are based on periodic connection events that define when the Client and Server are going to send & receive packets.
When fine-tuning your application, you will often find out that synchronizing the application activities (sensor sampling, ADC acquisition, algorithms, etc.) with these Radio events is very beneficial from a power consumption and code architecture simplification standpoint. - (Basic) threads IPC
Zephyr BT Subsystem works by spawning some threads for runtime operations. This means that operations executed inside callbacks are running in the context of one of these computational units. Any data shared between the application threads and BT threads is in danger of becoming a victim of race conditions: beware of these risks when designing the execution flow of your software! - Event-Driven architecture
Our application monitors the button states using a control-loop approach, that is, by periodically reading their GPIOs.
In order to make your device more power efficient, we suggest an event-driven approach, where IRQs can help detect events from the buttons. However, the application can still track time, if needed, by launching dedicated timers.
Of course, this will make the execution flow less obvious, but it is the price to pay to increase the CPU idle time, saving battery power. - BLE connection parameters fine-tuning
The connection parameters used for this application are typical for a general-purpose mouse, but be aware that your HID device may be very different: not every time minimizing latency is important!
We suggest that, rather than using default parameters, you reflect on the use cases of your applications and understand if it’s better to prioritize responsiveness or power saving. No one can tell you what’s best unless it is the Marketing Team at your organization speaking with you 📈
Conclusion & Resources
Thanks for following along with this tutorial! We hope you found it helpful as you dive deeper into Bluetooth HID technology.
And if you’re looking for more support, take a look at these resources:
- Comprehensive Resources - The Bluetooth Developer Academy
- Blog Article - Bluetooth HID: An Introduction to Human Interface Devices with BLE
- Official Spec - USB HID
- Official Spec - BLE HID-over-GATT Profile
- Official Spec - BLE HID Service
HID Simple Mouse — Complete Source Code
Get the full Zephyr RTOS project for the nRF52840 DK, ready to build and flash.
No spam. Unsubscribe with one click.


