It feels like an eternity since Bluetooth beacons were introduced! Sure, it's been about 10 years, and yet they still show up in new use cases every single day. In today's tutorial, we are going to focus on Apple's iBeacon technology standard and implement our own iBeacon device step-by-step on the Silicon Labs BG22 Explorer Kit.
The BG22 Explorer Kit is a powerful, yet cost-effective, development kit priced at only $10! It serves as the perfect development kit for the task of implementing an iBeacon device.
What are Bluetooth Beacons?
As the name beacon implies, it is simply a term given to Bluetooth devices that operate in transmit-only mode, broadcasting data for other Bluetooth devices to discover them.
Here are a few common properties of Bluetooth beacons:
- They are battery-powered
- They broadcast data that includes one or more unique identifiers
- In some cases, they also broadcast telemetry data such as battery voltage reading, temperature, timestamp since power up, etc
- They are commonly used in location-based services and applications
- and finally, the RSSI of the beacon is used to approximate the location of the beacon
Beacons are used in many applications. some examples include:
- Wireless sensors (temperature, humidity, pressure, motion, etc.)
- Payment systems (e.g., triggering financial transactions on mobile phones)
- Indoor navigation systems
- Asset tracking
- Any combination of the above
A couple of very popular beacon standards that you’ve probably heard of, iBeacon and Eddystone. But, keep in mind that a beacon standard is nothing more than a definition for the format of data that’s included in the advertising packets. So it’s not some new protocol or wireless standard or anything like that.
iBeacon is a standard that was introduced by Apple and Eddystone by Google. For this tutorial, we will focus on iBeacon. For a general overview of Bluetooth beacons, refer to my previous blog post on the topic.
Refresher: Advertising Data Format
Before getting into the format for the iBeacon standard, let’s recap what advertising data looks like:
LTV #1
LTV #2
LTV #3
The advertising data is arranged in Length-Type-Value tuples. Each of these contains a specific type of advertising data. So in this example, you can see that we have three different advertising data types included:
- Flags indicate whether the device is general discoverable, limited discoverable, or not discoverable at all. They also indicate whether BR/EDR is supported or not (needed for dual-mode devices).
- Complete list of 16-bit UUIDs. This is a "shortcut" for informing the scanner what 16-bit services are included in the GATT database for the device.
- A complete local name, which is basically a device name.
iBeacon Data Format
This is what the iBeacon data format looks like (click the image to view in full-screen mode):
Flags
Manufacturer Specific Data
(0x4C 0x00)
(iBeacon)
0x02
Length
0x15
(16 bytes)
(2 bytes)
(2 bytes)
(1 byte signed)
An iBeacon is required to send out the following advertising data types:
Flags:
BR/EDR not supported bit set
General discoverable mode bit set
Manufacturer Specific Data, which is a way to include proprietary vendor data. For iBeacon, it contains the following:
The first is the length (standard and fixed)
The second is the type (standard and fixed)
The third is the company ID (registered with the SIG, 0x004C in the case of Apple), but in reverse byte order, since it needs to be in Little Endian format
And then actual data which includes:
Subtype, set to 0x02 which corresponds to iBeacon per Apple’s spec.
Subtype length (0x15)
Next comes the user-defined fields. These include:
16-byte UUID (defined by the user), think of it as a unique ID you define for all your devices or product line
A 2-byte major number: think of it as a location
A 2-byte minor number: think of it as a sub-location
And finally, a signed 1-byte value, which represents the Tx power: the average signal power measured at 1 meter from the device
As you can see, the standard really just defines the format of the data included in the advertising packets, nothing more!
iBeacon Implementation on Silicon Labs BG22 Explorer Kit
Now, let’s go ahead and implement each of these on the BG22 Explorer Kit, which is a $10 development kit provided by Silicon Labs, and we’ll be discovering the beacon device via the Silicon Labs EFR Connect mobile app.
To do this, we first have to download and install Simplicity Studio, which is the official IDE from Silicon Labs for working with their chipsets and development kits. You can do so here.
Once you have Simplicity Studio downloaded, connect the BG22 Explorer Kit to your computer. Now, navigate to the Launch perspective and it should now show up there under Connected Devices. Then, hit Start.

Loading Bootloader
Now, first, we want to run one of the demo applications in order to load the bootloader onto the device. We'll be running the SoC Blinky Demo example:
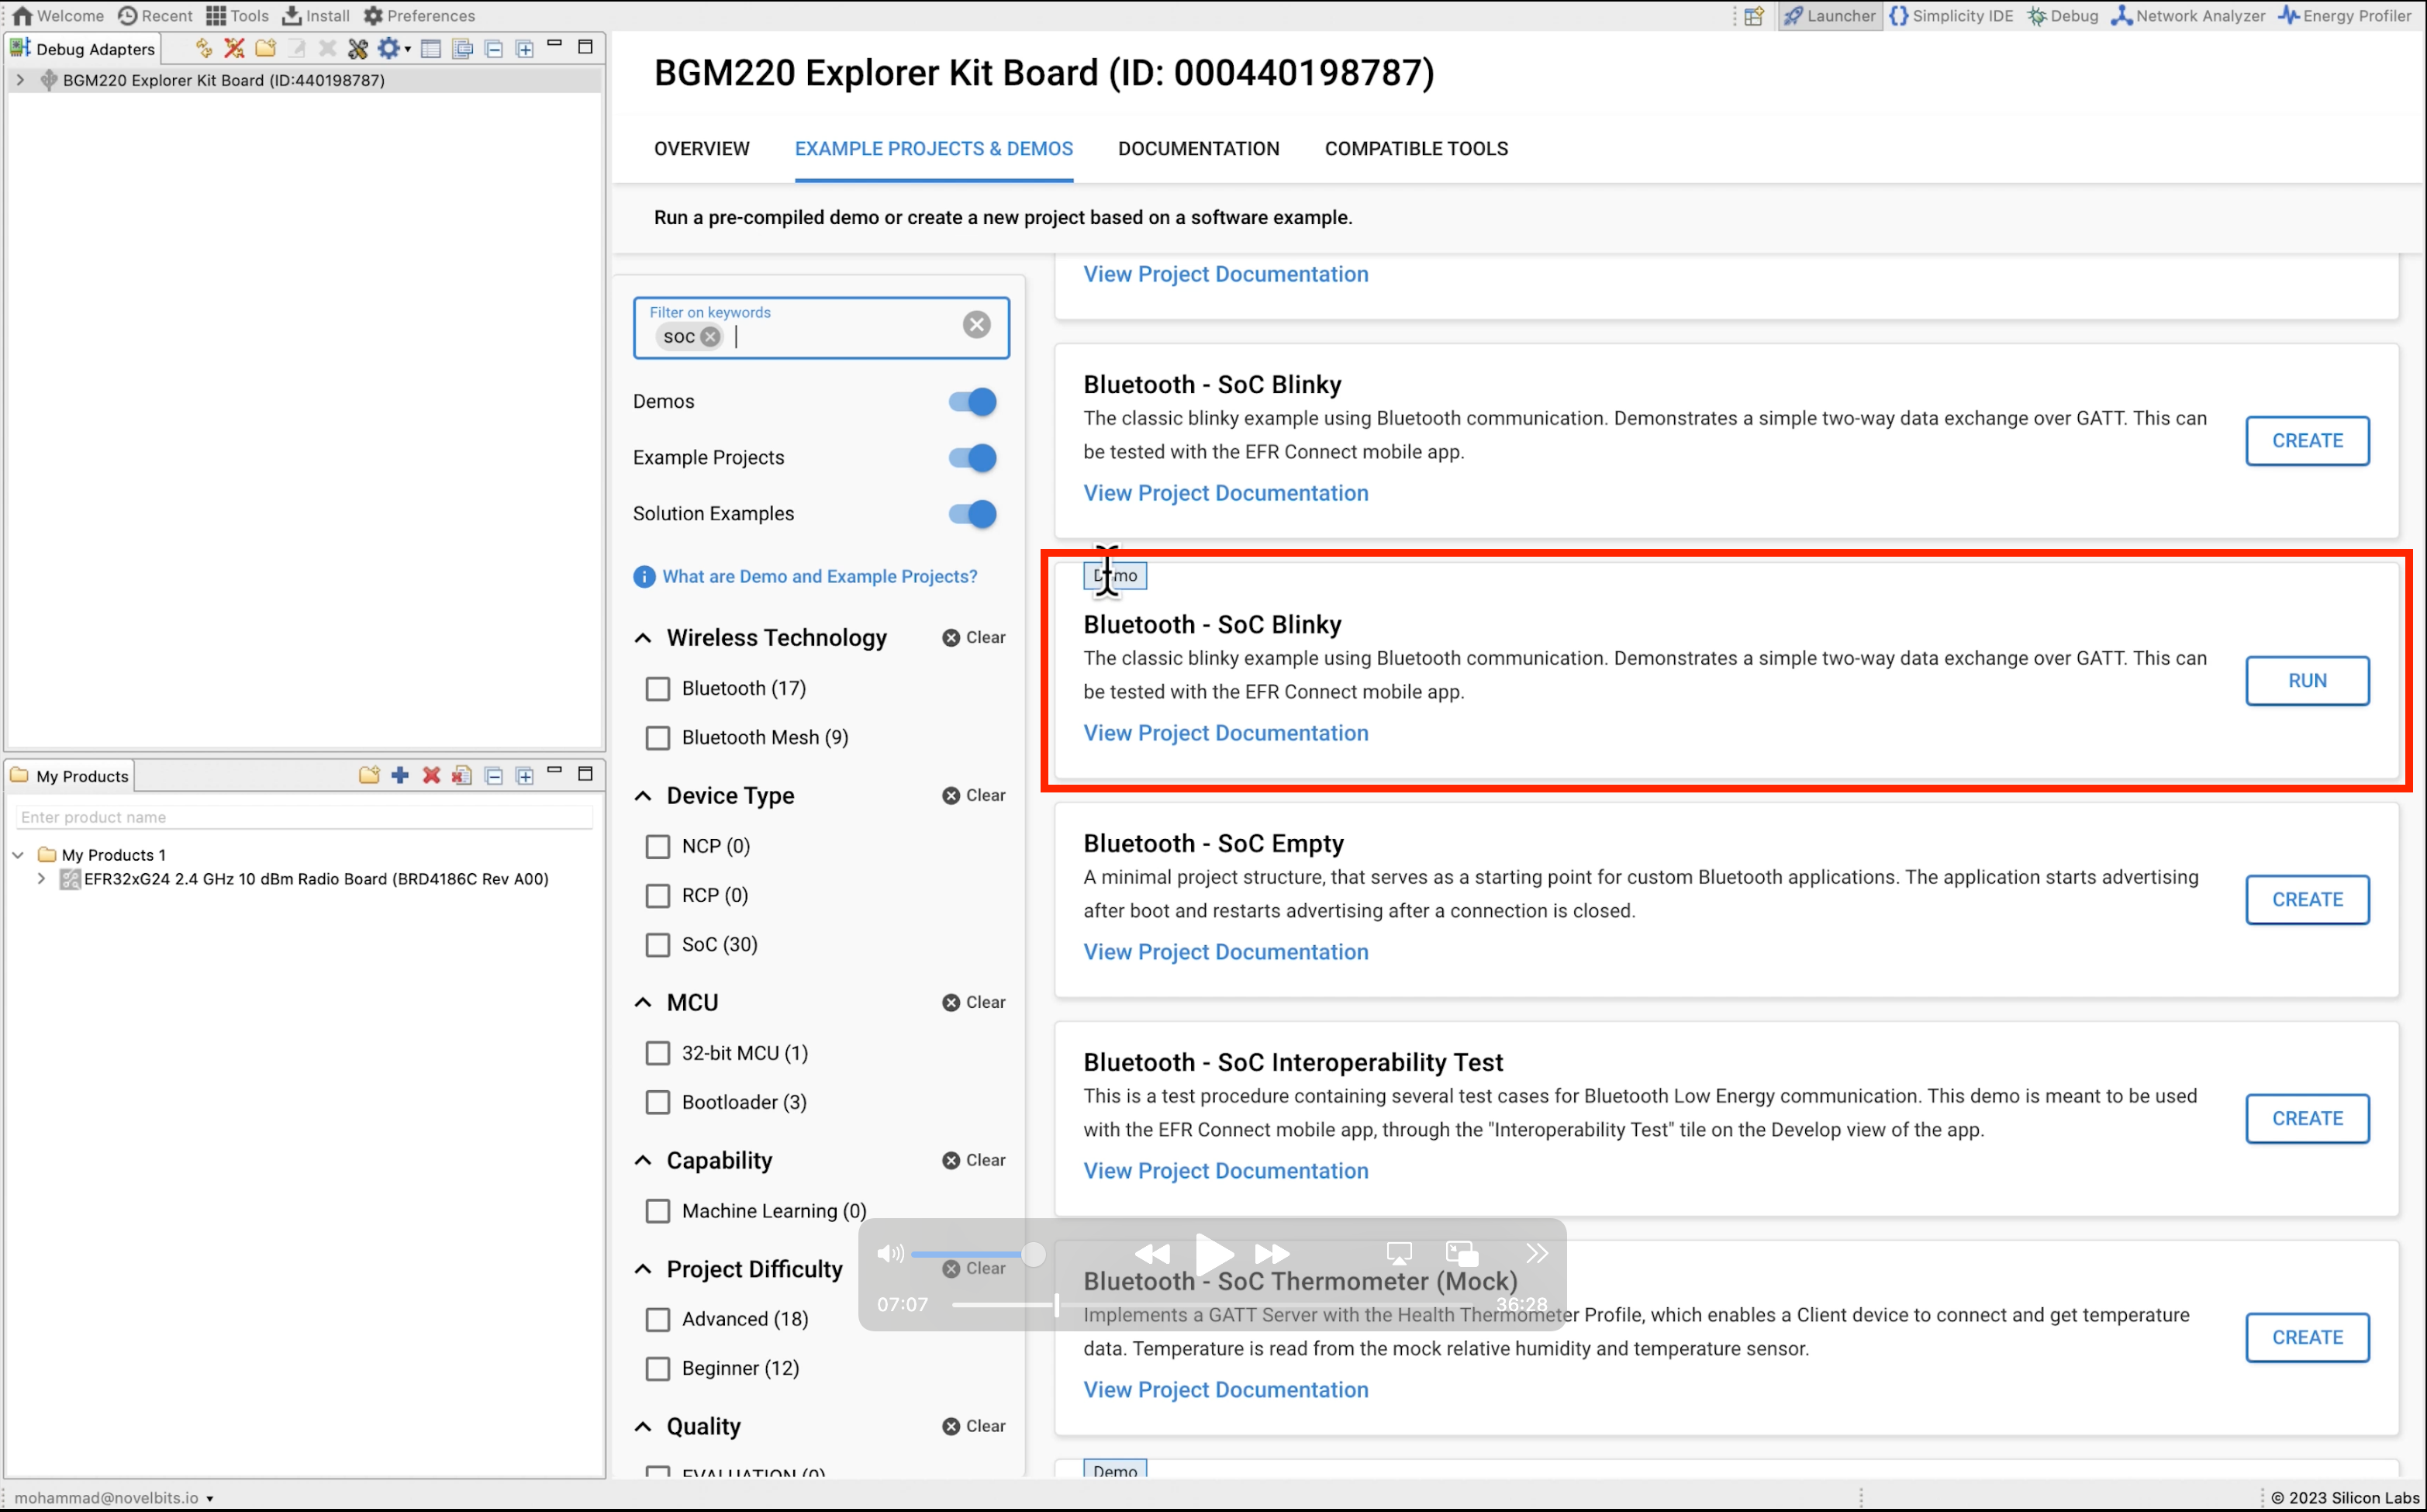
Once you run the demo, the device will now have the bootloader installed on it, so we don't have to worry about it from here on.
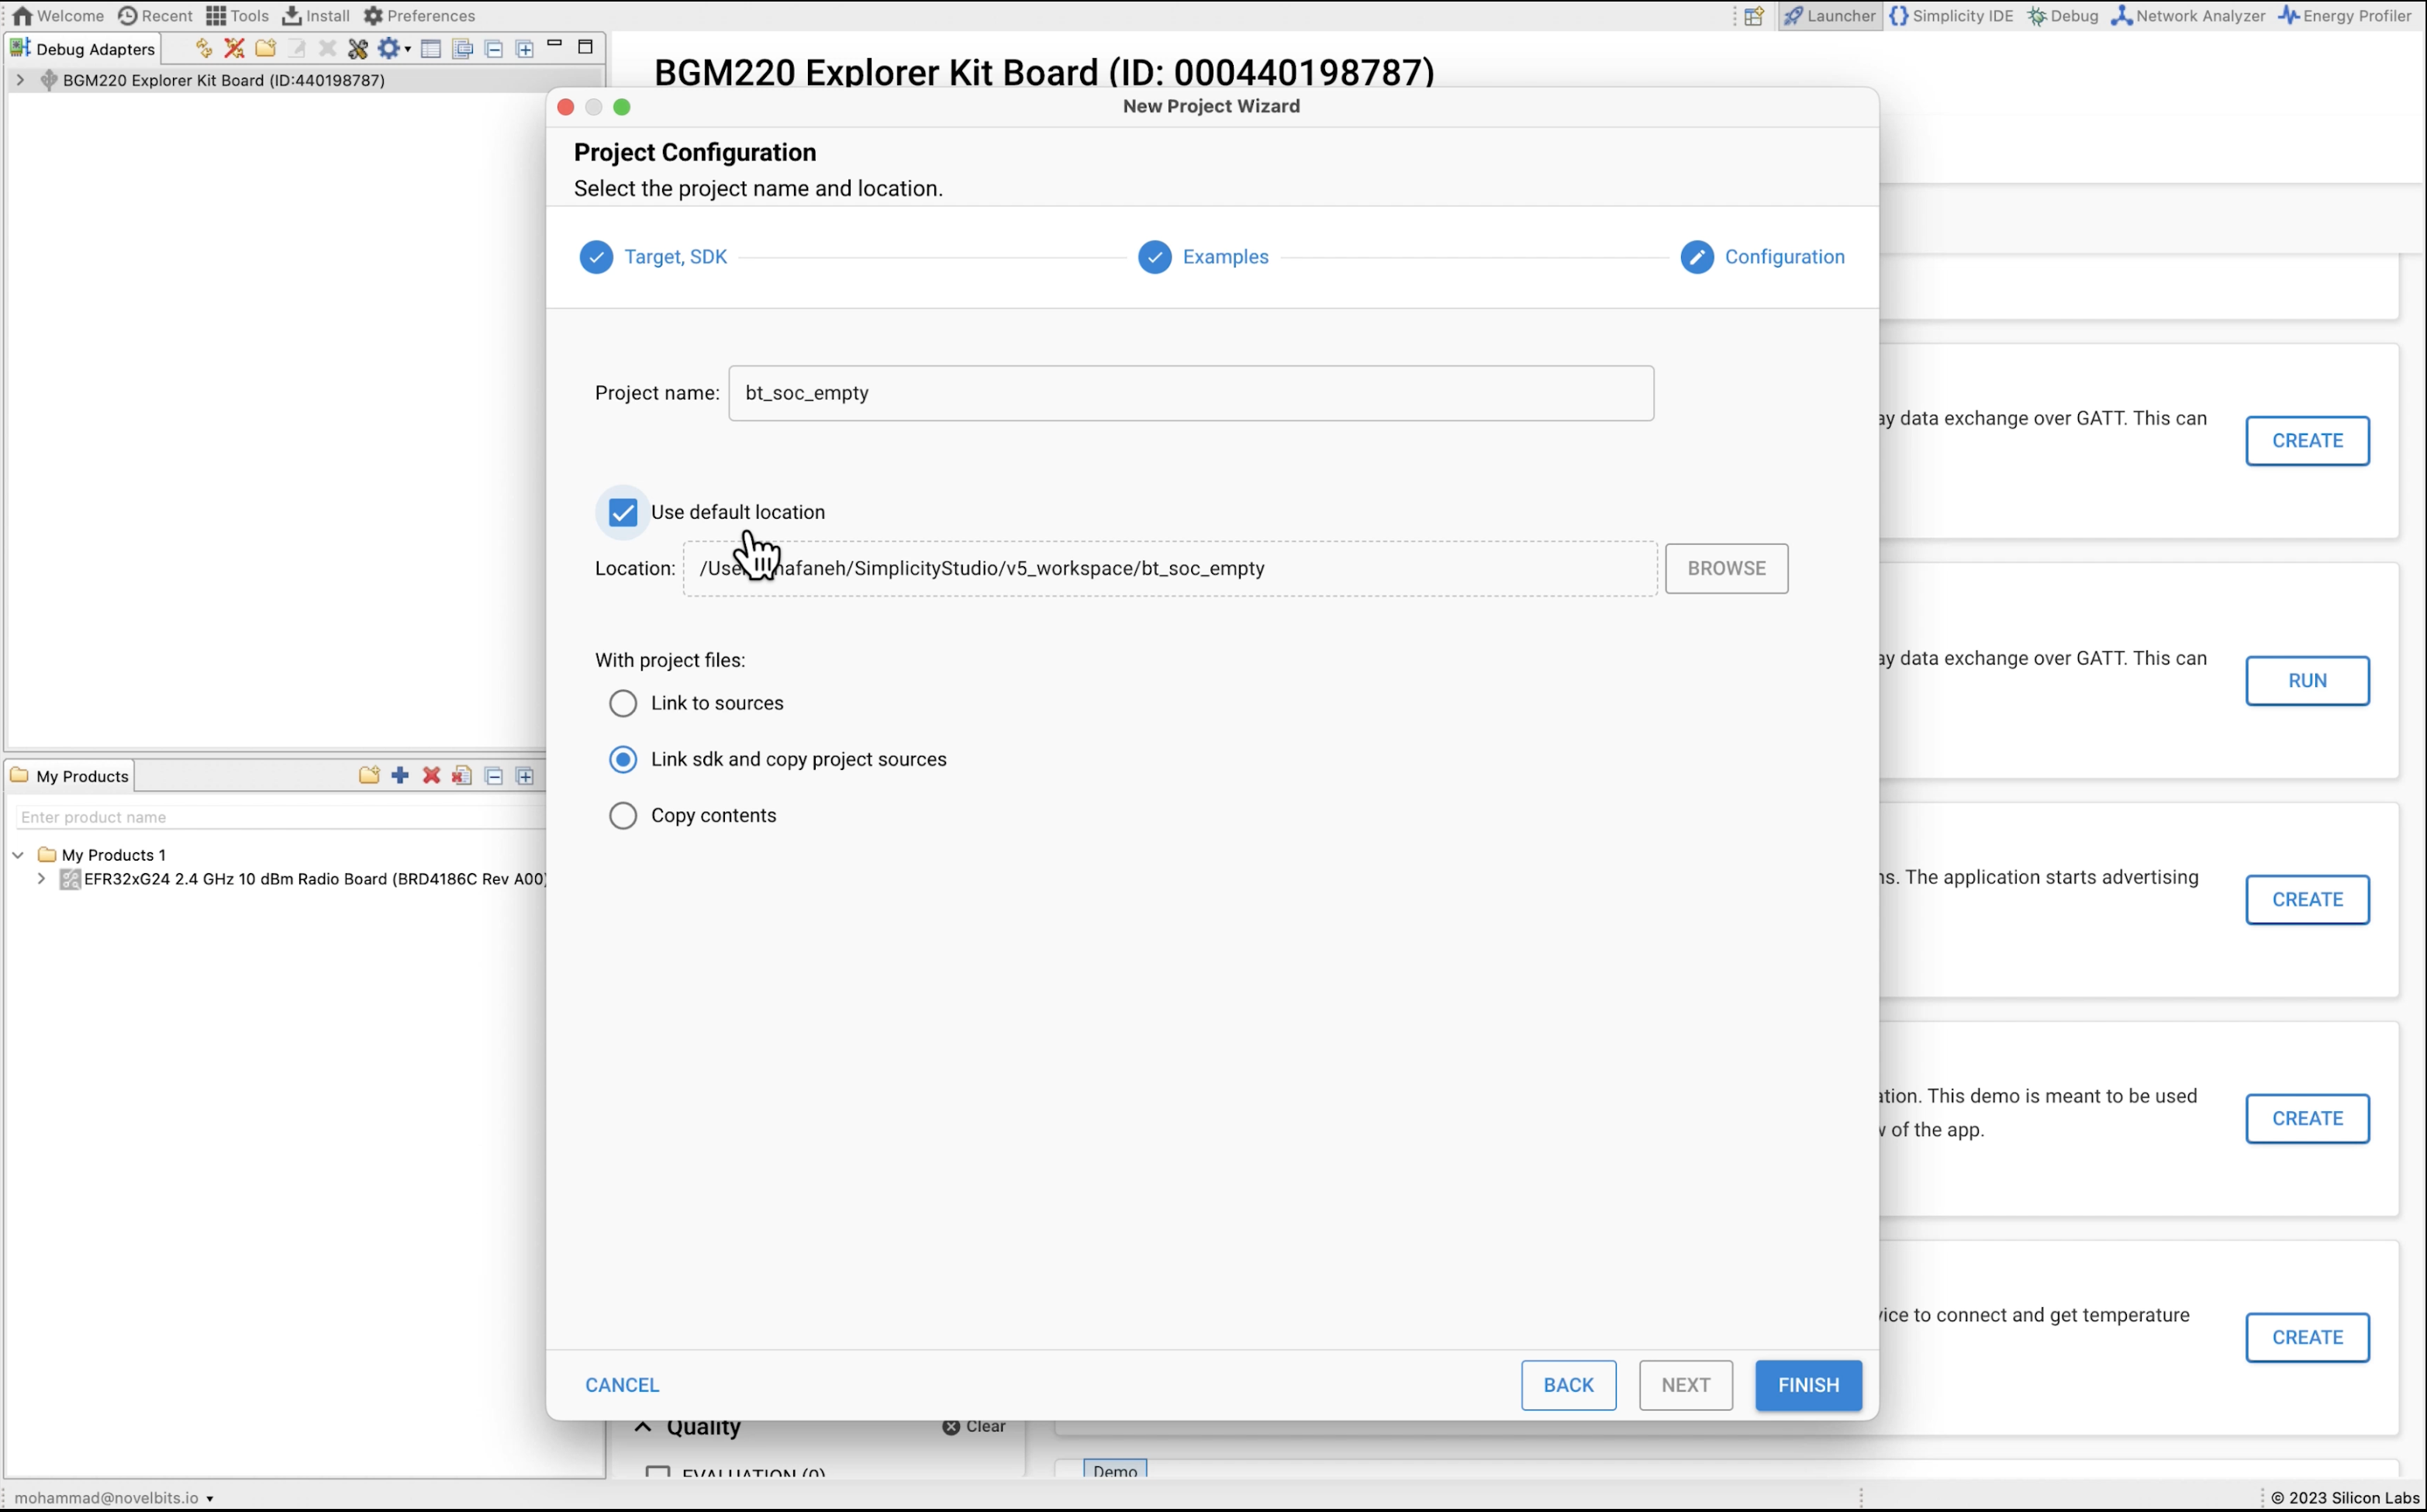
Creating a Project Based on Example
Next, we want to create a project based on the SoC Empty example. Hit create and set a name for your project:
Now that we have the project ready, we will start adding code to set our advertising data for the device.
Defining the Advertising Data
In terms of advertising data, recall that we need two advertising data types included with certain settings:
- Flags: fixed value
- Manufacturer Specific Data: includes fixed values and four variables (UUID, Major, Minor, and Tx Power)
We'll use the following values:
- UUID:
01020304-0506-0708-090A-0B0C0D0E0F10 - Major: 1
- Minor: 2
- Tx Power: 0
Defining the Flags
If you remember, the advertising data entries follow the format Length-Type-Value.
For Flags that would be: 0x02-0x01-0x06. In app.c, let's add the following code right below the #include statements for the Flags:
// Flags
#define ADVERTISE_FLAGS_LENGTH 0x02
#define ADVERTISE_FLAGS_TYPE   0x01
#define ADVERTISE_FLAGS_VALUE  0x06
Defining the Manufacturer Specific Data
The Manufacturer Specific Data entry is the one containing the most important information:
Length:
0x1A(fixed)Type:
0xFF(fixed)Value:
Company ID (Apple):
0x004C(fixed)Manufacturer Specific Data Value:
iBeacon Subtype: 0x02 (fixed)
Subtype Length: 0x15 (fixed)
UUID:
0x01, 0x02, 0x03, 0x04, 0x05, 0x06, 0x07, 0x08, 0x09, 0x0A, 0x0B, 0x0C, 0x0D, 0x0E, 0x0F, 0x10Major:
0x0001Minor:
0x0002TX Power:
0x00
Let's put this all together in code! In app.c, let's add the following code right below the Flags definition:
// Manufacturer Specific Data
#define ADVERTISE_MANDATA_LENGTH      0x1A
#define ADVERTISE_MANDATA_TYPE        0xFF
#define ADVERTISE_MANDATA_COMPANY_ID  0x004C
#define ADVERTISE_MANDATA_VALUE       { 0x02, 0x15, 0x01, 0x02, 0x03, 0x04, 0x05,\
                                        0x06, 0x07, 0x08, 0x09, 0x0A, 0x0B, 0x0C, 0x0D, 0x0E, 0x0F, 0x10,\
                                        0x00, 0x01,\
                                        0x00, 0x02,\
                                        0x00}
We added "\" in order to break up lines into a more readable format.
The company ID is a two-byte value (0x004C), but it needs to be stored in the advertising data in Little Endian format, so we'll add a macro to do that conversion for us (and also convert from a 16-byte value to an array of two bytes):
#define UINT16_TO_BYTES(x) { (uint8_t)(x), (uint8_t)((x) >> 8) }Advertising Data Struct
For storing the advertising data, we will define a struct as follows:
typedef struct
{
  uint8_t flags_length;
  uint8_t flags_type;
  uint8_t flags_value;
  uint8_t mandata_length;
  uint8_t mandata_type;
  uint8_t mandata_company_id[2];
  uint8_t mandata_value[23];

} ble_advertise_data_t;
Now, we're going to store the values we decided on in a macro so we can assign a struct to statically contain these values:
#define ADVERTISE_DATA_DEFAULT \
{ \
  .flags_length = ADVERTISE_FLAGS_LENGTH, \
  .flags_type = ADVERTISE_FLAGS_TYPE,\
  .flags_value = ADVERTISE_FLAGS_VALUE,\
  .mandata_length = ADVERTISE_MANDATA_LENGTH,\
  .mandata_type = ADVERTISE_MANDATA_TYPE,\
  .mandata_company_id = UINT16_TO_BYTES(ADVERTISE_MANDATA_COMPANY_ID),\
  .mandata_value = ADVERTISE_MANDATA_VALUE\
}
Again, the "\" is added here at the end of each line in order to break it up into more readable code (since a macro needs to sit on one line we can't just break it up into separate lines without the special character).
Now we define a struct variable and assign it:
static const ble_advertise_data_t adv_data = ADVERTISE_DATA_DEFAULT;Setting the Advertising Data
Now we need to modify the code in sl_bt_on_event() to set the advertising data we just defined.
Just under the following switch case:
case sl_bt_evt_system_boot_id:Replace the code with the following:
// Create an advertising set.
      sc = sl_bt_advertiser_create_set(&advertising_set_handle);
      app_assert_status(sc);


      // Set Advertising data
      sc = sl_bt_legacy_advertiser_set_data(advertising_set_handle,
                                            sl_bt_advertiser_advertising_data_packet,
                                            sizeof(ble_advertise_data_t),
                                            (uint8_t *)&adv_data);
      app_assert_status(sc);

      // Set advertising interval to 100ms.
      sc = sl_bt_advertiser_set_timing(
        advertising_set_handle,
        160, // min. adv. interval (milliseconds * 1.6)
        160, // max. adv. interval (milliseconds * 1.6)
        0,   // adv. duration
        0);  // max. num. adv. events
      app_assert_status(sc);

      // Start advertising and enable connections.
      sc = sl_bt_legacy_advertiser_start(advertising_set_handle,
                                         sl_bt_advertiser_non_connectable);
      app_assert_status(sc);
Let's recap what we did here:
We did not change anything with creating the advertising set
For setting the advertising data, we called
sl_bt_legacy_advertiser_set_data()We passed it the advertising set handle (
advertising_set_handle)We set the type to
sl_bt_advertiser_advertising_data_packetWe set the data length to
sizeof(ble_advertise_data_t)We set the data to
(uint8_t *)&adv_data
We did not change anything with the advertising interval setting
We modified the advertiser start function
sl_bt_legacy_advertiser_startto set the type tosl_bt_advertiser_non_connectable(for non-connectable, non-scannable type)
Remove Connection-Based Handlers
The final change we need to make it remove the handlers for the connection and disconnection scenarios (since we changed our advertising set to non-connectable).
For the following switch-cases, make the following change (removing the function calls):
// -------------------------------
// This event indicates that a new connection was opened.
case sl_bt_evt_connection_opened_id:
  break;

// -------------------------------
// This event indicates that a connection was closed.
case sl_bt_evt_connection_closed_id:
  break;
Adding Logging of Bluetooth Device Address
Let's add one more thing before we start testing: logging the Bluetooth Device Address.
Installing the Necessary Software Components
To do this, we need to first add two Software Components: Log and IO Stream USART. These will enable logging to the UART which can be monitored via a serial terminal on the development PC.
We can do this by:
- Navigating and double-clicking on the file <Project Name>.slcp file in your project
- Navigating to Software Components (you might have to wait for a few seconds before everything loads up)
- Search for "io stream" and look for Services -> IO Stream -> Driver -> IO Stream: USART and install it
- Search for "log" and look for Application -> Utility -> Log and install it
Now we're ready to add some log messages to our application.
Adding Log Messages
Under case sl_bt_evt_system_boot_id: let's add the following log message:
app_log("iBeacon example started!\r\n");Finally, we'll add code to retrieve and print out the Bluetooth Device Address (BD_ADDR):
// Retrieve the BT Address.
sc = sl_bt_system_get_identity_address(&address, &address_type);
app_assert_status(sc);
app_log("BT Address: ");
for (int i=0; i<5; i++)
{
app_log("%02X:", address.addr[5-i]);
}
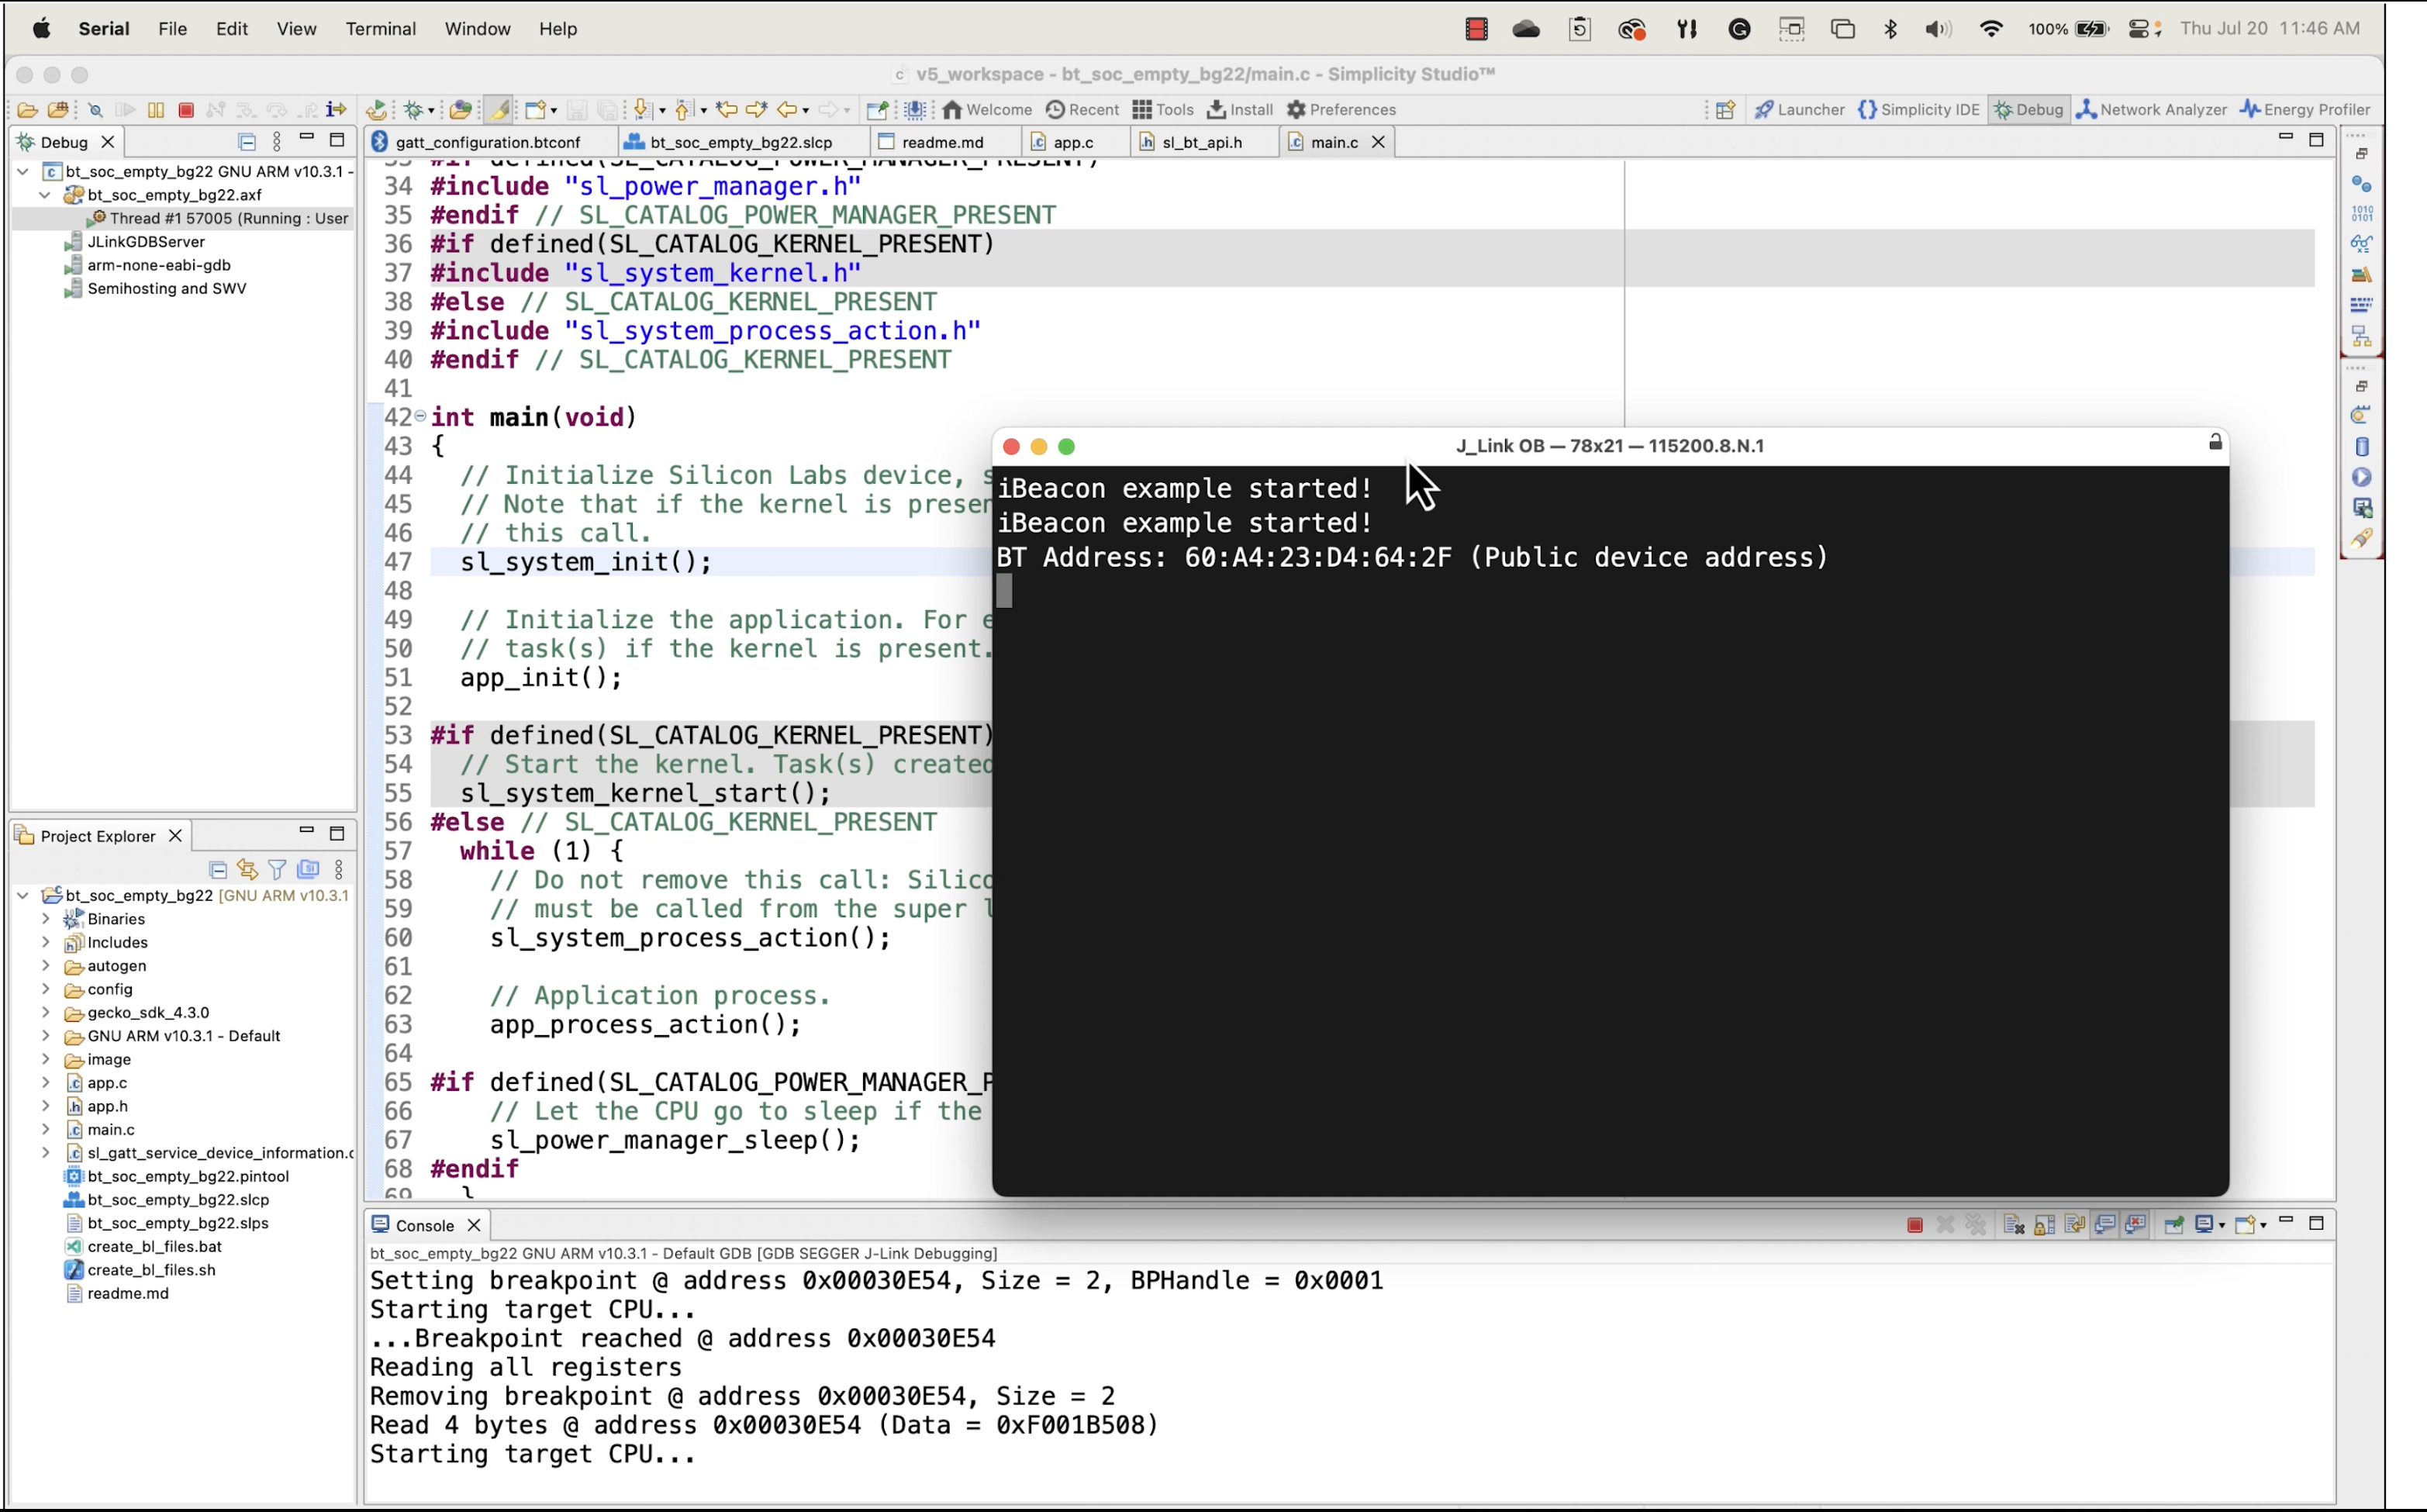
app_log("%02X (%s)\r\n", address.addr[0], address_type == 0 ? "Public device address": "Static random address");Now we can build and run our application and by running a serial terminal program on your development machine, you should see the following (obviously, your device's address will probably be different):
Testing from the EFR Connect Mobile App
We're at the final stage, and ready to test our application!
We'll be using the EFR Connect mobile app from Silicon Labs for this test. You can download it from here (iOS) and here (Android).
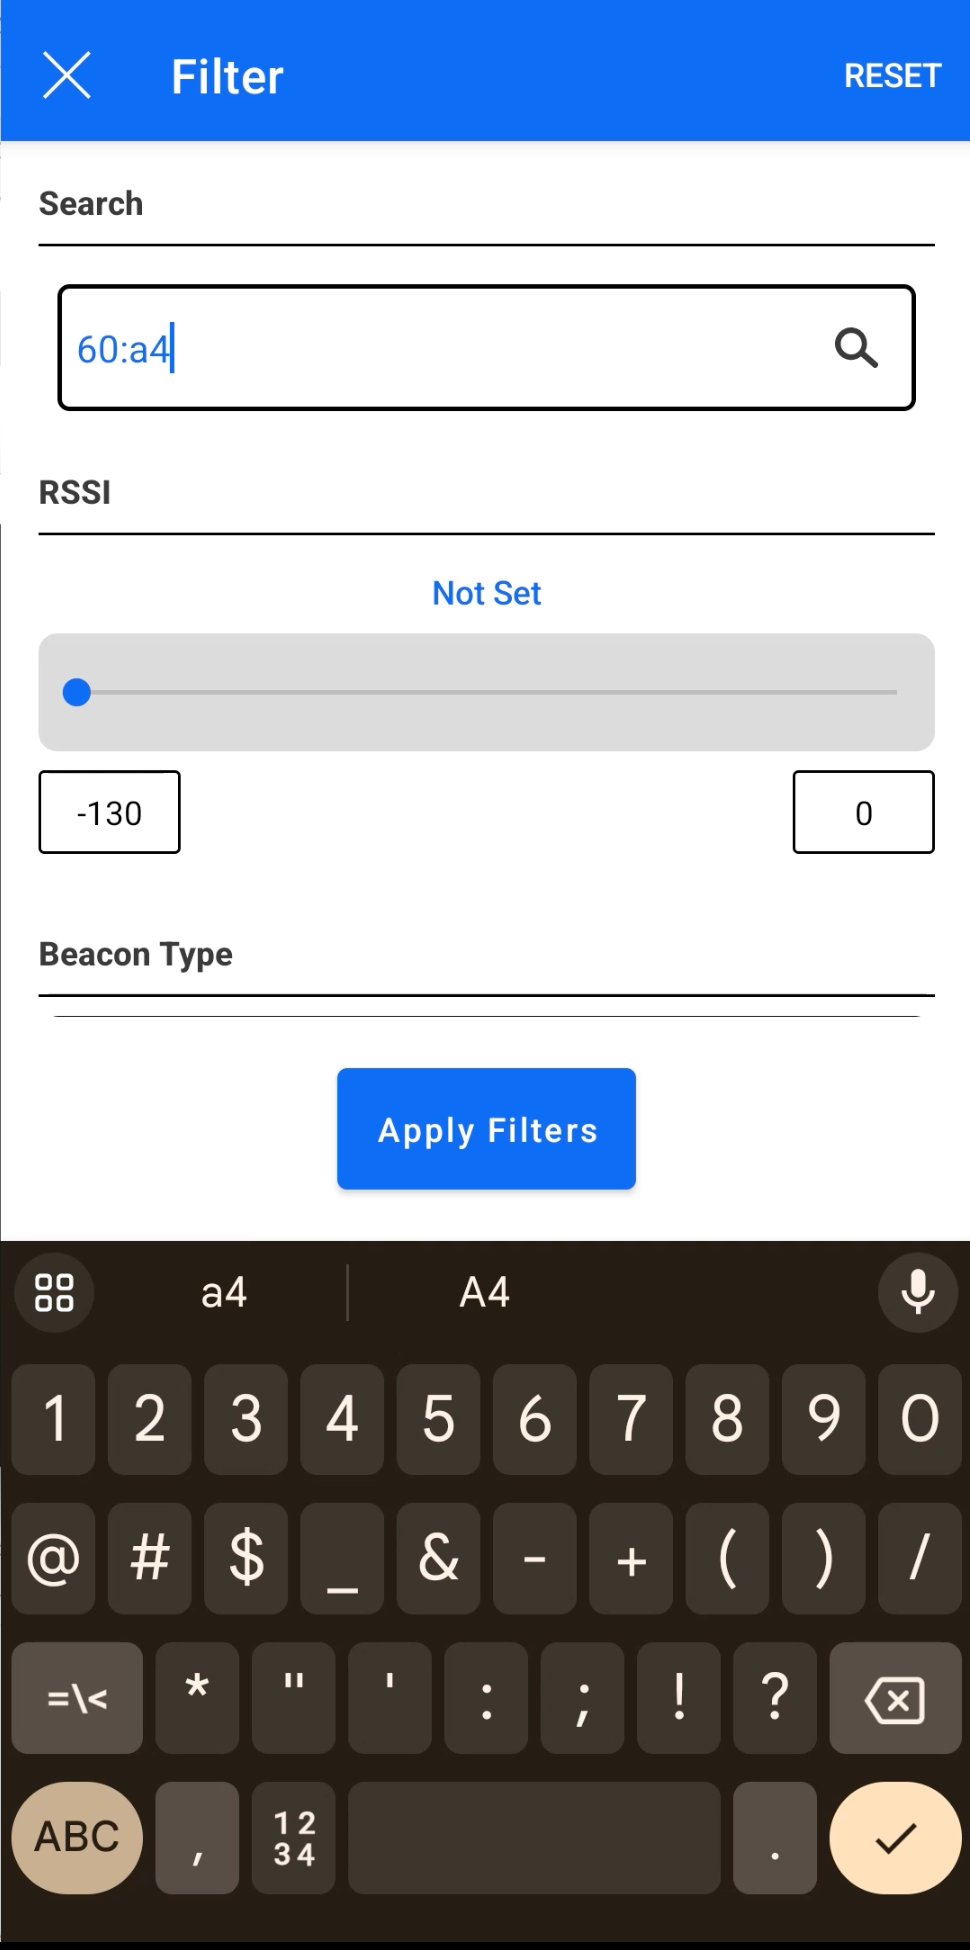
Filtering via Bluetooth Device Address
Launch the EFR Connect mobile app and add a filter for your device address in the scanning view (you can probably get away with just the first 2 bytes of the address):
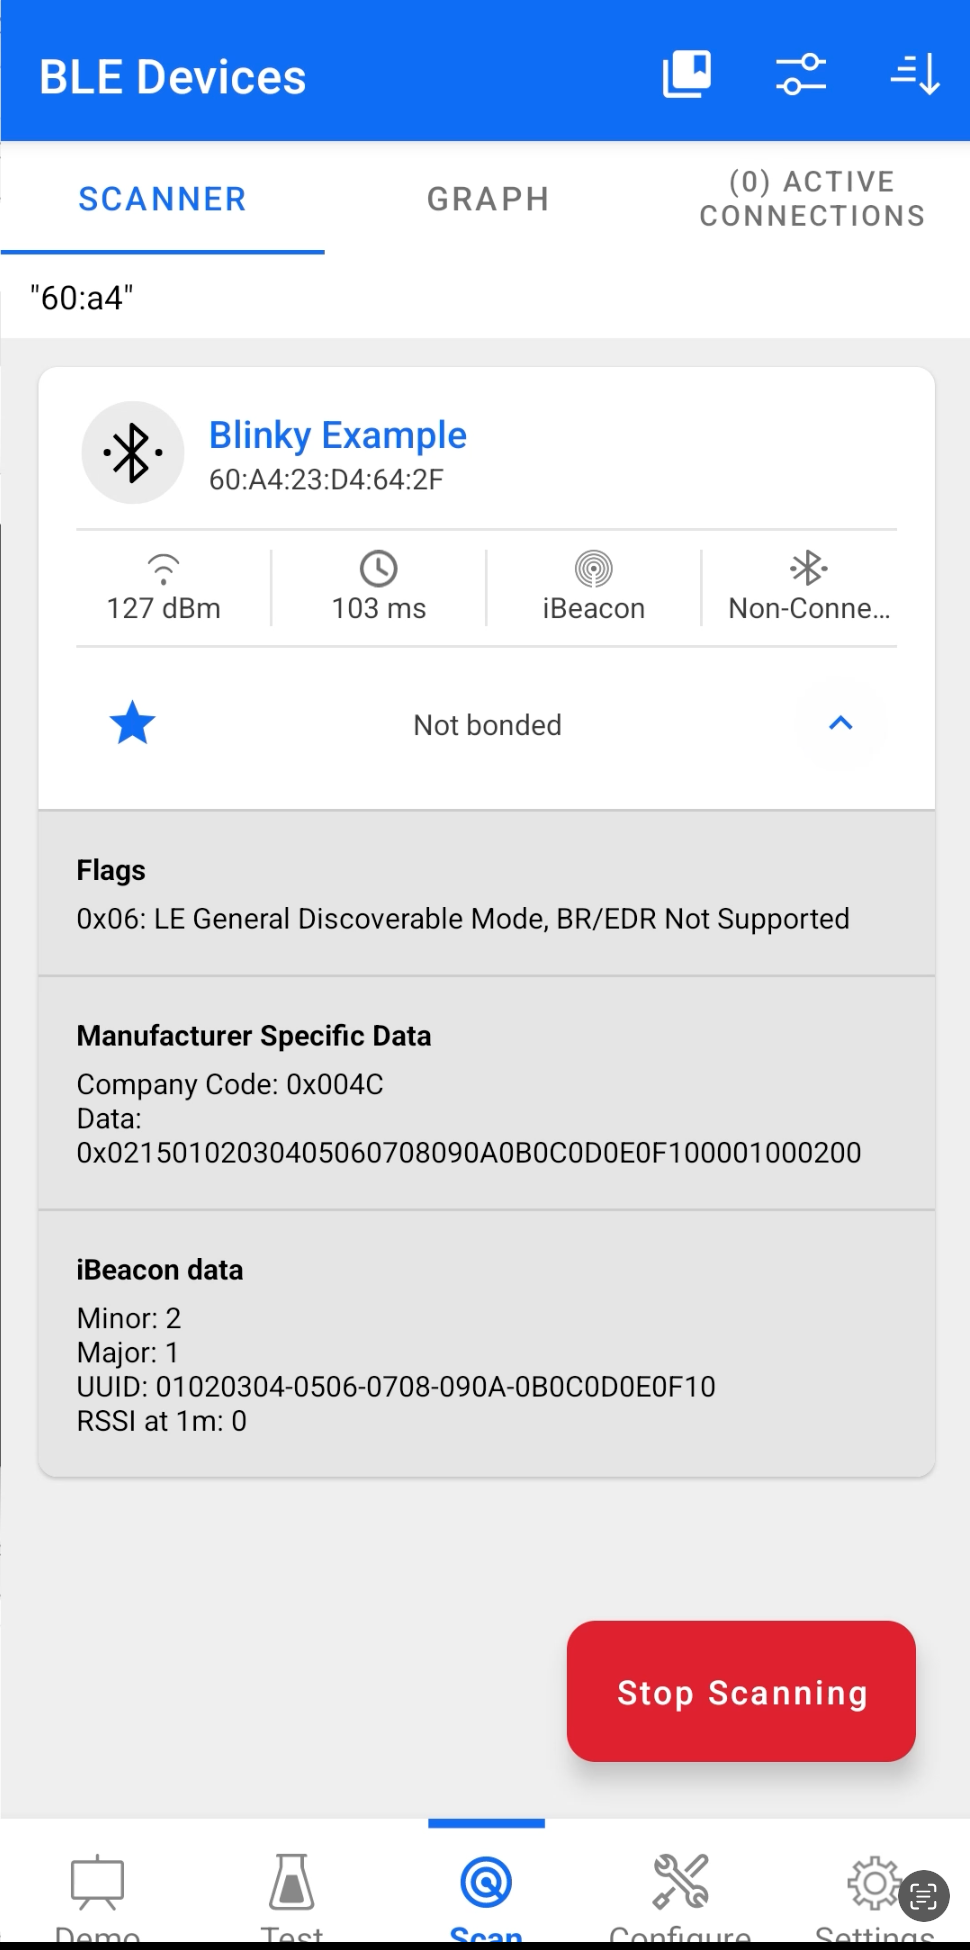
Discovering Your Device
Hit Apply Filters and you should now see your device discovered and shown with the correct iBeacon data fully parsed:
And that's it! We are done!
Now, you can go back and modify the iBeacon data and watch it change in the scanner view and make any changes necessary for your own application.
Source Code
Here's the complete source code for app.c:
/***************************************************************************//**
 * @file
 * @brief Core application logic.
 *******************************************************************************
 * # License
 * <b>Copyright 2020 Silicon Laboratories Inc. www.silabs.com</b>
 *******************************************************************************
 *
 * SPDX-License-Identifier: Zlib
 *
 * The licensor of this software is Silicon Laboratories Inc.
 *
 * This software is provided 'as-is', without any express or implied
 * warranty. In no event will the authors be held liable for any damages
 * arising from the use of this software.
 *
 * Permission is granted to anyone to use this software for any purpose,
 * including commercial applications, and to alter it and redistribute it
 * freely, subject to the following restrictions:
 *
 * 1. The origin of this software must not be misrepresented; you must not
 *    claim that you wrote the original software. If you use this software
 *    in a product, an acknowledgment in the product documentation would be
 *    appreciated but is not required.
 * 2. Altered source versions must be plainly marked as such, and must not be
 *    misrepresented as being the original software.
 * 3. This notice may not be removed or altered from any source distribution.
 *
 ******************************************************************************/
#include "em_common.h"
#include "app_assert.h"
#include "sl_bluetooth.h"
#include "app.h"

// AD: Length Type Value

//iBeacon: Flags + Man Specific Data

// Flags
#define ADVERTISE_FLAGS_LENGTH 0x02
#define ADVERTISE_FLAGS_TYPE   0x01
#define ADVERTISE_FLAGS_VALUE  0x06

// Manufacturer Specific Data
#define ADVERTISE_MANDATA_LENGTH      0x1A
#define ADVERTISE_MANDATA_TYPE        0xFF
#define ADVERTISE_MANDATA_COMPANY_ID  0x004C
#define ADVERTISE_MANDATA_VALUE       { 0x02, 0x15, 0x01, 0x02, 0x03, 0x04, 0x05,\
                                        0x06, 0x07, 0x08, 0x09, 0x0A, 0x0B, 0x0C, 0x0D, 0x0E, 0x0F, 0x10,\
                                        0x00, 0x01,\
                                        0x00, 0x02,\
                                        0x00}

#define UINT16_TO_BYTES(x) { (uint8_t)(x), (uint8_t)((x) >> 8) }

#define ADVERTISE_DATA_DEFAULT \
{ \
  .flags_length = ADVERTISE_FLAGS_LENGTH, \
  .flags_type = ADVERTISE_FLAGS_TYPE,\
  .flags_value = ADVERTISE_FLAGS_VALUE,\
  .mandata_length = ADVERTISE_MANDATA_LENGTH,\
  .mandata_type = ADVERTISE_MANDATA_TYPE,\
  .mandata_company_id = UINT16_TO_BYTES(ADVERTISE_MANDATA_COMPANY_ID),\
  .mandata_value = ADVERTISE_MANDATA_VALUE\
}

typedef struct
{
  uint8_t flags_length;
  uint8_t flags_type;
  uint8_t flags_value;
  uint8_t mandata_length;
  uint8_t mandata_type;
  uint8_t mandata_company_id[2];
  uint8_t mandata_value[23];

} ble_advertise_data_t;


// The advertising set handle allocated from Bluetooth stack.
static uint8_t advertising_set_handle = 0xff;

static const ble_advertise_data_t adv_data = ADVERTISE_DATA_DEFAULT;

/**************************************************************************//**
 * Application Init.
 *****************************************************************************/
SL_WEAK void app_init(void)
{
  /////////////////////////////////////////////////////////////////////////////
  // Put your additional application init code here!                         //
  // This is called once during start-up.                                    //
  /////////////////////////////////////////////////////////////////////////////
}

/**************************************************************************//**
 * Application Process Action.
 *****************************************************************************/
SL_WEAK void app_process_action(void)
{
  /////////////////////////////////////////////////////////////////////////////
  // Put your additional application code here!                              //
  // This is called infinitely.                                              //
  // Do not call blocking functions from here!                               //
  /////////////////////////////////////////////////////////////////////////////
}

/**************************************************************************//**
 * Bluetooth stack event handler.
 * This overrides the dummy weak implementation.
 *
 * @param[in] evt Event coming from the Bluetooth stack.
 *****************************************************************************/
void sl_bt_on_event(sl_bt_msg_t *evt)
{
  sl_status_t sc;

  bd_addr address;
  uint8_t address_type;

  switch (SL_BT_MSG_ID(evt->header)) {
    // -------------------------------
    // This event indicates the device has started and the radio is ready.
    // Do not call any stack command before receiving this boot event!
    case sl_bt_evt_system_boot_id:

      app_log("iBeacon example started!\r\n");

      // Retrieve the BT Address.
      sc = sl_bt_system_get_identity_address(&address, &address_type);
      app_assert_status(sc);

      app_log("BT Address: ");
      for (int i=0; i<5; i++)
        {
          app_log("%02X:", address.addr[5-i]);
        }

      app_log("%02X (%s)\r\n", address.addr[0], address_type == 0 ? "Public device address": "Static random address");

      // Create an advertising set.
      sc = sl_bt_advertiser_create_set(&advertising_set_handle);
      app_assert_status(sc);


      // Set Advertising data
      sc = sl_bt_legacy_advertiser_set_data(advertising_set_handle,
                                            sl_bt_advertiser_advertising_data_packet,
                                            sizeof(ble_advertise_data_t),
                                            (uint8_t *)&adv_data);
      app_assert_status(sc);

      // Set advertising interval to 100ms.
      sc = sl_bt_advertiser_set_timing(
        advertising_set_handle,
        160, // min. adv. interval (milliseconds * 1.6)
        160, // max. adv. interval (milliseconds * 1.6)
        0,   // adv. duration
        0);  // max. num. adv. events
      app_assert_status(sc);

      // Start advertising and enable connections.
      sc = sl_bt_legacy_advertiser_start(advertising_set_handle,
                                         sl_bt_advertiser_non_connectable);
      app_assert_status(sc);
      break;

    // -------------------------------
    // This event indicates that a new connection was opened.
    case sl_bt_evt_connection_opened_id:
      break;

    // -------------------------------
    // This event indicates that a connection was closed.
    case sl_bt_evt_connection_closed_id:
      break;

    ///////////////////////////////////////////////////////////////////////////
    // Add additional event handlers here as your application requires!      //
    ///////////////////////////////////////////////////////////////////////////

    // -------------------------------
    // Default event handler.
    default:
      break;
  }
}
Conclusion
In this article, we covered:
- The basics of Bluetooth beacons
- The basics of the Apple iBeacon standard
- Recap of Bluetooth LE advertising data format
- Step-by-step implementation of an iBeacon device using the Silicon Labs BG22 Explorer Kit