

In a previous article, we covered the basics of Bluetooth sniffers (aka Bluetooth protocol analyzer), how they work, and even a comparison of the different BLE sniffers available on the market. If you haven't read that article, I recommend reading it before continuing with this post.
The list of Bluetooth LE sniffers varied from those costing under $50 to others costing tens of thousands of dollars $$$!
One noteworthy BLE sniffer from that list is the Nordic Semiconductor nRF52840 USB Dongle (in combination with the nRF Sniffer and Wireshark). This combination is probably the most versatile and cost-efficient solution available today for sniffing BLE! Here are some unique advantages of this solution:
- It only costs $10!
- It is physically small and portable.
- It plugs directly into the USB port on your computer, so there is no need for cables.
- It integrates with Wireshark, an open-source, free software tool with many powerful features.
Why Use a Bluetooth Sniffer?
By becoming proficient at BLE sniffing techniques, you can troubleshoot bugs more efficiently and optimize performance by adjusting the settings of your Bluetooth Low Energy product accordingly.
As a Bluetooth developer, this unique skill gives you "magical powers" to uncover the unknowns in many scenarios where things just aren't working as expected with your Bluetooth Low Energy devices. Then you can blame your mobile developer or embedded developer for that pesky bug! (j/k! 😊)
Moreover, reading and interpreting raw packet data gives you greater insight into how BLE works – something that would take much longer by only reading the theory, specifications, and even developing applications!
In this tutorial, we will focus on capturing and analyzing Bluetooth Low Energy advertising packets using the combination of the nRF52840 USB Dongle, nRF Sniffer software tool, and Wireshark. All BLE devices start in the advertising state, so this is the perfect place to start!
We will cover the topic of sniffing BLE connections in a follow-up tutorial.
Set Up Your Environment
To use this BLE sniffer solution, you will need to make sure you have a few things in place. Let's go through each of them.
Requirements and hardware setup
- Nordic Semiconductor nRF52840 USB Dongle
Note: You can use any Nordic Semiconductor nRF52 series development kit as an alternative. However, I do not recommend the nRF51 series development kit or USB dongle as this does not support many of the latest Bluetooth features. - Nordic nRF Sniffer software
- Nordic nRF Connect for Desktop
- Wireshark
- Python v3.6 or later
- SEGGER J-Link Software
The solution works for all major operating systems: Windows, macOS, and Linux (make sure you check Wireshark prerequisites for version compatibility).
Install and Configure the nRF Sniffer for Bluetooth LE Software
We don't need to go through the details of the installation and setup since Nordic has a comprehensive guide for this. You can access this at Nordic's dedicated Infocenter page or in the nRF Sniffer User Guide [PDF; downloadable from the Infocenter page].
In summary, the main steps involved are:
- Download the nRF Sniffer software package
- Download and install the nRF Connect for Desktop application
- Download and install the SEGGER J-Link Software package
- Flash the nRF52840 USB Dongle with the BLE sniffer firmware hex file via the Programmer app within the nRF Connect for desktop application
- Download and install Wireshark
- Copy the nRF Sniffer software to the appropriate Wireshark folder
- [Optional] Copy the nRF Sniffer Wireshark Profile to the appropriate Wireshark folder
Once you've completed all these steps, you're ready to sniff some BLE packets!
Enable the nRF Sniffer Interface Toolbar
Before we start getting into the technical details of sniffing advertising packets, I recommend enabling the nRF Sniffer Interface toolbar.
You can do so from the following menu in Wireshark:
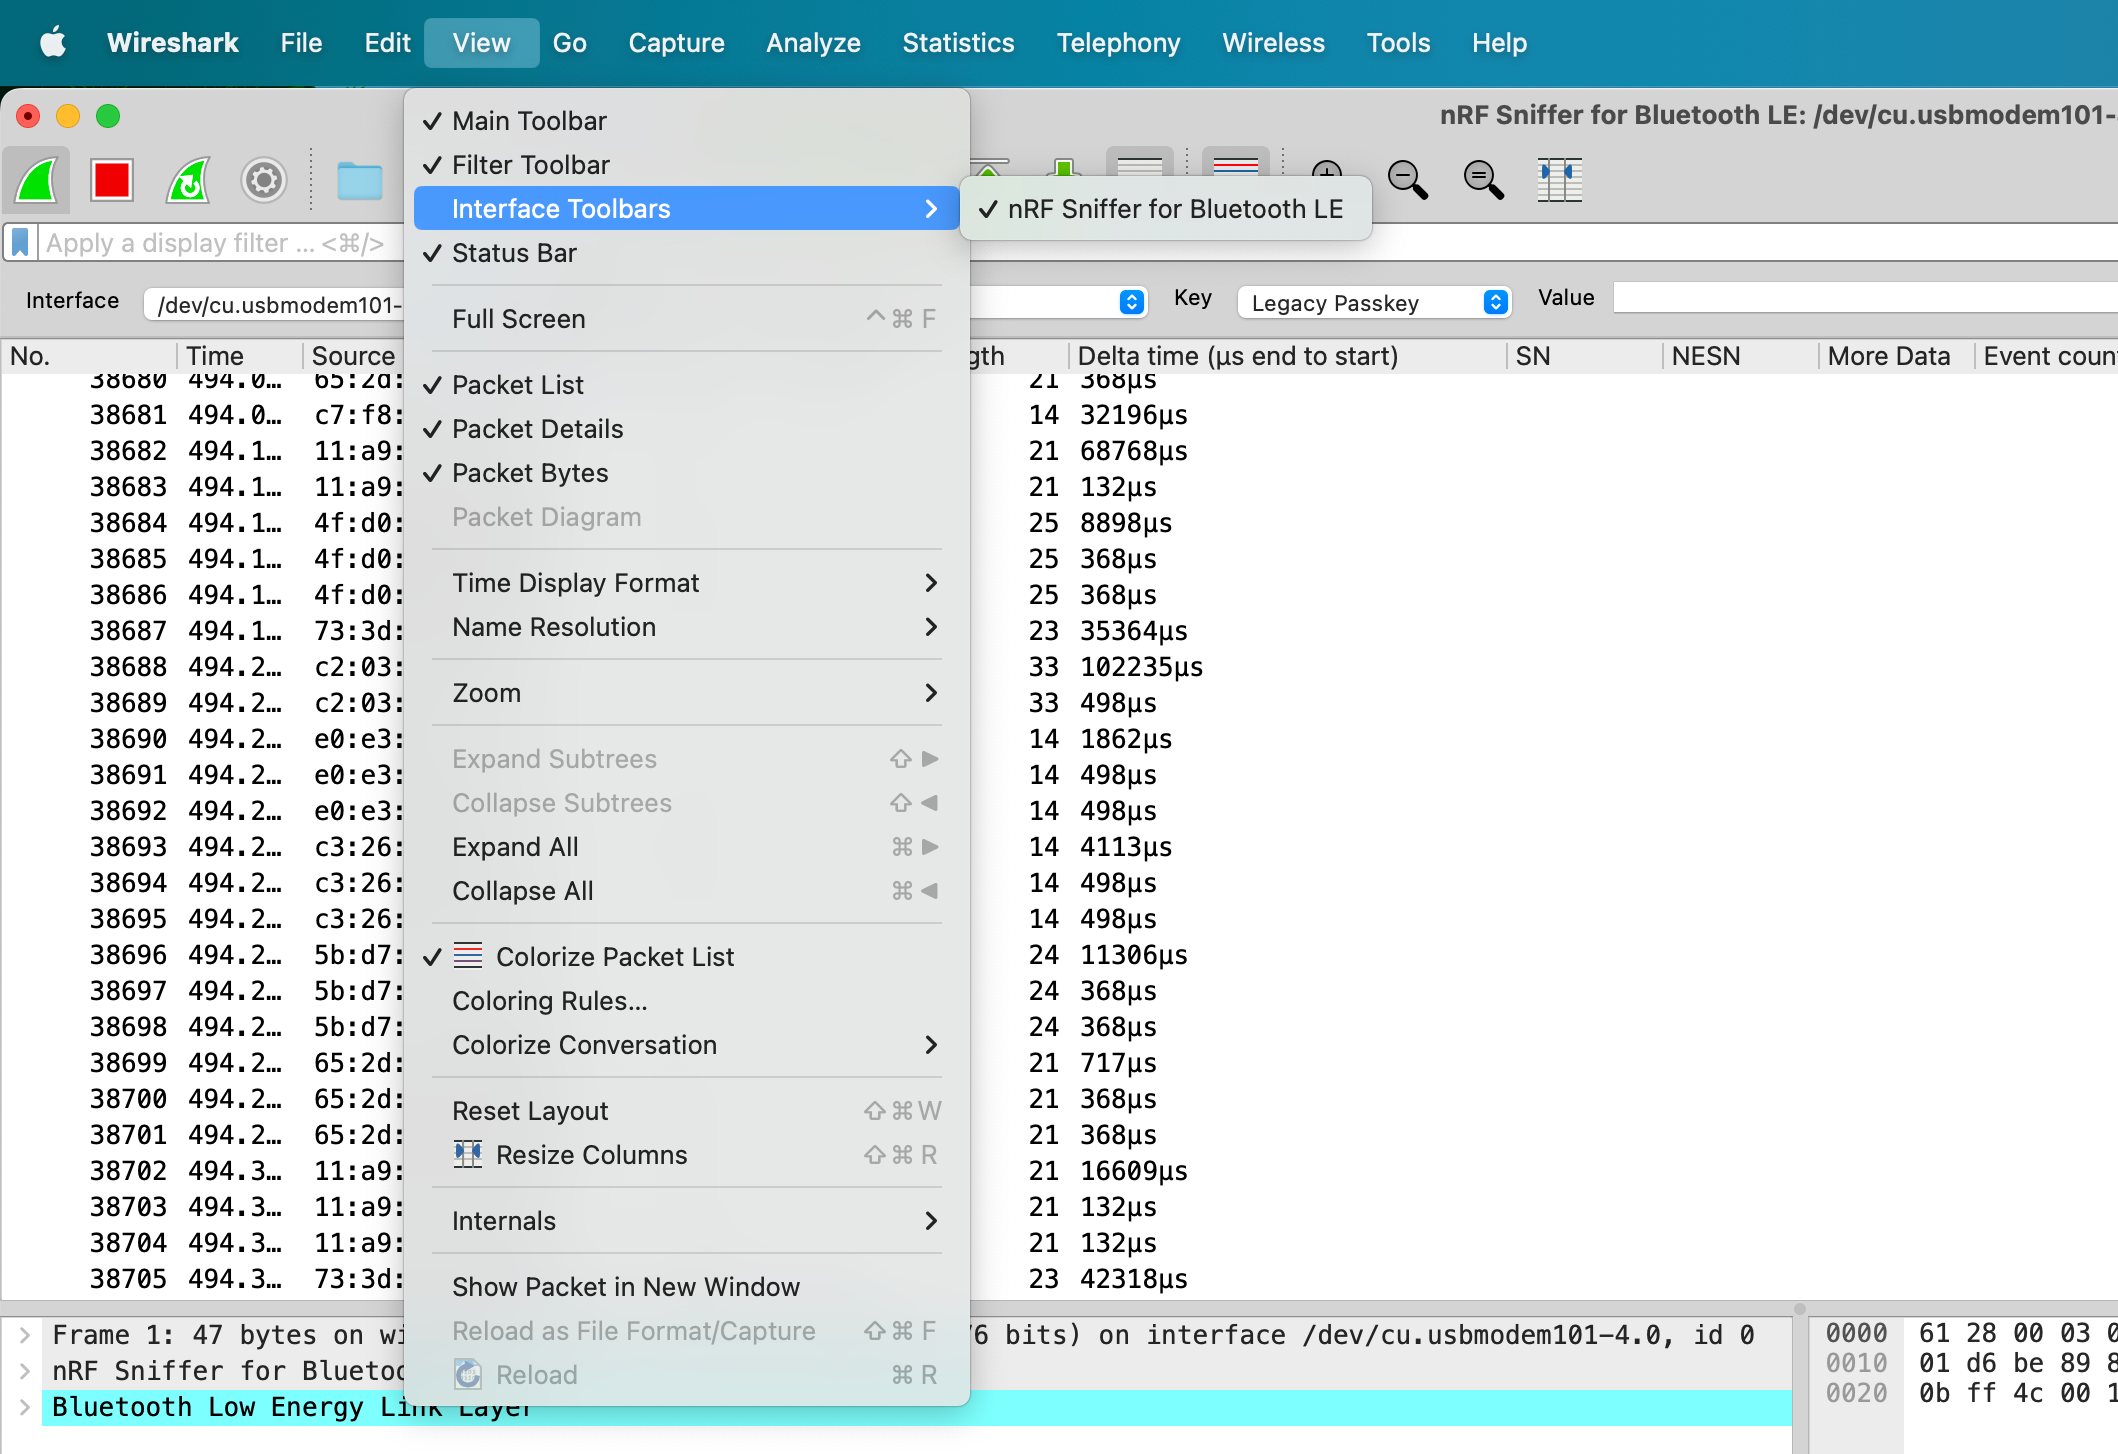
Once you have it enabled, you will see it at the top of the window right below the generic Wireshark toolbar:

The toolbar provides a few useful options:
- Selecting the interface, which can be helpful when you have multiple nRF52840 USB dongles attached.
- Select a specific device, whether via the Bluetooth address or by using an IRK (which a bonded BLE device uses to resolve a previously bonded BLE device's random Bluetooth address).
- Selecting a key (type and value): which applies during a connection (primarily keys related to pairing and bonding). This allows you to decrypt encrypted data being exchanged between two paired or bonded BLE devices.
- Selecting the RF channels to hop on when searching for advertising packets. If you recall, advertising BLE devices broadcast packets on the three primary advertising channels (37, 38, and 39). The default mode for the nRF Sniffer is scanning all three of these channels, but you can modify that within the nRF Sniffer Interface Toolbar.
Capture Advertising Packets using a Bluetooth Low Energy Sniffer
To start sniffing BLE data, click the green Wireshark button, and you should start seeing some BLE traffic:


To stop the capture, click the red Stop button.
Typically, you'll find that Wireshark shows a lot of data from nearby BLE devices, and that's due to the fact that BLE devices have become very ubiquitous. This can be overwhelming and make your life very difficult when trying to find the device(s) you are most interested in! We'll share a few tips for cleaning this up when we get to the Display filters section later in the tutorial.
💡Note: You'll also notice that the data keep scrolling off the screen, making it difficult to look at and analyze the data closely. This is because Wireshark, by default, enables the automatic scrolling option. To disable this option, click on the icon highlighted in the screenshot below:

Now you can scroll through the rows freely and click on any packet you're interested in without it scrolling off the screen.
Identify BLE Devices
In general, there are a few ways you can identify a BLE device that you're interested in:
- By its Bluetooth Address (sometimes referred to as MAC address)
- By the Manufacturer Specific Data Company ID
- By the Device Name
The most unique of these parameters is probably the Bluetooth address. In many cases, especially when involving smartphones, the Bluetooth Address is random and changes every 12-15 minutes, making it almost impossible to identify the device.
💡Tip: Generally, we are interested in sensors, beacons, and devices that are not smartphones, in which case the Bluetooth Address is usually fixed. Even in such situations, a more robust method would be to combine two or more of these parameters to get a more accurate match.
Tips to Make BLE Sniffing Easier
Add Wireshark Display Columns
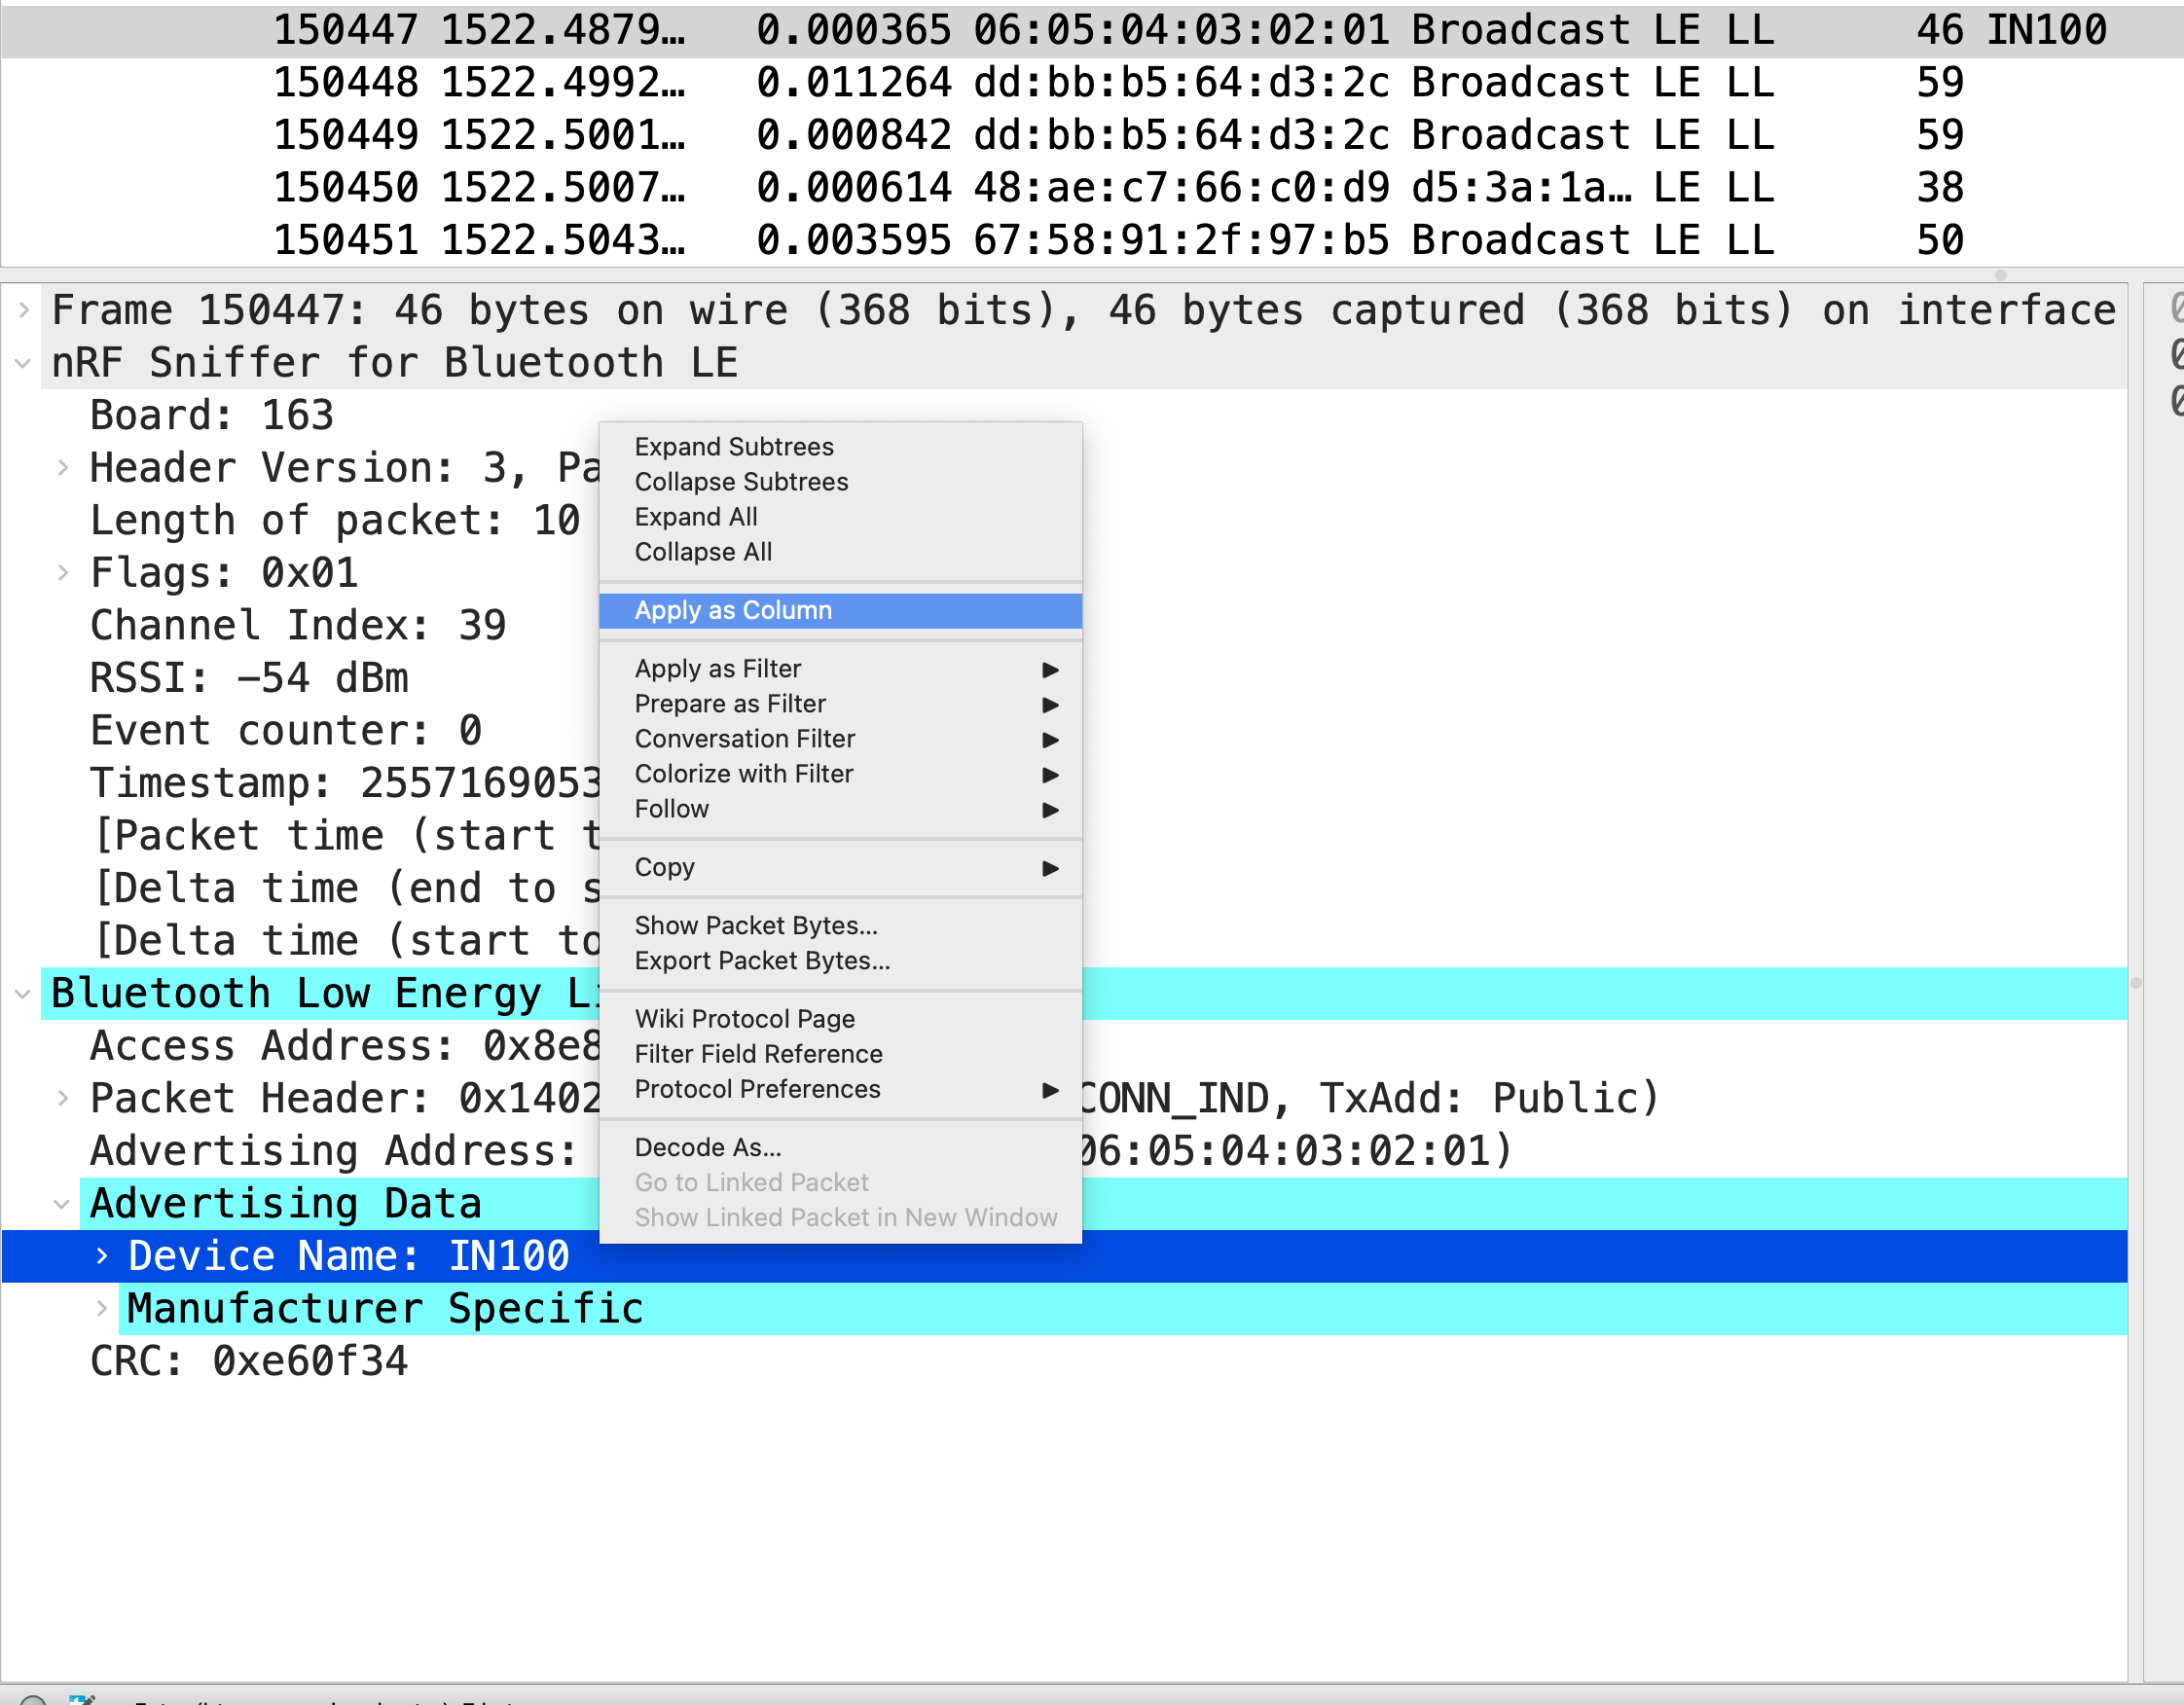
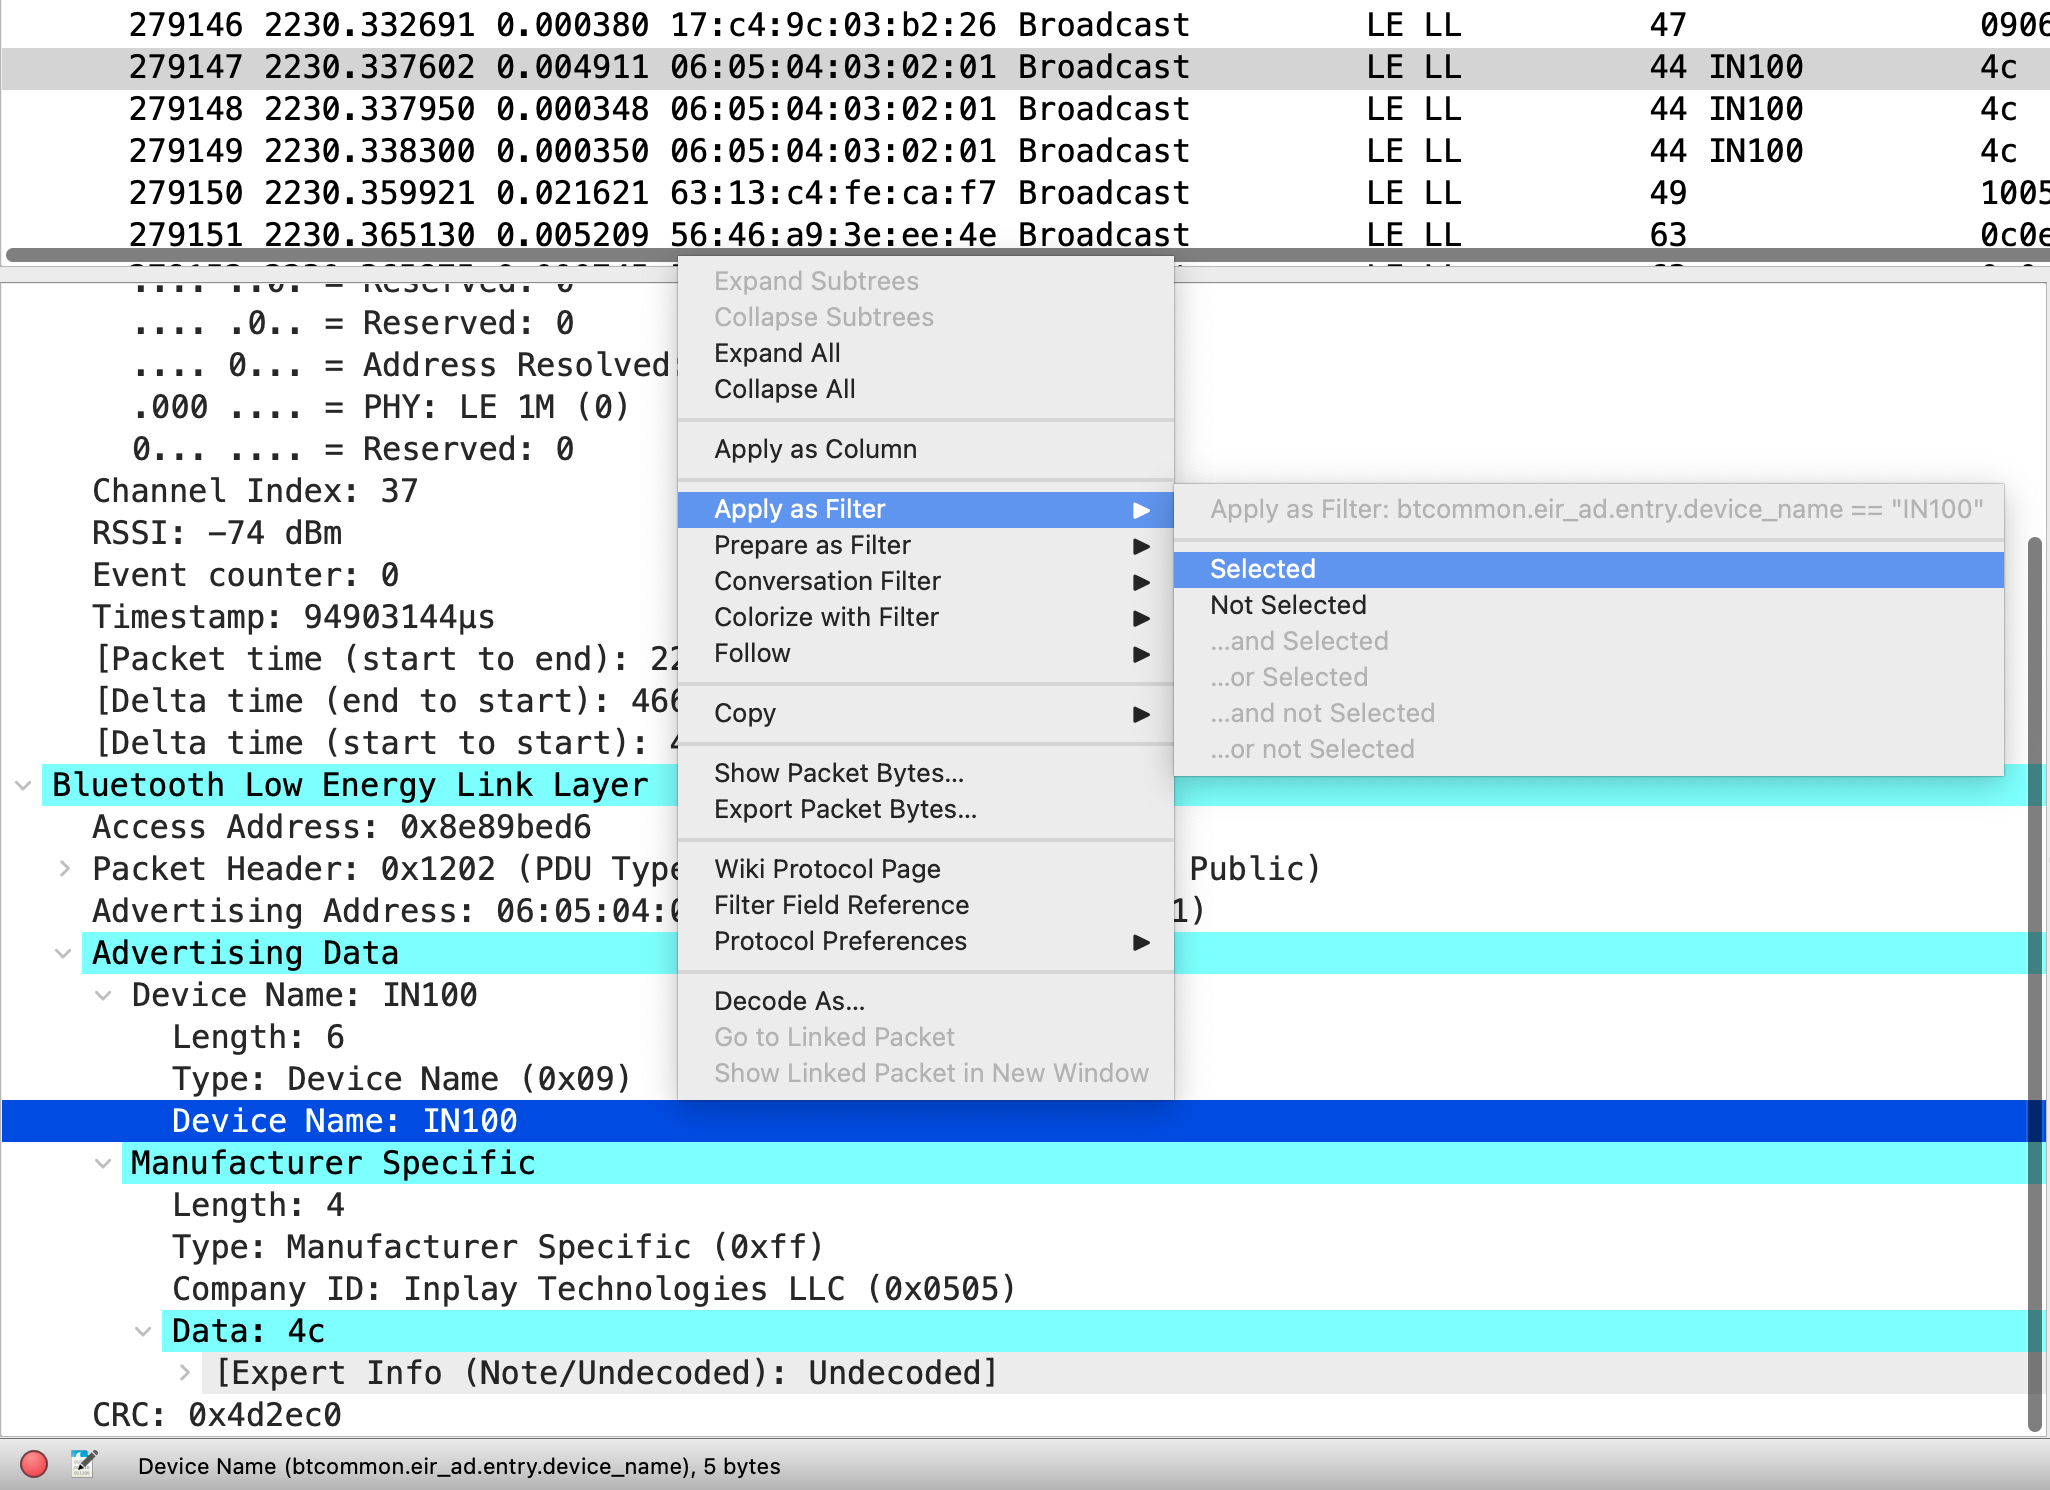
One way to make finding BLE devices in the capture easier is by adding columns displaying the relevant fields in the packets. For example, if we were interested in seeing the Device Names, we could add the Device Name field as a column. The easiest way to do this is to look for a BLE device that has the device name field in its advertising packet, right-click on the specific field, then click "Apply as Column":
Now, we should be able to see the Device Name column in the packet capture view:
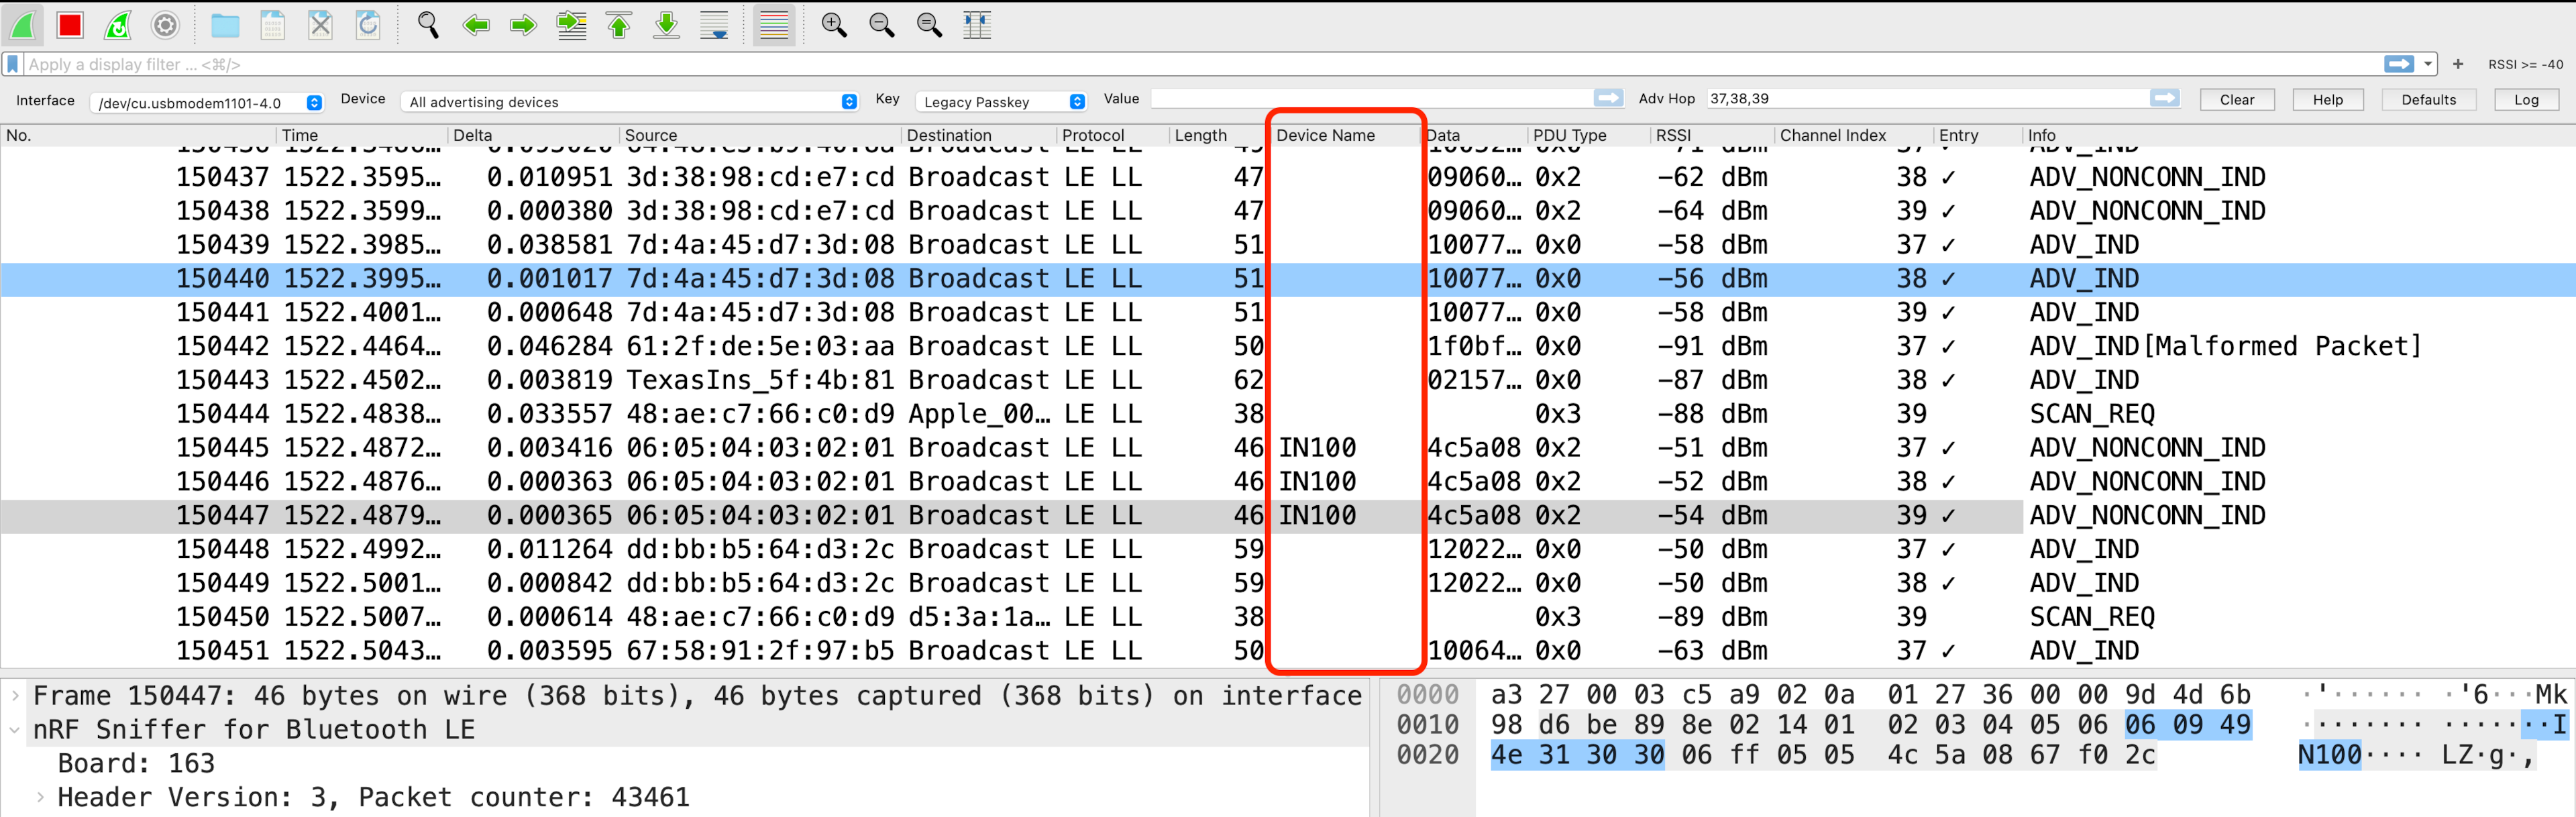
You can already see that it's much easier to locate and identify devices with a Device Name once we have this column added!
Other useful columns to add (including the packet section it's located in) are:
- Manufacturer-Specific Data Company ID (Bluetooth LE Link Layer)
- Tx Address Type (Bluetooth LE Link Layer)
- Packet Time – start to end (nRF Sniffer for Bluetooth LE)
Set Wireshark Coloring Rules
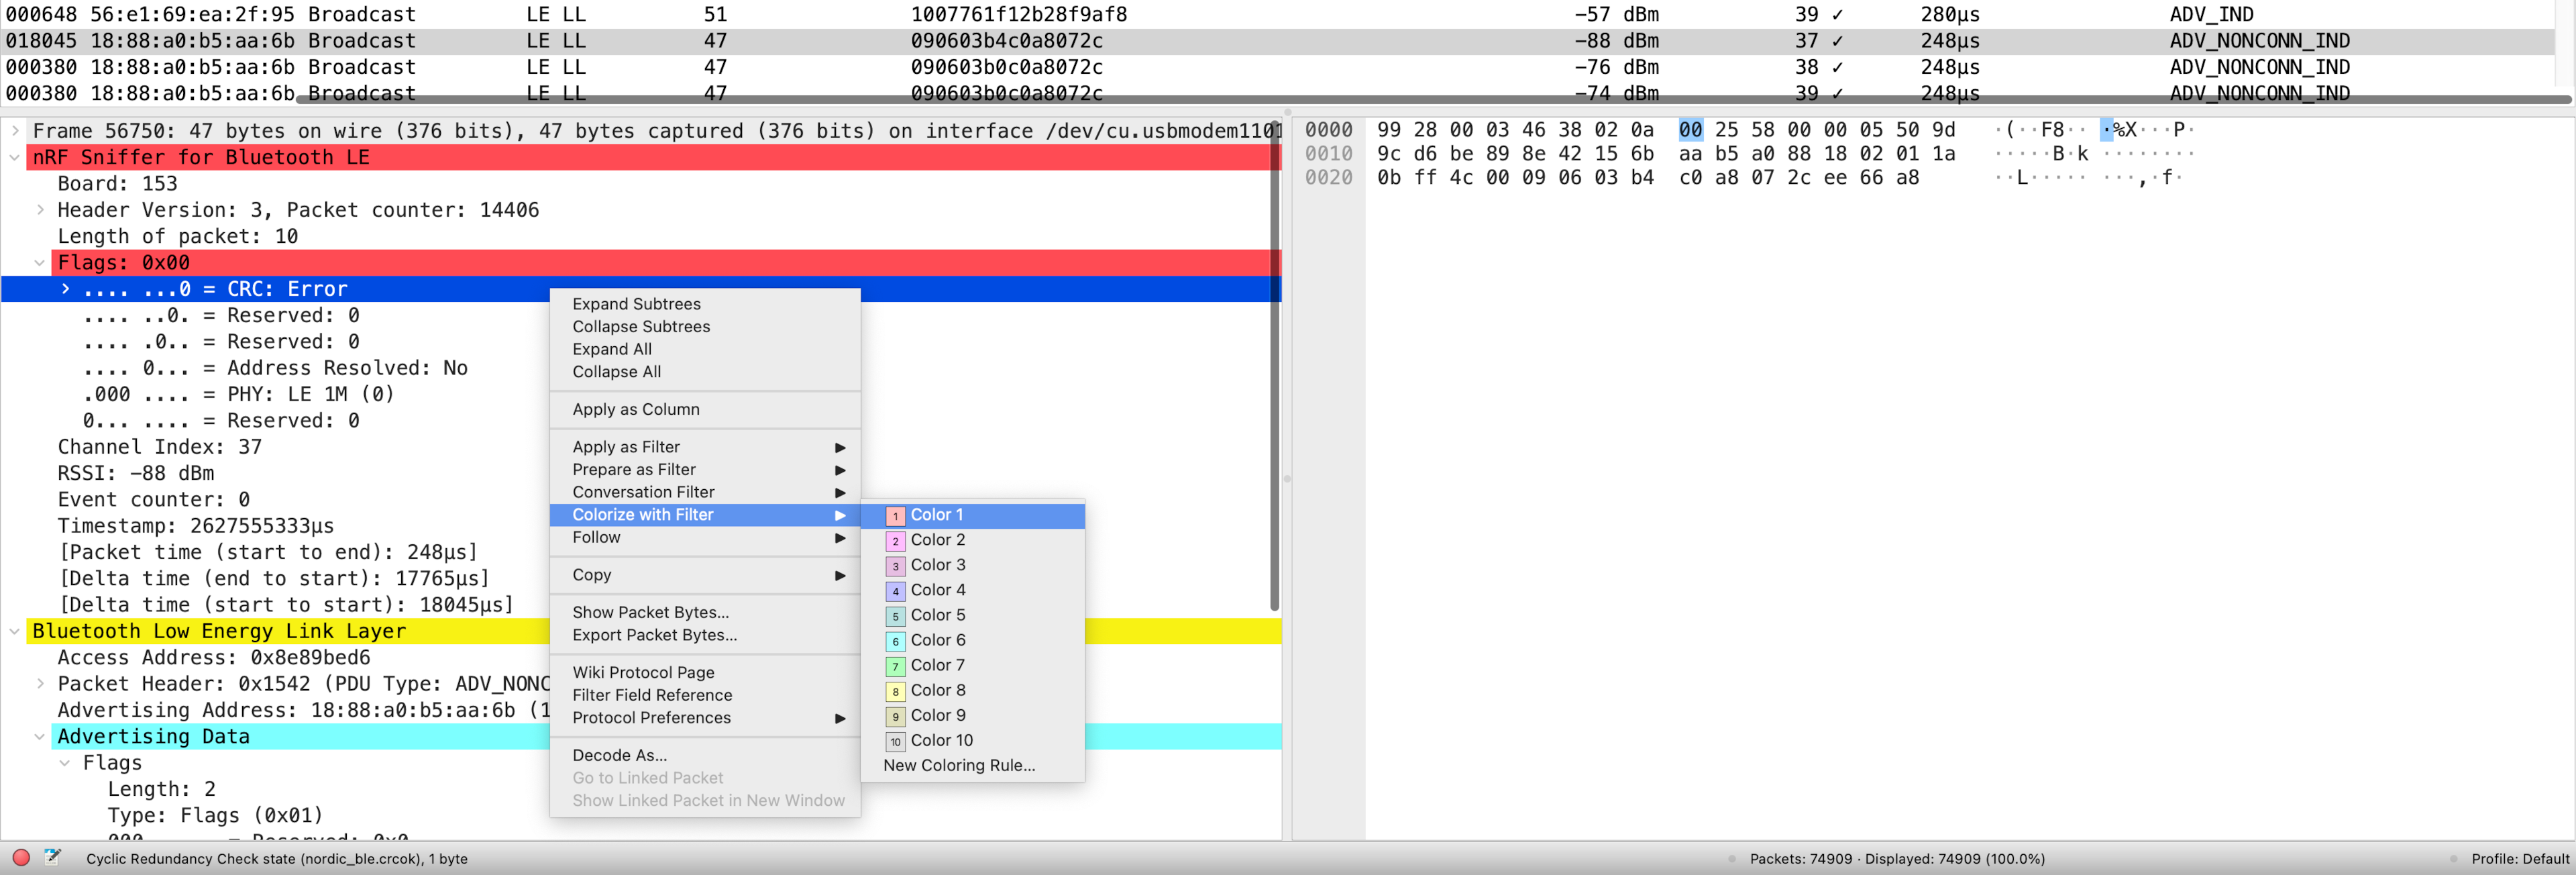
One other way to make packets stand out is by setting Coloring Rules within Wireshark. A great example of a use case for this is to add the red color to packets that are corrupt and have a bad CRC (whether that's due to transmission error, a noisy environment, or the transmitter being far away from the sniffer).
One way to do this is to find a packet with a bad CRC, expand the "nRF Sniffer for Bluetooth LE" section --> Flags --> right-click on the CRC status field --> choose "Colorize with Filter" --> choose the color:
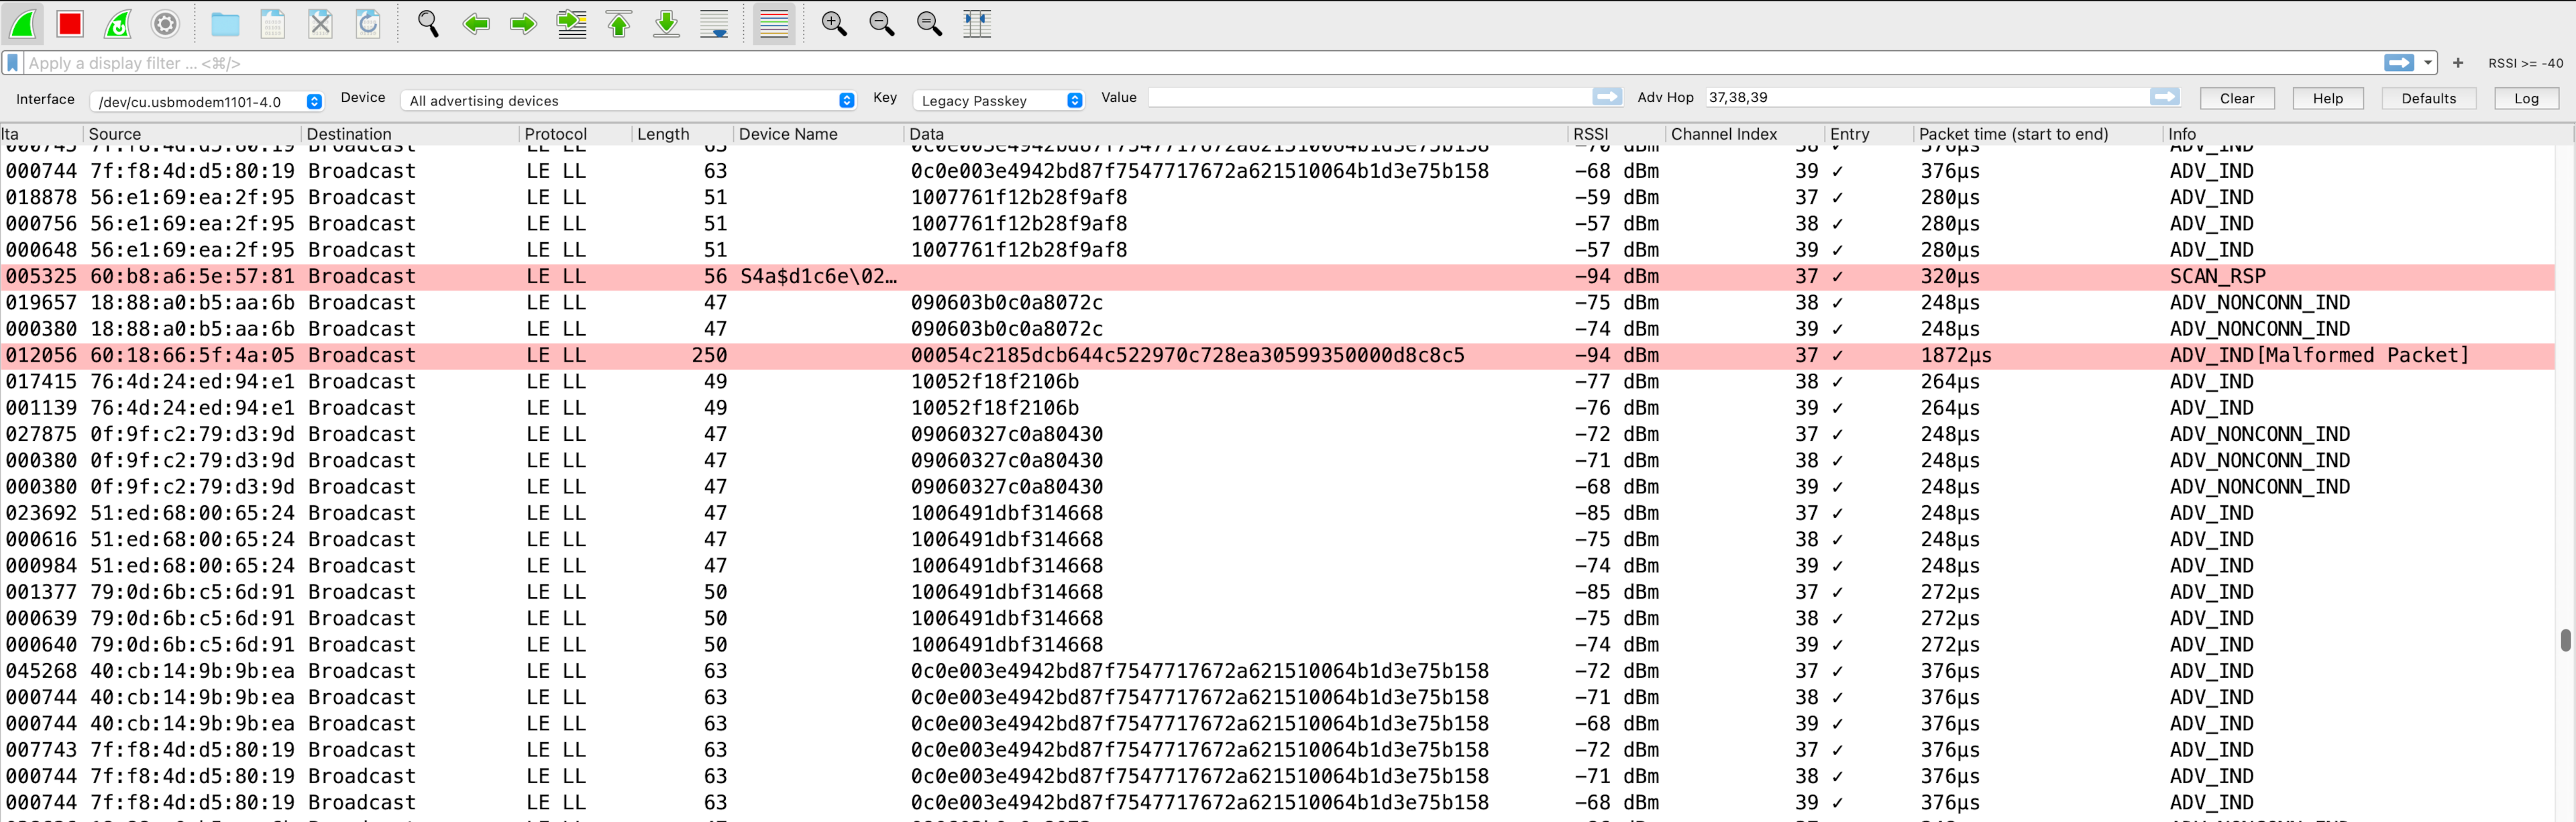
Once enabled, you can now easily locate the bad CRC packets in the capture view:
Apply Wireshark Display Filters
To filter out nonrelevant BLE devices, we can apply one or more "Wireshark Display Filters." These allow us to focus on the device(s) in question and those that contain the data we're looking for.
The format of a Wireshark Display Filter looks like this:
[protocol layer].[filter] [operand] [value]
For example:
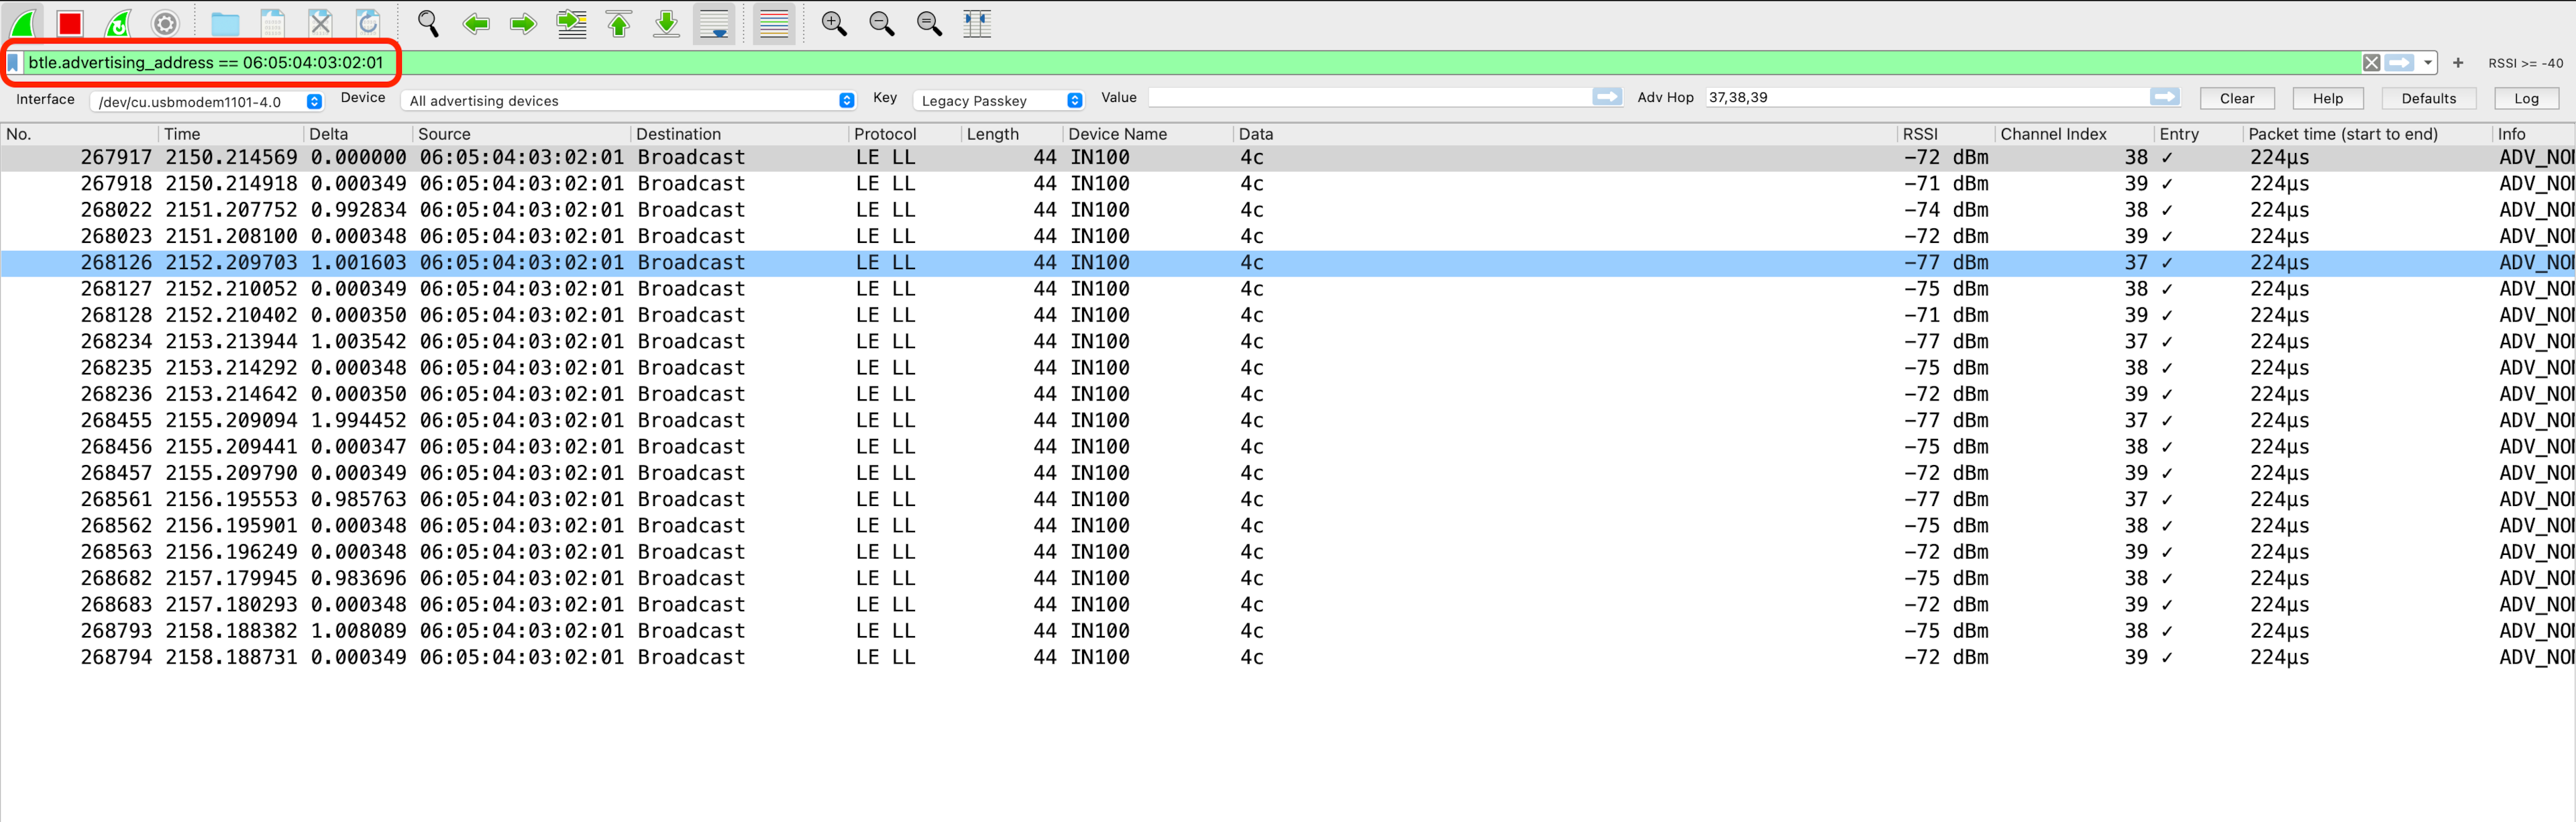
nordic_ble.rssi >= valuebtle.advertising_header.pdu_type == 0x0(for showing only connectable advertising packets)btle.advertising_address == 06:05:04:03:02:01
There are two common ways to apply a Display Filter:
1. Finding a packet broadcast by the device we're interested in, selecting the field of interest, right-clicking it, and then clicking "Apply as Filter --> Selected."
2. Adding the filter into the filter field. For this method, you will have to know the exact format and filter syntax (Wireshark will also auto-complete and suggest based on the letters you type in the field).
💡Note: You can add multiple Display Filters and apply them. However, keep in mind that this is easier done via the Filters entry field since the right-click/UI method will override any applied Display Filters.
Here are a few examples of very useful Display Filters that apply specifically to BLE advertising packets:
btle.advertising_address == [Bluetooth Device Address]btcommon.eir_ad.entry.device_name == ["DEVICE NAME VALUE”]btle.advertising_header.pdu_type == 0x2(Non-connectable advertising packets)btle.advertising_header.pdu_type == 0x0(Connectable advertising packets)btcommon.eir_ad.entry.company_id == [COMPANY ID](filters for a specific Company ID within the Manufacturer-Specific Data field)nordic_ble.channel == [37, 38](filters for advertising packets sent on channels 37 and 38, excluding channel 39)nordic_ble.rssi >= [Minimum RSSI value](filters for devices that have an RSSI above a certain threshold)nordic_ble.crc.bad == 1(filters for packets that have a bad CRC)nordic_ble.crcok == 1(filters for packets that have a valid CRC)
There are so many other Display Filters that we can only list so many!
💡Note: Wireshark Display Filters are not to be confused with Wireshark Capture Filters. Capture Filters are set before beginning a capture and cannot be modified during the capture. In contrast, Display Filters filter out data from the view of the capture and can be removed/changed/added during the capture session.
Setup Wireshark Profiles
Wireshark Profiles are one of the most powerful features of Wireshark. This useful tool allows you to customize the user interface and save as many customizations as you'd like, so you can switch between them for different views and use cases.
For example, the UI layout, the displayed columns, and even some UI buttons can be customized for a specific analysis use case, such as for analyzing BLE advertising packets. The Nordic nRF Sniffer software already comes with a Profile for you to use with the sniffer, but it focuses more on BLE connections instead of advertising packets, so it doesn't serve well for this purpose.
I've gone ahead and saved you the trouble of customizing the UI with columns, buttons, and a layout that's perfect for analyzing BLE advertising packets. You can download the ZIP package containing the "BLE Advertising Wireshark Profile" at the bottom of the tutorial.
Installing a Wireshark Profile is very simple. Here are the steps to do so:
- Open Wireshark
- In the bottom right-hand corner of the window, right-click on where it says "Profile: ..." and choose "Import" --> "from zip file"
- Then navigate to the folder where the Profile Zip file is, select it, and click "Open."
- The Profile should now be imported and selected in your window
Here's a view of what the UI looks like when installing and selecting the "BLE Advertising Wireshark Profile":
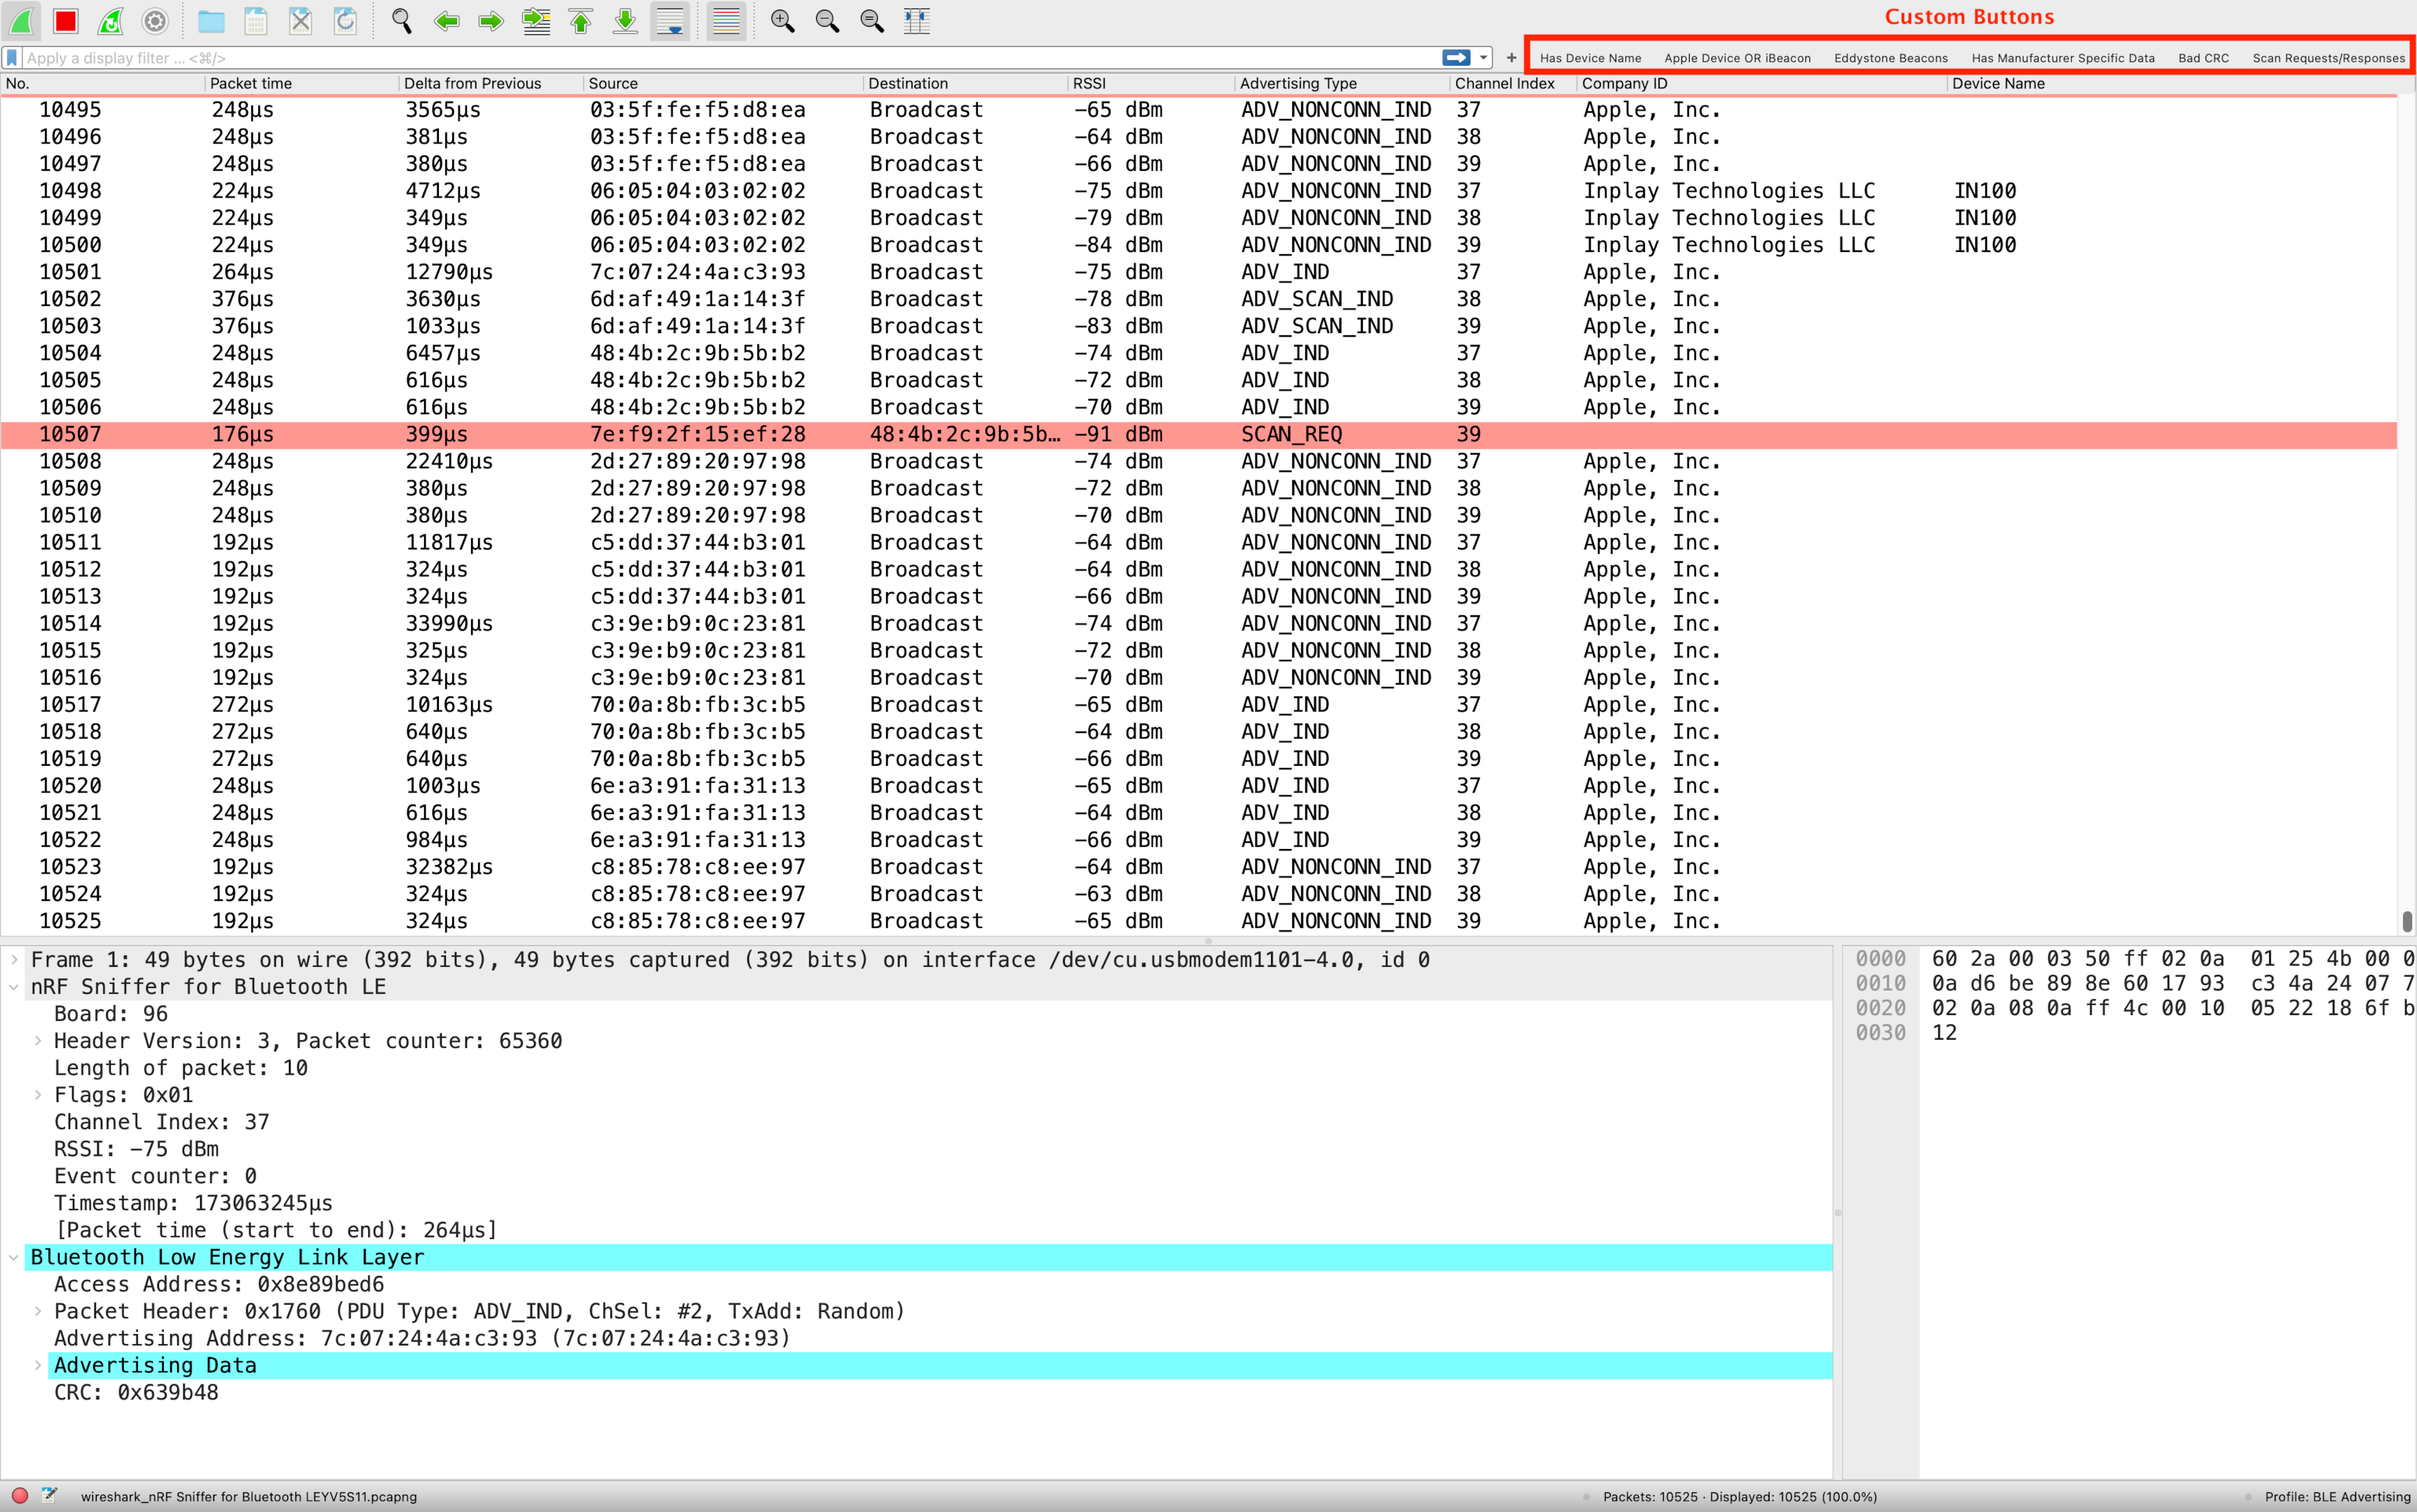
You'll notice the following columns have been included:
- Packet No.
- Packet Transmit Time
- Delta Time from Previous Packet
- Source Address
- Destination Address
- RSSI
- Advertising Type
- Channel Index
- Company ID (from Manufacturer Specific Data field)
- Device Name
You'll also notice a few custom buttons:
- "Has Device Name": shows only packets that contain a Device Name
- "Apple Device or iBeacon": shows only Apple device packets or those that contain iBeacon data
- "Eddystone Beacons": shows only Eddystone packets
- "Has Manufacturer Specific Data": shows only packets that have Manufacturer Specific Data present
- "Bad CRC": shows packets with a bad/invalid CRC
- "Scan Requests/Responses": shows only Scan Request and Scan Response packets
Finally, you'll notice that packets with a bad/invalid CRC will be highlighted in
light redto make it easier to notice them.
So, go ahead and download the Profile using the form below, import it, and start using it today!
Conclusion
In this tutorial, we covered a lot!
Learning how to sniff BLE packets is crucial to both understanding BLE and being able to debug communications issues with your BLE system.
With this guide, you should be able to get started with learning how to sniff BLE packets and discover the various BLE devices in the environment around you.
In future tutorials, we'll cover a lot more including:
- Analyzing the timing of BLE advertising packets, such as the Advertising Interval
- Advanced Filters, such as for parsing manufacturer-specific data
- Reverse-engineering BLE devices and analyzing BLE connections
Download the Custom Wireshark Profile
Get the BLE Advertising Wireshark Profile with custom columns, display filter buttons, and CRC coloring rules.
No spam. Unsubscribe with one click.
Resources
- Nordic nRF Sniffer Display Filters
- Bluetooth Low Energy Link Layer Display Filters
- Bluetooth Common Display Filters
Quick Tip
Need to generate test BLE advertising traffic while sniffing? The BleuIO USB dongle can act as an advertiser you control via simple AT commands — perfect for generating known advertising packets to verify your Wireshark setup and filters are working correctly.
Learn More About BleuIO →
Intro to Bluetooth Low Energy
Get the key concepts every developer needs before diving into Bluetooth LE development.
No spam. Unsubscribe with one click.
Want a solid foundation in Bluetooth LE?
Get the free Intro to Bluetooth Low Energy eBook — or grab the expanded 2nd Edition in print.


